admin
-
Content
-14 -
Joined
-
Last visited
-
Days Won
1 -
Feedback
0%
Everything posted by admin
-
Exit separation has become a point of contention at many DZ's lately. Years ago, when belly flying was the rule and the Cessna 182 was the aircraft at most DZ's, exit separation wasn't too much of a big deal - you gave the other group (if there was another group) some time and then you went. With the aircraft in popular use 15-20 years ago, it was hard to exit very quickly to begin with, and so the issue never came up very often. Bill von Novak started skydiving in 1991 at a small DZ in New York. Since then he has become an S+TA, an AFF, tandem and static line instructor, and has set two world records in large formation skydiving. He lives with his wife Amy in San Diego. Since then, several factors have conspired to make exit separation more of an issue. First off, there are more people freeflying. Freeflyers, especially head down groups, drift differently than belly flyers, and thus need different considerations when planning for exit separation. Faster canopies mean that people who open facing each other need more distance to deal with a potential collision. Large aircraft with big doors can hold several larger groups, and those groups can get out those big doors more quickly. Finally, GPS spotting has removed some of the delay between groups. It's rare to see people even check the spot before beginning their jam-up. I first became aware of this issue in 1994, when I started jumping at Brown Field in San Diego. We went through a series of aircraft as we grew, from Cessna 206's to King Airs to Beech-99's, none of which had GPS. In addition, we were less than a mile from the US-Mexico border, which meant our jump runs had to be east-west and our spots had to be dead on. Several instructors were "designated spotters" and we would argue over 100 yard differences in jump run offset and exit location. After a while we got pretty good at spotting. As our aircraft became larger, exit separation became more of an issue. We had a few close calls, and so we agreed to start allowing more space between groups. At first it was essentially trial and error - we would leave some amount of time (10 seconds or so) between groups and increase that time whenever someone felt they were too close to someone else. After a while, we began to get a feel for how much time was required. We knew that if the upper winds were strong and the plane was just creeping along the ground, we had to leave more time. We also knew that if we let the freeflyers get out first, we had a problem almost every time. We ended up with a system that worked for us, and had essentially no problems with collisions or close calls after that. During this time I was also traveling in the summers to different boogies and I noticed a wide variety of exit separation techniques. By far the most common technique was some amount of fixed time - the next group would pause, then climb out and go, without knowing what the upper winds were doing or what the spot was. The next most common technique was similar but they added a "leave more time if it's windy" clause to their delay. There was also a class of jumpers who looked out the door to tell how much separation to leave; these jumpers either looked at angle of the departing group or the ground to tell how much space to leave. This got me thinking. What really works and what doesn't? I tried a few methods on my own, from the "45 degree" method to a purely ground-based method. After some experiments, a group of skydivers collaborated via email and internet and came up with the actual math behind separation, the physics that determines how far the center of group A will be from the center of group B after they open. But before diving into the math, there are a few basic concepts to cover. What we care about. When we're talking about separation at opening time, we don't really care about where we are in relationship to the plane or even the ground - what we care about is how far we will be in the air horizontally from the next group that opens. So for our purposes, the airplane and the ground don't really matter, and someone watching from either of those places may not get the same "picture" of things that we get. (Of course, we do care about our relationship to the ground when it comes to spotting and landing on the DZ, but that's a separate issue.) How we fall. In most freefall (tracking dives and wingsuits excepted) we fall essentially straight down with respect to the air. If there's wind, the wind blows us at whatever speed it's blowing. If the wind is doing 30kts at altitude, a group of skydivers will be doing 30kts as they drift with the wind. It's also important to realize how your trajectory changes after you open. At a freefall speed of 100kts, a 30kt wind will slightly deflect your trajectory, because it's a small fraction of your total speed. Once under canopy and descending at 10kts, it will deflect your trajectory a tremendous amount, since it is now a very large part of your speed. Of course, under canopy you have much more control over your own horizontal speed, and the winds may add or subtract from your canopy's groundspeed depending on the direction you are facing. Speeds. When discussing speeds, it's important to define units. There is feet per second, which is very useful for people who are trying to figure out how far they want to be from another group. At 100 feet per second, 10 seconds gives you 1000 feet, which is about as easy as it gets. You may also hear the terms indicated airspeed, true airspeed, and groundspeed, in both knots and miles an hour. These can all be converted back and forth as needed .Now that all that's out of the way, the math is pretty simple. The distance you will get between group centers is the speed of the aircraft plus the speed of the winds at opening altitude, multiplied by the time you leave between groups. That's it. So if the aircraft is flying into the wind doing 80 knots per its GPS, and the winds at opening altitude are 10 knots from the same direction, and you are waiting 10 seconds between groups, you are going to get (80+10 = 90 kts, which is 153 feet per second) 1530 feet between groups. It gets a little more complicated when the winds are not from the same directions. If the winds at opening altitude are opposite jump run, you have to subtract them rather than add them. If the winds at opening altitude are from the side, it's the same as zero winds at opening altitude when it comes to separation. If you put these equations into a spreadsheet and play with the numbers, some basic patterns emerge. If the headwinds at altitude are strong you have to leave more time. If the plane is slow (i.e. it's indicated airspeed on jump run is low) you have to leave more time. If the winds at opening altitude are strong as well, and from the same direction, you can safely leave less time. (Or, preferably, just leave the same amount of time and you'll end up with even more separation.) If the winds at opening altitude are opposite from jump run, that's the worst case, and you have to leave even more time. Some people have a problem visualizing how winds at opening altitude can possibly cause them trouble if they leave enough distance on exit. The question is usually phrased as "don't all jumpers follow the same path out of the plane?" And they definitely do. To visualize why this can still cause you problems, take a look at the separation diagram shown below. Drawing showing exit separations In the first drawing, there is no wind after exit, and the first group breaks off, tracks, opens, and flies their canopies away from the center for the first few seconds, which is what they should be doing on most formation skydives. (After that, it's a good idea to turn away from line of flight once you're sure you are clear of others in your group.) The second group arrives 10-15 seconds later, shortly after the first group has opened their parachutes, with some room to spare. The second drawing shows what happens when there are winds are the same all the way down. Notice that the "cone" caused by the breakoff and the canopy flight has shifted strongly to the right. This is because (as mentioned before) once their parachutes are open, the wind affects their trajectory more strongly. As with the first example, it is assumed that everyone flies away from the center for the first few moments. That means the jumper flying into the wind makes no progress and comes straight down, while the jumper flying downwind gets a boost in groundspeed.. The third drawing shows where you can run in to problems. In this drawing, the winds after exit are from the opposite direction. You get the same skewing of the cone, but now the edge of the cone is getting dangerously close to the trajectory of the next group. This is a case where the same separation at exit led to trouble because of opposite winds at opening altitude. This leads naturally to the question "how much separation do you really need?" That depends on the group. 1000 feet should probably be an absolute minimum for any belly formation skydiving. That means that two four-ways can exit, fall straight down the pipe, track 300 feet from center on breakoff, and then still have 300 feet to deal with avoiding a potential collision after opening. With the speeds of today's canopies, that's a bare minimum. If the group size grows to two 10-ways, 2000 feet might be a wiser separation. If a low-time RW group backslides a bit, again, 1500 feet might be needed to be clear of them at opening time. So how does a jumper who doesn't want to carry around a calculator figure out how much time to leave between groups? One very simple way is to just look out of the plane and wait until it has covered 1000 feet, then go. This method, originally suggested by Skratch Garrison, takes much of the figuring out of exit separation. It can be hard to determine how far 1000 feet is on the ground, but fortunately most DZ's come with a handy ruler - a runway. A 3000 foot runway allows you to put 3 groups out along its length with a bit of margin thrown in. This method also has the tremendous advantage that it requires people to look out the door, and that means they are more likely to see traffic, high canopies or clouds that could pose a hazard to their skydive. Another simple way is time-based. There are several tricks you can use to determine how long to wait. One common one is to always leave at least 7 seconds, then if the upper winds are strong divide them by 2 and wait that number of seconds. (Faster aircraft sometimes use divide by 3.) So if the winds are 30kts you wait 15 seconds between groups. This technique uses some math but isn't too bad. A third technique that seems to be popular for some reason is the 45 degree method. In this method, jumpers wait until the previous group passes through an imaginary 45 degree line before they exit. The problem with this method is that the jumpers never pass through that 45 degree angle, or pass through it so quickly (under 1 second) that it's not useful for determining separation. The numbers confirm this. What you see out the door depends purely on speed of the aircraft, fallrate of the jumpers and type of exit. If the plane is going slower than freefall speed, the group may start out above the 45 degree line, but will drop below the line in less than a second and never rise above it again. If the plane is going faster than freefall speed (which is rare) the jumpers stay above the line and never cross it at all. A good head-down exit will tend to move jumpers lower in the picture. Winds will not affect the picture; an exit in 5kt uppers looks the same as an exit in 50kt uppers. There has been some friction over this issue. The 45 degree method has a lot of supporters because it's so simple and makes a sort of intuitive sense. Beyond that, it actually seems to work for some people - although it's likely that the extra time it takes to locate and stare at the previous group has something to do with the reason the next group usually leaves enough time. To show that this doesn't work, two cameras were fixed at a 45 degree angle and mounted on a boom outside an Otter's door (see pictures below.) Pictures and video of several jump runs both into the wind and downwind were taken and magnified to determine how close each group was to the imaginary 45 degree line, which was essentially the center of the images. The pictures confirmed the basic problems of the 45 degree rule. RW groups, falling a little faster than the aircraft, never quite passed behind the 45 degree line. Freeflyers, going much faster than the aircraft, stayed well below the 45 degree line for as long as they were visible in the stills (about 30 seconds.) Some version of the 45 degree method may work for some people. It may be that the simple act of looking out the door delays them enough, or their subconscious may see the group moving slowly along the ground (because the aircraft's groundspeed is low) and send a warning message to the rest of their brain - "hey, hold up a minute." But waiting for a true 45 degree angle simply does not work. Another issue that has become more important lately is exit order. Some places still put freeflyers out first, and that doesn't make much sense. In 30kt uppers, a belly flyer who leaves 10 seconds and gets out after freeflyer will open 100 feet from him, but if the belly flyer goes first and the freeflyer leaves the same time he will open 2200 feet from the freeflyer. RW groups, since they are in freefall longer, drift farther downwind before opening. It seems like a no-brainer to choose an exit order that used this to your advantage and increased, rather than decreased, separation distances. You can certainly wait 20 seconds after the freefly groups before the belly groups exit if there is some other reason why the freeflyers have to exit first, but at most DZ's it's hard to ensure that 20 seconds, especially since waiting so long almost guarantees long spots or a goaround. Below are two diagrams that show how exit order can affect separation. Belly out first diagram Freefly out first diagram One reason given at DZ's to explain a backwards exit order is that freeflyers open sooner and therefore are beginning to descend before the next group gets there. Bryan Burke of Skydive Arizona has pointed out that you simply cannot trust vertical separation - one premature deployment or malfunction and all that vertical separation is gone. Even during a normal skydive, when you add up altimeter error, pull timing and snivel distance, you can easily get a jumper opening 1000 feet from where he expected to be open. In fact, Bryan points out that at Skydive Arizona, the primary reason high pullers get out last is not for separation but rather because they are the ones that can make it back from a bad spot. Every drop zone is going to have a different set of rules and a different approach to exit order. Some work well, some don't work as well. Jumpers have to understand the factors that can reduce group separation so they can make informed decisions about when they want to exit and what kind of exit orders they are comfortable with.
-
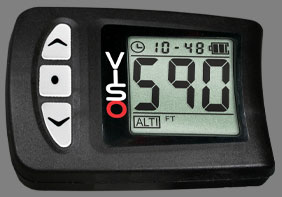 The VISO comprises three instruments: Digital Alti-Meter- Stores detailed altitude information about the last jump for later review Digital Speed-Meter- Stores detailed speed information about the last jump for later review Jump Counter- Electronic logbook, storing and displaying information about the last 200 jumps. - Can be used to keep track on the number of jumps on a rig. - Can be reset at any time, but time and date for the last reset remains stored and cannot be erased. VISO™ FEATURES: Digital Altimeter or Speed-Meter Electroluminescent backlight for night jumping. Can remain ON for several hours. Automatic calibration to local elevation LCD screen for easy and intuitive operation and information review Logbook with playback of altitude/speed profile for the last jump. Operational at sub-zero temperatures Always ON. No need to be powered OFF
 -
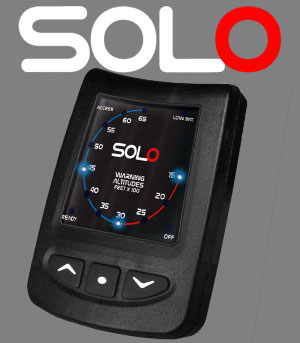 Tons more for less... L&B has completely redesigned the Pro-Dytter™ from the ground up. All new software and design to make the world’s favorite audible altimeter even easier to use with the quality construction and accuracy you have come to expect from L&B. The SOLO™ is even SMALLER than its predecessor the Pro-Dytter™ so it is even more comfortable inside your helmet... you might not even feel that it’s there! You’ll hear it! Developed with all skydiving disciplines in mind, the SOLO™, when combined with our new ALTITRACK™ visual altimeter and data recorder makes a perfect combination for all of your altitude awareness needs.
 -
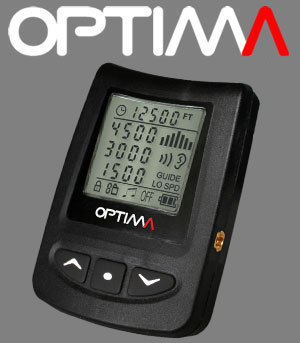 Lights, Jumps and Swoops... L&B has listened to skydivers across the globe and has answered the call with OPTIMA™! The OPTIMA™ is a more advanced audible altimeter with extremely accurate altitude detection. The OPTIMA™ introduces a new class of warnings for use by skydivers – Canopy Descent Warnings and Landing Guide Tones. These Canopy Descent Warnings and Landing Guide Tones allow you to preset warning altitudes for use under canopy and, if desired, to provide timing beeps to help you track your landing process versus your altitude during the semi-final stage of your canopy descent. Hail the return of the visual warning light for audible altimeters! L&B has added the ability to increase your altitude awareness by adding a visual LED port to warn you at the altitudes you set.
 -
 Analog Display with Digital Accuracy At first glance, the ALTITRACK™ looks like many of the more common analog altimeters used throughout the world... but look a little closer. ALTITRACK™ is the only sport altimeter with an analog face but utilizes the most high tech and durable digital components for accuracy that surpasses every other mechanical sport altimeter currently available. L&B has also gone beyond the average by incorporating all of the popular features of our PRO-TRACK™ audible and added several new and useful features to the ALTITRACK™. Imagine a visual altimeter that records your jump information from exit to landing, has the ability to download jump information to a computer, has an ergonomic fit, is both shock and water resistant, has upgradeable software... and most of all... is extremely easy to use... among its long list of features. You just found the answer you’ve been looking for... ALTITRACK™.
 -
Prompted also by the sale of the Durban based factory, Aerodyne Research Corporation in Tampa, Florida, has decided to move forward and find new investors for its expanding sport parachute business. "The previous owners were operating at a distance and could not provide us with the support we need to channel the growth of our sales", reports President Edward "Bushman" Anderson. "We have found a positive group of investors who are actually interested in developing Aerodyne Research into a stronger and more cohesive unit with a concentrated focus on sport parachute products." Anderson sees this change of ownership as an opportunity to put together a new and modern manufacturing facility, which will not have a mix of military and sport products. This means both engineering and production can focus on common goals and objectives. "It will allow us to concentrate our efforts and become one of the bigger players in the sport market", predicts Anderson. Aerodyne's sales so far this year have been above projected forecasts and the company attributes this to the ability of providing stock canopies at a lower price than custom, as well as to the carefully maintained stock levels. Over the summer the company will run a pilot program to sell stock Icon harness-container systems. These will have fully articulated (hip and chest rings) harnesses, which will be custom finished for the customer's body size. Anderson: "We believe we are one of the few manufacturers capable of doing this due to the unique geometry of the Icon harness. It is also important to recognize that the Icon comes standard with all popular features, so there is no need to order additional options. These stock Icons will have everything from stainless steel hardware to spacer foam back pads." For the most part it is business as usual. Aerodyne anticipates strong sales of stock over the summer again, as experienced in past seasons, and this will give the possibility of ramping up the new facility so as to address custom orders later in the year. It would seem that in the summer, when the weather is good, people want their gear as soon as possible and only "now" will do for them… We believe that our typical Pilot, Smart & Icon combination from one source and with a single order from stock, will present customers and distributors with the best alternative when choosing their new equipment this summer.
-
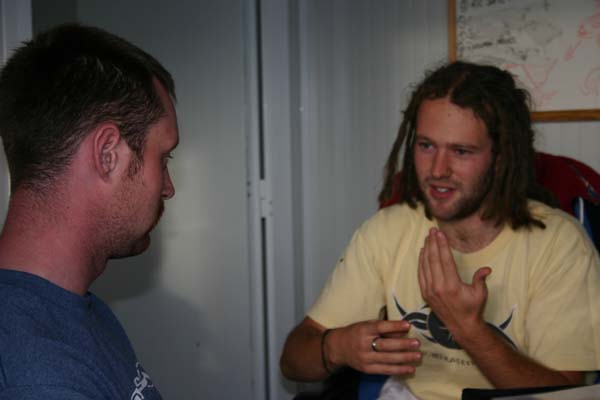
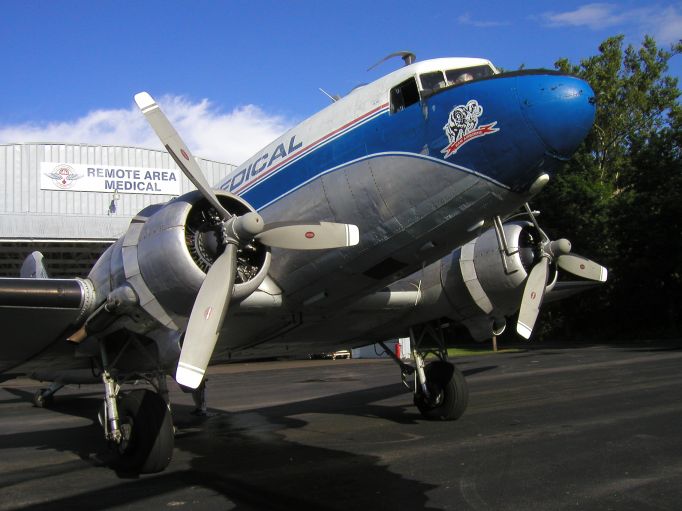 With all of the worldwide disasters happening, have you thought about joining in and helping out somehow? Skydiving skills, to reach people in isolated areas, are being used by Remote Area Medical, to bring in help where it is needed yet where it is inaccessible by conventional ground transportation. Remote Area Medical - RAM AirborneRemote Area Medical, RAM, has been providing humanitarian aid to people worldwide since 1985, with the airborne division currently on the rise and seeking skydivers. Founded by Stan Brock, from the show Wild Kingdom, RAM and its volunteers are “Pioneers of No-Cost Health Care” with well over 400 missions in the US and abroad. The first RAM Airborne mission was to Tennessee in 2005, proving that skydivers and cargo can be dropped into an unknown area, on top of a hill in the Appalachian Mountains. The next RAM Airborne mission is to Guyana in South America, to clear trees from existing grass runways; making them accessible once more by airplanes. From March 26 to April 9, RAM’s mission to Guyana will provide air-ambulance access to the people living in the nearby villages. This is a non-medical mission, but medical support is needed, in the event of an injury or medical emergency during the mission. An additional trail team is being recruited, not requiring skydiving skills, to re-clear a trail in the Amazon forest, connecting two villages to another airstrip which was repaired by a RAM team in 2004. This will be a physically demanding mission, to clear large trees and thick undergrowth, while living in a tent or hammock. Hiking through the Amazon forest is no walk through the park either, with machetes in hand and packs on your back; these are a few things to keep in mind, and a few things to savor, for those who want to come for the adventure. Skills Being Sought:Skydivers must have a B-license or better, with an average of 100 jumps as a minimum; good canopy control and a canopy wing loading of 1.3 or less are expected, because there’s no room for error, and no hospitals to go to if you biff your landing. As you may have guessed, no hook turns allowed. You bring in your own gear for camping, and you pay for your own airfare to and from Georgetown, Guyana – but it is tax-deductible, since it is for a humanitarian effort. It is the most direct way to give, by providing your skills directly where it is needed! RAM is also seeking people with medical skills, to handle any potential injuries that may happen, one per team at a minimum – more if possible – plus some basic medical supplies. The rest of the team is not required to be medically trained but everyone must be physically prepared – this is not your typical working-holiday trip overseas – it is hard work and it is worth it. Videographers are also being sought, to help document this first-time-ever event. Proof of skills will be necessary, to ensure one’s safety, and others’ as well; video cameras may also be provided, as details are confirmed. Videographers would be the first to land, then film the others as they land; the case-of-beer policy will be waived, mainly because there are no stores to go get any and no refrigeration either. If you or someone you know is interested – here are some things to begin doing: Work on hop and pop exits and accurate landings Gear up your camping supplies – for a two-week camping trip Get in shape – it’s a load of work and physically exhausting Join RAM as a volunteer – send an e-mail to karen @ karenhawes.com for further details, or go to http://www.karenhawes.com/ram/RAM-Mission-FAQ.htm RAM CampIf you want to work on the skills necessary for this type of skydiving mission, there will be a “RAM Camp” training program offered in mid-March at Skydive Arizona, prior to the Guyana mission from March 16 - 19, to hone or develop your skills in: Spotting, exiting and landing in unfamiliar areas Cargo-bail preparations and air drops Basic field-medical skills, stitching open-wounds, making traction splints Basic camping and navigation skills Other survival tips and tricks to know, plus pitfalls to avoid Prospective volunteers, who complete this course and display the necessary skill level required, will be selected over volunteers who do not. For more information about the RAM Camp, go to http://www.karenhawes.com/ram/RAM-Camp.htm This course will be taught by three RAM volunteers, with years of experience in the areas of skills being taught: Rene Steinhauer – Medical Aid in Remote Areas Bryan Burke – Cargo/Spotting/Airdrops and Navigation Karen Hawes – Travel Tips (for men and women) and Gadgets in the Wild RAM Camp InstructorsAll three trainers will cover their own areas of expertise, and survival skills training, based on actual in-field experience; with personal experiences ranging from domestic and international relief efforts, everyone has something to learn in this course. Here’s a brief background of each instructor: Rene Steinhauer RN, CFRN, EMT-P – Rene is a currently working as a flight nurse in Antarctica till February 2006. He has worked on humanitarian projects around the world and has also worked as a combat medic on the front lines in Iraq. He has trained civilian and military personnel in remote and combat medicine for years. He is also one of the founding members of RAM Airborne. Bryan Burke – Safety and Training Advisor at Skydive Arizona, with two decades in the sport and 3,200 jumps. Although he is known in the sport as the organizer of numerous boogies and competitions, he also has considerable experience with parachute testing, skydiving for the entertainment industry, and other applications that require precise airborne delivery. Most of his off-DZ time is spent kayaking, backpacking, or rafting in remote wilderness areas. Karen Hawes – A Systems Engineer at Lockheed Martin, with 500 jumps on 6 continents in 12 countries and at over 100 dropzones, she has been a RAM volunteer since 2004. She is the current RAM Airborne recruiter, with three missions to: Guyana (airstrip repair), Sumatra (tsunami relief), and Tennessee (first RAM airdrop mission). A fourth RAM mission to New Orleans is scheduled, for the second week in February 2006. She is also working on configuring solar power sources for hand-held electronic devices, to be used on remote-area missions. For More Information and to Sign-UpFor more information on the mission in March and the RAM Camp, go to: http://www.karenhawes.com/ram/RAM-Mission-FAQ.htm http://www.karenhawes.com/ram/RAM-Camp.htm Come One, Come All!If someone you know is interested, but not a skydiver, then now is the time to begin training and cap it off with one of the RAM Camps, to be ready for future missions. If you already have the skydiving skills, you can take advantage of this unique opportunity to add “Humanitarian” to your list of skills and world experiences.Find out more about RAM at www.ramusa.org and join the adventure!
 -

-
 When first learning to freefly the members of the Avalore Freefly School received a lot of 'coaching' from small freefly schools that offered little more than a good video of flailing attempts of headup flying. This gave them the idea of running a freefly school that provides a high level of customer service and support. They aim to help students with every aspect of their coaching trips from booking hotels to getting a reserve repack as well as supporting them after their coaching as much as possible. The school has spent a considerable amount of time improving their flying and coaching technique from the likes of Max Cohn, Chris Fiala and the UK Sports Council. They have developed numerous resources to help their students from written articles to training videos. As well as the normal coaching jump options the Avalore Freefly School (http://www.avalorefreefly.com) offers freefly courses aimed at beginner freeflyers as well as the more advanced freeflyer. The courses are for the individual wanting to learn to fly in a headup orientation or wanting to gain their BPA (British Parachute Association) FF1 qualification. Much like an AFF course, they are split up into levels to learn different skills. Courses usually last 4 days and consist of an average of 20 coached jumps, which can take you from having done no freeflying to having your FF1 qualification. The advantage of running courses is that as well as covering all the skills needed to fly in a headup orientation you also learn every other aspect of freeflying over the duration of the course. Everything is covered from exit orders, group separation and gear issues to planning successful safe freefly jumps with your friends. The courses include thorough briefs/debriefs, a copy of your coaching jumps on DVD and a comprehensive course manual covering everything you need to know. Your coach is always on hand after the course for continuous advice and support. The school has received excellent testimonials from their students all of which have returned or have booked to return in the near future. Some comments from their students are quoted below: Billy Gibbons, January 2006: "Contact was established quickly and maintained right through up until my visit, even with Louis taking time to offer hints and tips via e-mail for me to try at home and in the air which I found invaluable and which in my mind displayed excellent customer commitment." Kevin Dawes, November 2005: "During these jumps my coach quickly helped me overcome some of the bad habits I had obtained over the years. The detailed briefs he gave me before and after each jump helped improve my understanding a great deal. He also ensured that before we exited the plane I was in a relaxed state and was not rushing. This made all the difference and helped focus my mind." The Avalore Freefly School has locations in Ocana, Spain and also at the Black Knights Parachute Centre in UK. The head coach is Louis Harwood who is based in Spain and Rob McVey is the UK coach. All of the coaches have been trained as coaches by the UKCC. Coaches from the school Louis Harwood and Rob McVey train along with David Downham to form the Avalore Freefly team. They don't claim to be champions but enjoy competing and use it to improve their own skills and also their coaching. They believe you don't have to be a world champion to run a successful freefly school. They have worked hard to become good coaches and run the school the way they wanted to be coached when they first started. It goes to show that commitment and hard work does pay off! Feel free to contact the school to book your course or ask any questions you might have. You can also have a look at the website for more information. Louis Harwood Avalore Freefly http://www.avalorefreefly.com info@avalorefreefly.com (UK) 01212880618 (ES) +34662021951
 -
As part of our efforts to fight scams in the Classified section we have instituted a policy that requires users to be registered for a minimum of 3 days before you can either post an ad or contact a seller. If you can not see the contact information for an advertiser then you have not been registered for the minimum number of days required. This feature is simply designed to place an obstacle in the way of creating a quick username and spamming everyone in the classifieds or posting an ad ripped from EBay on the same day. We apologize to skydivers who are simply trying to list their gear or get in touch with a seller. We trust that you'll be back in a few days and wish you the best of luck with your dealings.
-
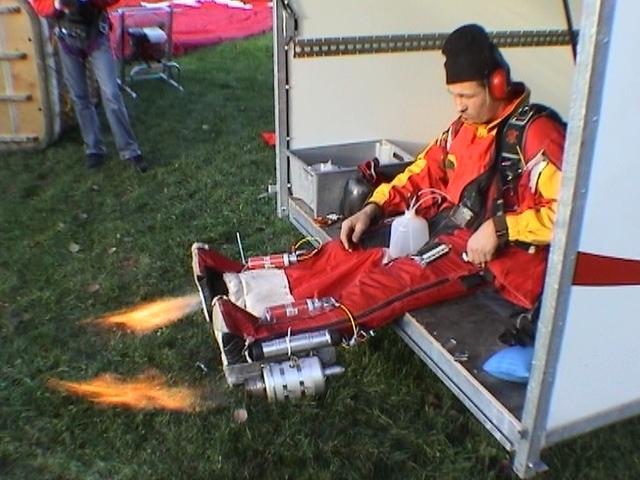 Tuesday 25th October 2005 - It was an untypical crisp October morning in Lahti, Finland when Visa Parviainen and the BirdMan Rocket Team attempted to make the first ever jet powered, birdman flight. The team set up camp in a small park in downtown Lahti, to prepare for the jump. The locals appeared to be not-at-all phased by the fact that some person was igniting a jet engine in their tranquil little park while they were walking their house pets. The launch platform selected for the day was provided by the famous Finnish Balloon Bros, who graciously offered their services for this historic event. Visa had designed a unique launch platform to hang outside the balloon to avoid 'cooking' the balloon occupants during the ascent to altitude from the exhaust gases of the jet engines. Once Visa had adorned his birdman suit and rig on the ground, it was time to test the rocket boots. Each jet engine provides around 16kgs of thrust, and is primed with a mix of butane and propane. Once ignited, the engines rely on a steady supply of kerosene (JetA1) fuel. This fuel burns at around the rate of 0.5 litres per minute, on full power, for each jet engine. The combined thrust of both power plants was calculated to be enough to sustain level human flight in a wing suit for an average weight skydiver. Once all the gear checks were made and rigorous safety procedures executed on the ground, it was time to inflate the hot air balloon for the ascent. The Balloon Bros provided a smooth and relaxing ride up to altitude over the beautiful vista of the humble town of Lahti in middle Finland. The Balloon ascended over the unpopulated areas around the lakes and forests of rural Lahti, visa primed and started the rockets prior to exit. After warming up the engines in the cold surrounding atmosphere, it was time to make the attempt. The high pitch whine of the jet engines sounded surreal in the calm stillness of the hot air balloon. Tensions were high that this attempt would be a successful one. It was time to go, as the fuel was rapidly running out, Visa gave the all clear sign (a quick grin) at around 2300m (7000ft) before 'edging' off the platform into the first rocket-powered-human-flight attempt. The exit was stable and on-heading, after attaining normal bird-man flight, Visa requested full power from the engines, which responded smoothly in horizontal acceleration. After checking the altimeter several times, it was apparent that there was no appreciable loss in altitude for this period of time. Visa next changed his angle of attack by redirected the thrust and changing his body position to attain vertical climb. This caused a loss in horizontal speed, and stalled (the body?). Recovering from the stall was made easy because of the agility of the human body to change flight profile easily. A few more attempts at this exercise yielded the same result. Pretty soon it became apparent that fuel consumption would soon terminate the level flight portion of the jump. Visa simply rode out the rest of the jump in level flight following the highway until the fuel ran out. Visa then continued in normal bird-man flight until deployment altitude. The deployment sequence was normal, and the landing was uneventful. The jump has proven empirically that level human flight is possible and sustainable using the combination of jet engines and a bird-man suit. The strength required to control level flight was relatively easy, and controlling the direction of flight feels surprisingly natural. The duration of flight is simply a factor of the consumption of fuel of the engine(s) powering the flight. Visa Parviainen has proven that with a little innovation, determination and courage it has been possible to realise the dream of uninhibited human flying.
 -
 I'm sure by now you have heard the buzz in the Skydiving community about the newest SkyVenture wind tunnel being built in Lone Tree, Colorado. Well, the buzz is true; finally Colorado will have its very own indoor flight chamber. All of SkyVenture's latest technology wrapped in a single spectacular package and placed in the middle of The Entertainment District next to Park Meadows Mall located at 9230 Park Meadows Drive, in Lone Tree, Colorado. SkyVenture Colorado tunnel has all the latest improvements in design. The first thing you'll notice is the building is a single fully contained facility. Behind the unique architecture you will find a massive amount of very sophisticated components making up what is referred to as a "re-circulating tunnel". This technology has many advantages. By re-circulating the air they can maintain a very comfortable 70 degrees in the tunnel even when it is snowing outside. By virtually eliminating all influence from outside wind gusts and channeling the air early on it gives the ultimate smooth as silk air. Combining extremely tight tolerances on aerodynamic design and 1200 hp they have created the finest, smoothest 160mph+ air available in the industry. SkyVenture Colorado LLC is a private Colorado based company formed to own and operate the most technologically advance and realistic skydiving simulator in the world. A group of investors headed up by Norm Rosendale are not new to the world of entertainment. Norm was involved in the SkyCoaster amusement ride business and served on the Board for Sky Fun 1. He has flown hang gliders for over 25 years and owned and operated his own hang gliding business. Norm's mission is to create a comfortable atmosphere for the skydivers and non-skydivers to relax and interact with each other and share their dreams and experiences of flight. "If we all don't walk away with a smile on our face then we are not doing it right". Construction is going very well for a late December early January opening. Please sign up for e-mail updates or buy now and make your reservations to be one of the first fliers at www.SkyVentureColorado.com
 -
 The Aerodyne Mamba is the ultimate high performance 9 cell elliptical designed with the more experienced pilot in mind that isn't looking for all the costs and pack volume issues associated with cross braced canopies. It is intended to compete with canopies like the Katana and Crossfire. Edward "Bushman" Anderson, President of Aerodyne Research, describes how the Mamba came into existence: "This product is the result of 2 years of continued Research & Development and test jumping, with the final version of prototype being test jumped in cooperation with the Norwegian 4-way team Arcteryx. The team has approximately 1500 jumps on the Katana and therefore had a good platform to relate to, whilst evaluating the Mamba." With a planform factor of 22.1 and an aspect ratio of 2.7:1 the Mamba is one of the most elliptical wings on the market today. As a comparison, the Pilot has a planform factor of 6.6 and the Vision 14.7. Despite its aggressive taper, the Mamba sports unparalleled openings and provides the jumper with a smooth controlled snivel & maximum forgiveness during inflation. It is extremely responsive to toggle input. One of the most impressive features of the Mamba is the glide ratio. Recent tests against other high performance canopies show that the Mamba has a definite advantage in this performance arena. With the Mamba a jumper will increase the ability to get back from long spots and have the absolute longest swoop landings ever experienced under a non cross braced wing. The Mamba has light toggle and riser pressure, allowing the jumper to explore all avenues of available control input and to maximize the performance of this new wing. By utilizing the light front riser pressure one can continue to increase both the speed with steep but controlled dives. The flare on the Mamba is powerful and easy to read, leaving you with total control of pitch angle. "From the moment you start your flare you will easily be able to gauge your distance and landing speed. Experienced canopy pilots will find that the Mamba is easy to land while maximizing their swoop distance and control.", so reports Ole Petter Hjelle, team captain of Arcteryx. "Our team member Tore Buer has already flown the Mamba during swoop competitions and put respectable scores on the board!" Design Features Fully Elliptical Planform - Provides phenomenal flight performance and landings. Pre Shaped Nose - Improved inflation and aerodynamics. Zero Porosity Fabric - Provides increased durability & longevity 700 lb HMA Line - Provides exacting tolerance on line trims. Aspect Ratio - 2.7:1 Planform Factor - 22.1 Available Sizes90, 96, 104, 111, 117, 124, 132, 140 and 150 sq ft. The retail price of the Mamba is fixed at $ 1999 and we are taking orders now. Aerodyne International
 -
 The Aerodyne Mamba is the ultimate high performance 9 cell elliptical designed with the more experienced pilot in mind that isn't looking for all the costs and pack volume issues associated with cross braced canopies. It is intended to compete with canopies like the Katana and Crossfire.
 -
How do you perform a canopy controllability check? What happens if you flare too high? How do you prevent that? What is your decision altitude? What does that term mean? How do you recognize a good canopy? How do you get the slider down if it's stuck partway up? How do you deal with closed end cells? How do you fix line twist? How do you use your reserve if you need it? How do you handle a horseshoe malfunction? How can you avoid losing sight of your reserve handle during a cutaway? What do you do if you’re in the plane and your jumpmaster tells you "BAIL OUT ON YOUR MAIN?" What do you do if your parachute deploys prematurely in the plane? How can you prevent this from happening? If you find yourself still in freefall and the altimeter needle is in the red, what do you do? If you're in freefall, and you're unstable but you're still above 5000 feet, how do you get stable again? If you find yourself in freefall at 5000 feet and you're unstable, what do you do? What do you do if two canopies are out? How do you control them? When would you cut one away? What would you do if the pilot chute goes over the front edge of the canopy? How do you handle a hard-to-pull main ripcord? If you start having some kind of serious problem during the freefall, how do you stop the skydive? If you see your jumpmaster pull, what does that indicate? What do you do if you can't find the main ripcord? How do you steer your canopy? How do you flare it? How is your reserve canopy different from your main? How do you collapse your canopy after landing to avoid being dragged? How do you prepare for a landing in trees? Rough terrain? Water? How do you determine wind direction? What direction should you land in with relation to the wind? How do you find the landing area? What do you do if you realize you will not be able to make it back to the landing area? What is the hand signal for pull? Check-altitude? Legs-out? Hips-down? Relax? What is your pull altitude on this dive? What are the manuevers you'll be expected to perform on this dive? IF YOU DON'T KNOW THE ANSWERS TO THESE QUESTIONS, ASK A JUMPMASTER BEFORE YOU JUMP! REMEMBER, YOUR SAFETY IS IN YOUR HANDS.
-
INTRODUCTION TO SKYDIVING JUMP SEQUENCE: When jumpmaster says "GET INTO POSITION", take your position in the door. You should be facing forward, with your left foot on the edge of the door. Keep your back low to avoid snagging your rig on the top of the door. When you are ready to exit, turn to your right and shout "CHECK IN!" to your main side JM. The JM will respond "OK!" and nod his head when you are ready to go. Do the exit count - "Ready! Set! Arch!" On "Arch!" step to the left, out of the plane. Try to remain facing forward, and try to hit the wing with your pelvis as you leave the plane. Remember to ARCH! Count to four, maintaining a hard arch - "One thousand! Two thousand! Three thousand! Four thousand!" Do three practice ripcord touches - "Arch! Reach! Feel! Back to arch!" Check your altitude by turning your head to look at the altimeter on your left hand. Look at your main side jump master and shout your altitude at him - "Ten thousand feet!" Respond to any hand signals your main side JM gives you. Check your altimeter once every five to ten seconds, and shout your altitude to the main side JM each time. At 5000 feet, wave off once, then arch-reach-feel-pull. Hang on to the ripcord after the pull! Start counting - "One thousand! Two thousand! . . . . . . Five thousand!" to give your parachute time to open. Check your canopy to make sure you have a good parachute, unstow your brakes, and head back to the landing area. PERFORMANCE STANDARDS: Freefall awareness - Open your eyes and look around! Pay attention to hand signals. Altitude awareness - Check your altimeter once every 5-10 seconds, and tell your JM your altitude. Stability - Maintain the arch during the entire dive, especially on exit. Canopy control - Check your canopy upon opening, and listen to the radio during the descent. LEVEL ONE HINTS: To fix stability problems - ARCH! Check your altimeter at least once every five seconds. Time goes fast up there. Remember to keep your legs out. Don't let them collapse on your butt. REMEMBER THE MOST IMPORTANT PARTS OF ANY SKYDIVE: PULL! PULL AT THE RIGHT ALTITUDE! PULL STABLE! LAND SAFELY UNDER AN OPEN CANOPY! Before Level 1 Level 2 Level 3 Level 4 Level 5 Level 6 Level 7
-
FORWARD MOTION JUMP SEQUENCE: When jumpmaster says "GET INTO POSITION", take your position in the door. You should be facing forward, with your left foot on the edge of the door. Keep your back low to avoid snagging your rig on the top of the door. When you are ready to exit, turn to your right and shout "CHECK IN!" to your main side JM. The JM will respond "OK!" and nod his head when you are ready to go. Do the exit count - "Ready! Set! Arch!" On "Arch!" step to the left, out of the plane. Try to remain facing forward, and try to hit the wing with your pelvis as you leave the plane. Remember to ARCH! Count to four, maintaining a hard arch - "One thousand! Two thousand! Three thousand! Four thousand!" Do three practice ripcord touches - "Arch! Reach! Feel! Back to arch!" heck your altitude by turning your head to look at the altimeter on your left hand. Look at your main side jump master and shout your altitude at him - "Ten thousand feet!" Respond to any hand signals your MS JM gives you. When you see the "forward motion" signal (legs-out signal, moving away from you) do forward motion for six seconds - hands back by your waist, legs straight, toes pointed. After six seconds, return to a neutral arch. Don't bring your feet up too much! Check your altimeter. If below 6000 feet, shake your head - no more manuevers. At 5000 feet, wave off once, then arch-reach-feel-pull. Hang on to the ripcord after the pull! Start counting - "One thousand! Two thousand!" to give your parachute time to open. PERFORMANCE STANDARDS: Move forward through the sky by straightening your legs and bringing your arms back. Do three good PRCP’s to help you find the ripcord later. Pull at the right altitude. Maintain stability by keeping the arch. LEVEL TWO HINTS: To fix stability problems - ARCH! Make sure your legs are still out a little after each forward motion. Check your altimeter at least once every five seconds. Time goes fast up there. Your legs are 80% of your drive during forward motion. Make sure you get them out there. REMEMBER THE MOST IMPORTANT PARTS OF ANY SKYDIVE: PULL! PULL AT THE RIGHT ALTITUDE! PULL STABLE! LAND SAFELY UNDER AN OPEN CANOPY! Before Level 1 Level 2 Level 3 Level 4 Level 5 Level 6 Level 7
-
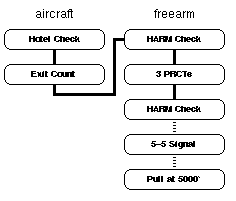 Napoleon Skydiving Center: Level 1 - Free ArmThis dive is intended to be an introduction to skydiving. As such we will leave plenty of time to just arch and enjoy the experience. Concentrate on a good, relaxed arch, but don't forget to have fun. Remember to hang on to that ripcord at pull time. TLOs Perform a controlled exit. Exposure to continuous freefall. Heading awareness. Focused awareness and attention. Coordinated body movements with 3 practice pulls from free arm. Altitude awareness. Actual ripcord pull by 4000 feet. Dive Flow Running DescriptionHotel Check: Check In, look to left and wait for a nod. Check Out, look to the right and wait for a nod. Exit Count : On the C-128, the count is Prop, Up, Down, Arch. On the Twin Otter, it is Center, Out, In, Arch. In both cases the count should include both the verbal commands and the physical motions. Exit: Step off of the aircraft and push hips forward, chest forward, head back, and arms and legs to "boxman" position. HARM Check: Also called a Circle of Awareness or Circle of Observation. Heading, look forward and down at a 45 degree angle to ascertain heading. Altimeter, read the altitude on the chest-mounted altimeter. Reserve, look at reserve side jumpmaster and wait for a nod. Main, look at main side jumpmaster and wait for a nod. PRCT: A practice ripcord touch. Arch, insure a good arch at hips and chest. Look, tilt head to the right and look down the side of the body at ripcord. Reach, in with the right hand to place it over the ripcord handle while extending the left hand one foot over your head. Touch, recover to an arched position. Check, over right shoulder. Short Circles: Heading, Altitude, Reserve, Main. Performed throughout the dive to maintain awareness (indicated by the dotted lines on the dive flow). No nods from JMs. 5-5 Signal: An altitude awareness signal performed by the student at 5500'. The signal is given by closing the hands twice in quick succession. Pull: Arch, Look at ripcord, Reach for ripcord with right hand while extending left hand over head, Pull ripcord, Arch, Check over right shoulder for pilot chute launch. Primary Canopy Check: Performed five seconds after the Pull. The main canopy is checked overhead for Shape (rectangular), Spin (not spinning), Speed (floating, not falling), and Twists (spread risers and kick out). Release Toggles: by grasping them and pulling them quickly to the waist. Secondary Canopy Check: Slider Down, Endcells Open, Rips/Tears, Broken Lines. Controllability Check: Execute a turn in each direction and then a flare. Canopy Control: Locate the Airport and then the landing area. Fly back using the halfway down, halfway back rule. Watch your jumpmasters canopies. Setup For Landing: The landing setup consists of three legs: Downwind: Starting at 1000' fly to the downwind side of the target. Base: By 500', begin crabbing across the wind downwind of the target. Final: By 200', turn into the wind and fly towards the target. Once on final, no turns in excess of 45 degrees should be attempted. Prepare to Land: At 50', feet and knees together, toggles at ``full flight''. Flare:: At approximately 10', bring both toggles smoothly to your crotch, keeping your feet and knees together. If the flare occurs prematurely, slowly raise the toggles to your stomach, then re-flare at 10'. PLF: Parachute Landing Fall. Keeping feet together and hands in, roll with the landing taking the force on the fleshy parts of the body (feet, calves, thigh, butt, back/shoulder). Collapse the Canopy: by reeling in a toggle and running to the downwind side. Field Pack: the canopy, turn off the radio and AAD, return to the student packing area with the jumpmasters. Return: the helmet, goggles, altimeter, jumpsuit and radio. Congratulations You've just made your first skydive! Hand Signals Level 1 Level 2 Level 3 Level 4 Level 5 Level 6 Level 7 Level 8
 -
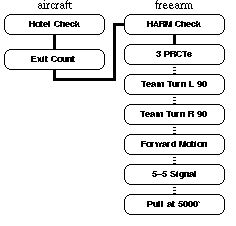 Napoleon Skydiving Center: Level 2 - Body AwarenessNow that you have your feet wet, we will start working on trim maneuvers. There are a lot of things to accomplish on this level, so don't waste time geeking the camera. Once you are under canopy, try a few spiral turns (above 1500' please). TLOs Maximum free arm time. 3 PRCTs. Heading awareness during freefall. Trim control or body awareness exercises. Relaxed, arched body position through entire freefall. Pull by 3500 feet, look over right shoulder to observe pilot chute launch. Dive Flow Running DescriptionHotel Check: Check In, Check Out. Exit Count: C-182 Prop, Up, Down, Arch; Otter Center, Out, In, Arch. HARM Check: Heading, Altimeter, Reserve JM, Main JM. PRCT: Arch, Look, Reach, Touch, Check 3 times. Short Circles: to maintain altitude awareness between maneuvers. Team Turn: initiated by looking over the arm in the direction of the desired turn to pick a heading refrence. Then bend his/her upper body 20 degrees at the waist in the direction of the turn. At the same time, drop the shoulder the turn is moving toward by 2-3 inches. Keep hands and arms still -- all motions are preformed from the waist. As the desired heading is aquired, return to a neutral boxman position. Forward Motion: initiated by extending legs (straightening them at the knees) while simaltanously bending arms at the shoulders to form a 'lazy W'. Hold for 3 seconds and return to a neutral boxman position. 5-5 Signal: at 5500 feet. Pull: Arch, Look, Reach, Pull, Check at 5000 feet. Primary Canopy Check: Shape, Spin, Speed, Twist. Release Toggles Secondary Canopy Check: Slider, Endcells, Tears, Lines. Controllability Check: turns and flares OK. Canopy Control: halfway down, halfway back. Setup For Landing: Downwind at 1000', Base at 500', Final at 200'. Prepare to Land: at 50'. Flare: at 10', feet and knees together, PLF if necessary. Collapse the Canopy, Field Pack, and Return. Level 1 Level 2 Level 3 Level 4 Level 5 Level 6 Level 7 Level 8
 -
TURNS JUMP SEQUENCE: When jumpmaster says "GET INTO POSITION", take your position in the door When you are ready to exit, turn to your right and shout "CHECK IN!" to your main side JM. The JM will respond "OK!" Do the exit count - "Ready! Set! Arch!" On "Arch!" step to the left, out of the plane. Count to four, maintaining a hard arch. Do one practice ripcord touch - "Arch! Reach! Feel! Back to arch!" Check your altitude. Look at your main side jump master and shout your altitude at him - "Ten thousand feet!" Your main-side jumpmaster will give you the left turn signal. When he does, look left, then turn left and face the reserve side jumpmaster. Check your altimeter. Your reserve side jumpmaster will give you a turn signal, either left or right. Look in the direction you want to turn , pick a landmark, and then turn 90 degrees towards it. Check your altimeter again. If below 6000 feet, shake your head - no more manuevers! At 5000 feet, wave off once, then arch-reach-feel-pull. Hang on to the ripcord after the pull! Count to five then check your canopy. PERFORMANCE STANDARDS: Do slow, controlled turns in each direction. Make sure you stop where you want to stop. Maintain good stability throughout the dive. Maintain altitude awareness by looking at your altimeter after every manuever. Respond correctly to all signals. Solo stable ripcord pull at the right altitude. Fly your canopy back to the LZ and land with minimal radio assistance. LEVEL THREE HINTS: To fix stability problems - ARCH! Remember - your body follows your eyes. Look, then turn. Keep your legs out and steady! Unwanted leg movement can keep you from turning. REMEMBER THE MOST IMPORTANT PARTS OF ANY SKYDIVE: PULL! PULL AT THE RIGHT ALTITUDE! PULL STABLE! LAND SAFELY UNDER AN OPEN CANOPY! Before Level 1 Level 2 Level 3 Level 4 Level 5 Level 6 Level 7
-
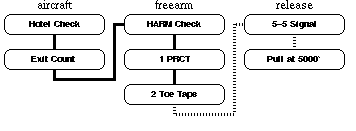 Napoleon Skydiving Center: Level 3 - Release DiveThis is the last of the two jumpmaster levels. If things go well, your jumpmasters will let go of you and you'll be skydiving unassisted for the 5-5 and pull. Stay relaxed and maintain a good arch. Pay careful attention during the pre-jump gear checks since you will soon have to know how to do one on your own. Likewise begin observing the packing procedure. Under canopy you should try a stall above 2000'. After you successfully complete this level, you should become a USPA member by filling out the application provided at manifest. TLOs Leg awareness and control modes. Heading maintenance. Hover control. Unassisted solo pull at or above 3000 feet. Dive Flow Running DescriptionHotel Check: Check In, Check Out. Exit Count: C-182 Prop, Up, Down, Arch; Otter Center, Out, In, Arch. HARM Check: Heading, Altimeter, Reserve JM, Main JM. PRCT: Arch, Look, Reach, Touch, Check. Toe Taps: Tap toes together twice to insure leg awareness. Short Circles: to maintain altitude awareness. Hover Control and Heading Maintaince: using principles of turning and forward motion. 5-5 Signal: at 5500 feet. Pull: Arch, Look, Reach, Pull, Check at 5000 feet. Primary Canopy Check: Shape, Spin, Speed, Twist. Release Toggles Secondary Canopy Check: Slider, Endcells, Tears, Lines. Controllability Check: turns and flares OK. Canopy Control: halfway down, halfway back. Setup For Landing: Downwind at 1000', Base at 500', Final at 200'. Flare: at 10', feet and knees together, PLF if necessary. Collapse the Canopy, Field Pack, and Return. Level 1 Level 2 Level 3 Level 4 Level 5 Level 6 Level 7 Level 8
 -
RELEASE DIVE JUMP SEQUENCE: When your jumpmaster says "GET INTO POSITION", take your position in the door. There will be no reserve side JM on this dive. When you are ready to exit, turn to your right and shout "CHECK IN!" to your main side JM. The JM will respond "OK!" and nod his head when you are ready to go. Do the exit count - "Ready! Set! Arch!" On "Arch!" step to the left, out of the plane. Count to four, maintaining a hard arch. Do one practice ripcord touch. Check your altitude. Your JM may give you hand signals, and will then move in front of you. If everything is going well, and you seem stable, your JM will release you and fly 5-10 feet in front of you. Maintain hover control. If you slide backwards away from the JM, use forward motion to correct. Maintain heading. If you seem to be turning away from the JM, turn back towards him At 6000 feet, shake your head. Your JM will move back beside you when he sees this. Do not follow! Wave off and pull at 5000 feet. Count to five and check your parachute. PERFORMANCE STANDARDS: Maintain heading control by using your turning skills Maintain forward/back control by using your forward motion skills Stay stable by holding the arch throughout the dive Pull on your own at the right altitude. Hold the arch through the pull. Fly your canopy back to the LZ and land with no radio assistance. LEVEL FOUR HINTS: To fix stability problems - ARCH! Remember - pull at 5000 feet NO MATTER WHAT! Do not attempt to get stable if you find yourself on your back at 5000 feet. PULL IMMEDIATELY! REMEMBER THE MOST IMPORTANT PARTS OF ANY SKYDIVE: PULL! PULL AT THE RIGHT ALTITUDE! PULL STABLE! LAND SAFELY UNDER AN OPEN CANOPY! Before Level 1 Level 2 Level 3 Level 4 Level 5 Level 6 Level 7
-
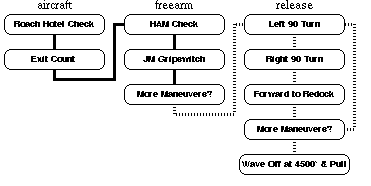 Napoleon Skydiving Center: Level 4 - Turns to RedockCongrats, you are halfway through the AFF program. In the aircraft you should be paying careful attention to the spotting procedures. On the ground, you should be well along learning how to do a JMPI and packing. Under canopy try using risers (front and rear) for control up high. Though you are still a student, you should start preparing for the time when you will be off student status and jumping on your own. Safe skydiving requires good equipment. Begin talking with your instructors and other jumpers about what type of equipment you should purchase. It is recommended that you start by ordering an appropriately sized jumpsuit, helmet, goggles and altimeter. In fact, you can begin using these items before you complete the AFF program. TLOs Start and stop controlled turns. Forward motion to redock. Wave off, then pull at or above 3000 feet. Dive Flow Running DescriptionRoach Hotel Check: Check In, but no check out. Exit Count: C-182 Prop, Up, Down, Arch; Otter Center, Out, In, Arch. HAM Check: Heading, Altimeter, Main JM. JM Gripswitch: Jumpmaster switches from side to front. More Maneuvers? Check Altimeter, if above 6000 feet signal with a nod yes. If below 6000 feet signal with a head shake no. In either case, JM has the final authority. 90 degree Turns: performed using a combination of bending and tilting the upper body. Initiate by looking over the arm in the direction of the turn. Bend upper body toward the turn at the waist and tilt shoulders by raising the shoulder opposite the direction of the turn by 3--4 inches. Keep arms in the same position at the shoulders and elbows, all motion should originate at the waist. Recover to box man as new heading is attained. Forward to Redock: At the completion of the 2nd turn, the JM will back up from 5--10 feet. Move forward by extending legs at the knees and bending arms at the shoulders. Keep elbows locked at 90 degrees. Hold position until redocked on JM, then recover to boxman. More Maneuvers? Yes if above 6000, else no. Wave Off: at 4500 feet by crossing hands above head twice with a large sweeping motion of the arms. Pull: at 4000 feet. Primary Canopy Check: Shape, Spin, Speed, Twist. Release Toggles, Secondary Canopy Check, Controlability Check. Canopy Control: halfway down, halfway back. Flare at 10 feet, knees together, PLF if necessary. Collapse the Canopy, Field Pack, and Return. Level 1 Level 2 Level 3 Level 4 Level 5 Level 6 Level 7 Level 8
 -
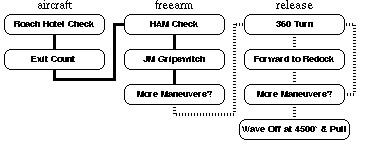 Napoleon Skydiving Center: Level 5 - Turns to Redock IIThis level is like the last but the turns are 360 degrees and the amount of forward motion is greater. You should be assisting with the spot in the aircraft and with packing on the ground. Under canopy practice a "collision avoidance" maneuver by turning using a front or rear riser prior to releasing your toggles. TLOs 360 degree turns (one before each redock). Forward movement and docking without assistance. Control of all 3 axes (Pitch, Yaw, and Roll). Wave off, then pull at or above 3000 feet. Dive Flow Running DescriptionRoach Hotel Check: Check In. Exit Count: C-182 Prop, Up, Down, Arch; Otter Center, Out, In, Arch. HAM Check: Heading, Altimeter, Main JM. JM Gripswitch: Jumpmaster switches from side to front. More Maneuvers? Yes if above 6000, else no. 360 degree Turns: one before each redock. Forward to Redock. More Maneuvers? Yes if above 6000, else no. Wave Off: at 4500 feet. Pull: at 4000 feet. Primary Canopy Check: Shape, Spin, Speed, Twist. Release Toggles Secondary Canopy Check: Slider, Endcells, Tears, Lines. Controllability Check: Turns and flares OK. Canopy Control: Halfway down, halfway back. Setup For Landing: Downwind at 1000', Base at 500', Final at 200'. Flare: at 10', feet and knees together, PLF if necessary. Collapse the Canopy, Field Pack, and Return. Level 1 Level 2 Level 3 Level 4 Level 5 Level 6 Level 7 Level 8