admin
-
Content
-14 -
Joined
-
Last visited
-
Days Won
1 -
Feedback
0%
Everything posted by admin
-
 ByNadene Beyerbach Want to improve your skydiving skills, but don’t have thousands of dollars to blow in the wind tunnel? Try yoga! Yoga has been around for thousands of years. What is commonly considered yoga in Western society is actually Hatha Yoga, focusing mainly on physical yoga postures. However, yoga is not just a series of postures or poses. Yoga is meant to integrate the mind, body and spirit, and to achieve a state of enlightenment. For skydiving, this means developing your insight, awareness and focus, as well as balance, flexibility and stability. Not just an effective exercise for improving skydiving skills, yoga is also extremely convenient to practice at the dropzone. The simplicity of yoga means that you can do it virtually anywhere and need very little to get started. The most important thing you can do is wear comfortable, loose fitting clothing that you’re able to move easily in. A yoga mat is ideal, since it will allow you to grip with your feet and go deeper into the poses. However, poses can be done on grass, a towel or a blanket, if necessary. You can experiment with different yoga postures, breathing, meditation and relaxation exercises to see how they affect your skydiving. Try the following to get started: Complete Breath: A complete, “three part” breath consists of deep, continuous breathing through the nose. It is referred to as “three part” breath because you breathe first into the throat, expanding through the ribs, then deep into the belly. Slowly exhale, drawing the belly back in. Slow, deep breathing both energizes the body and calms the mind. Try using complete breathing when you’re concentrating on flying a body position that requires a lot of effort. For a relaxed and stable exit, you can also try exhaling completely as you leave the aircraft. Meditation/Relaxation: Simply close your eyes and focus on your breathing. Let your mind go blank. As thoughts enter your mind, just return your attention to your breath and let the thoughts float away. Meditation reduces stress and tension and improves concentration. Try meditating for a few moments on the ride to altitude before you begin any mental rehearsal. This will allow you to visualize your intention for the jump from a calm and centered place. Physical Postures: There are many different types of yoga postures to explore. Standing poses, seated poses, forward bends, back bends, twists, inversions (upside down poses), balance poses and relaxation poses are just some of the different types of postures. Let’s take a more in-depth look at sun salutations, twists, inversions and balance poses. Sun Salutations are an ideal warm-up for skydiving. Sun salutations are made up of a series of poses, flowing continuously from one move to the next. As you move through the poses be sure to hold each one for a few deep breathes. Begin by standing with your shoulders back and body properly aligned (Mountain Pose). Taking a deep breath, stretch your arms overhead, then fold forward at the hips and let your head hang toward the ground (Forward Fold). Step back with your left foot into a lunge. Follow with your right foot, pushing into your hands and feet to create an inverted V shape (Downward Dog). Lower your body toward the ground (Plank), then straighten your arms, looking up and lifting your chest toward the sky (Upward Dog). Now return to your starting position: Push back into Downward Dog, lunge on the right leg, fold forward, and finish by inhaling deeply in Mountain Pose. Try this sun salutation before gearing up for your next jump. You’ll instantly increase circulation, mobility, and flexibility. Twists offer back relief for skydivers who do a lot of bellyflying. If you spend a great deal of time arching, try a Half Spinal Twist to release tension in your back. Sitting down, bend your right leg to bring your foot toward you. Lift your left foot and place it on the outside of your right knee. Looking over your left shoulder, place your left arm behind you and your right arm around your knee. Breathe deeply and twist through your spine. Along with relieving tension, spinal twists will increase flexibility in your back and neck to help you further improve your RW skills. Inversions are poses performed upside down (with your feet above your head). They improve circulation and increase the flow of oxygen throughout the body. Inversions allow you to become comfortable in an upside down position and to work on balance with your center of gravity above your head. To try the Half Shoulder Stand, lie on your back and pull your knees to your chest. Support your back with your hands and straighten your legs above your body. Your weight should be on your shoulders, not your neck. Breathe deeply and remain strong through your core to help you balance. The Half Shoulder Stand is an excellent inversion to work on if you’re learning to fly head down. Balance Poses deserve special attention when it comes to skydiving. There is no better way to develop balance, strengthen stabilizer muscles, and increase mind-body awareness. Warrior 3 (also known as Airplane) is a good pose to begin working on your balance. Start by standing tall and lifting your arms to shoulder-height. Place your weight on one leg, lifting the opposite leg and leaning forward until you form a straight line. Hold for a few deep breathes, then repeat on the opposite side. Holding a balance pose will quickly make you aware of your alignment and body position. If you do any freeflying, adding balance work to your routine could give you the edge you’re looking for. Enjoy your adventures in yoga! Test out the suggestions in this article and continue to experiment with different postures to find what works best for you. Always work at your own pace and stop if you experience any pain or discomfort. Remember, it’s about the journey, not the destination, so don’t worry if you’re not an expert right away. To learn more, consider attending a yoga class or inviting an instructor to teach at your dropzone. With practice you’ll start to notice improvement in your skydiving skills through increased mind-body awareness, balance, focus and control. Keeping your body strong and flexible will also help to protect you from hard openings and not-so-perfect landings. Blue skies, or as we say in yoga, Namaste. Nadene Beyerbach is a skydiver and yoga instructor. She is certified by Body Training Systems as a Group Centergy instructor and is a member of the Canadian Yoga Association. Learn more about skydiving specific yoga at Flex Fly.
 -
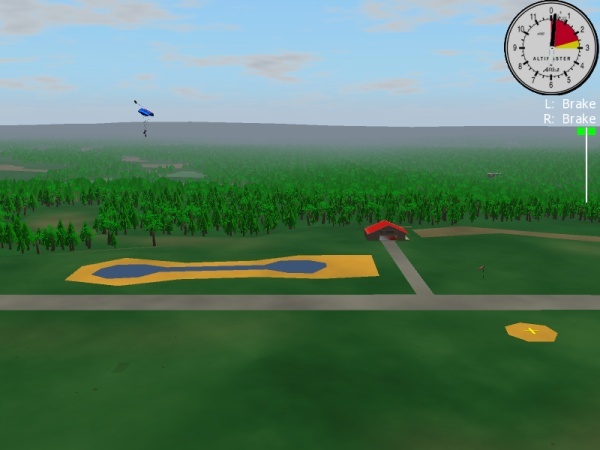 Skydiving requires an action to survive. Freeze, fight or flight are natural reactions to stress but they do not work for skydivers. There is very little time to think about what to do next when the ground is approaching fast. Hence, our response must be quick. We can separate a human reaction into three process: perception, assessment, and execution. These processes happen consecutively. The faster we complete them, the quicker our response is to the changing environment. Let's examine how education and training affects these processes. Perception is the process during which we become aware of information: we look at the altimeter to know the altitude, we look around to see if no other canopies are moving to collide with us, etc. Education and past experiences play a major role in a person's perception. We are not necessarily aware of what we look at. Education trains us to look for the right information in the right places. For example, if we do not look around after our canopy opens to see where the drop zone is, we will not turn to fly toward it. On the other hand, even if we see where the landing area is, we may not know how to detect if we can reach it. As a result, we may not make a turn to fly toward the landing area in time. Books and instructors tell students where to look and what to see, while videos show us examples. However, once students are in the air, they must make a conscious effort to look in the correct direction and focus on the right information: "It's landing time. The ground is moving very quickly. It should not move so quickly. Ohh... I must look at the horizon, I must not look directly underneath." The goal is to make proper perception a habit, because conscious effort is slow. Habits develop with practice, and practice takes time. A student has not yet developed habits and may forget to think about what to pay attention to, but help comes from the instructor over the radio: "Prepare for landing flare. Eyes on the horizon..." One does not develop a habit by taking a class, reading a book or watching a video. Instead, these sources supply knowledge that can be used during practice, which eventually leads to habit. Simulation of a situation, on the other hand, does help to develop a habit, in a safe environment. The emergency procedures that every jumper practices before every jump (you do, right?) is the example of a "simulation". In such "simulation" we create situations and responses ourselves. Another example of a "simulation" is hanging in a harness during a safety day. In this circumstance, an instructor creates an emergency situation for us. Dirt-dive is an example of a non-emergency "simulation". Airplane pilots take the concept of "simulation" further by using flight simulators (http://en.wikipedia.org/wiki/Flight_simulation). The military have used skydiving computer simulators (these are similar to flight simulators) for some time. Nowadays, computer parachute simulation software is available for everyone. The second process in our reaction sequence is assessment - making a decision about what the acquired facts mean. We look at the altimeter and it's 2000 feet. Nothing to be done just yet, or maybe we still have a problem with the canopy, or maybe we see that we are not making it to the landing area, etc. Education has the largest impact on the process of assessment. We are taught what actions are required in different situations. At the very beginning, all we need to do is to pick the right action from the proffered set of actions. Speed of the recall is important. Repetition is key for a quick recall. Taking a class, reading a book, or watching a video are good ways to refresh our memory (safety days help us do exactly that). The disadvantage of these methods is that they cover very limited number of situations and conditions. For example, we are told that to get back from a long spot we can use rear riser input, but that's only true for a certain ratio of your canopy forward speed and the speed of the wind. In some situations, we may have to use front risers or brakes. Now instead of a simple memory retrieval task, we have to do some reasoning. We may have all the knowledge to do the reasoning properly, but it's slow and error prone (time pressure and adrenalin rush do not help rational reasoning). Simulations offer an efficient way to condition memory by repetition. A computer simulation also allows for an infinite amount of situations with different conditions. It's easier to make a decision when we have already seen such a situation before. Execution is the process of acting on the chosen response. Muscle memory allows us to speed up this process. Instructors, books, or videos can not help this process. Muscle memory is developed by repeating an action... but we already know that simulation is good for that! Pulling the cut away and reserve handles while hanging in a training harness or before your reserve is due for a repack are good examples of muscle memory training: we feel how hard we need to pull the handles, what the proper motion of the hands are, etc. Computer simulation can help as well, but it is most effective with a special hardware, which is not yet available at a reasonable price. We have covered three processes that contribute to our reaction: perception, assessment, and execution. We repeat them over and over again. Every time we do something, a new set of conditions manifests itself. There is a dynamic and complex relationship between the situation and our responses to it. Instructors, books, and videos can only mention a very small set of examples. Traditional simulation methods (use of the imaginations or/and an instructor) are also quite limited. A computer simulation, however, provides real time feedback for all possible actions that we can exercise in the simulation. We can judge the correctness of our actions based on what happens next. Simulation has always been an essential part of skydiving education and training. Computer simulation takes this concept further and allows for even better results. We have seen how it can help us when other means of education and training are less efficient or can not help at all. One may ask: "How good must a "computer simulation" be to be used for training?". A similar question would be "How good must a picture be in a text book?" The answer is "As long as it (simulation or picture) reasonably illustrates the required concepts." No educational tool can or should be used by itself. The purpose of the tools is to make a student think, ask the right questions, and develop the correct responses. Given our limited attention span, it's always a compromise between focus on safety and focus on other things, especially for novice jumpers. The faster we get our habits and muscle memory developed, the safer our jumps become. This is why it's important to understand what tools are available to us, and what their limitations, advantages, and disadvantages are. In his book "The Parachute and its Pilot" Brian Germain phrased it this way "When we can acquire the right information, and access this data at the right time, we have a pretty good chance of walking away from sketchy situations." Our goal is "to acquire the right information." We can do this most efficiently when we understand what educational and training tools we have in our disposal: classes, book, videos, simulations, etc. The newest tool in the skydiver's toolbox is computer simulation software. This software greatly complements the other means of education and training. Which, in turn, will result in a safer and more enjoyable sport. Author Information: Alexander Shyrokov is the founder of Static Line Interactive, Inc.
 -
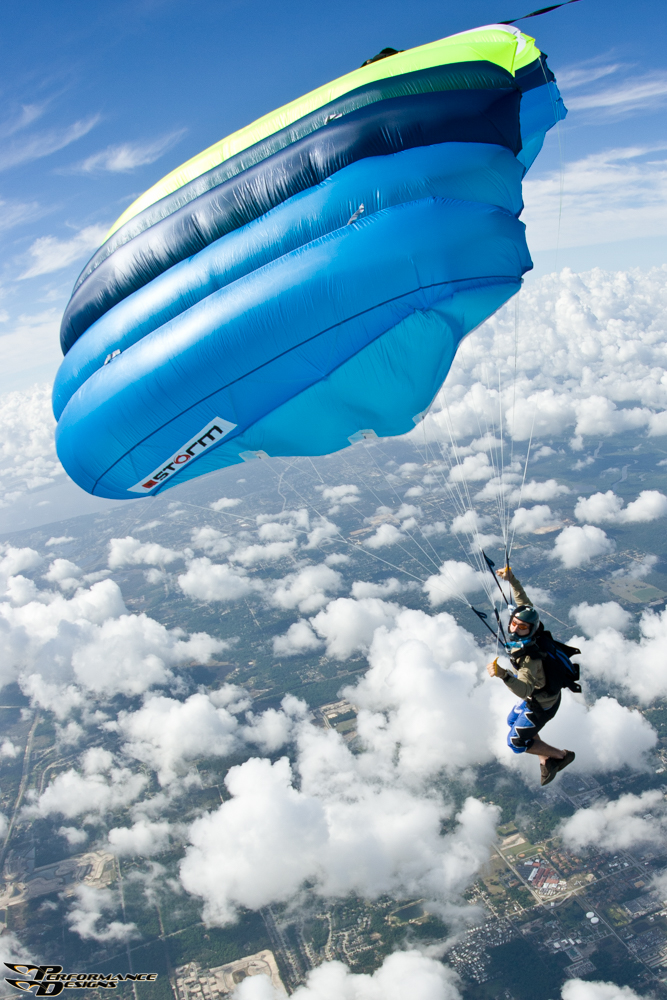 With great openings and a powerful flare, the Storm is truly a 7-cell that thinks it's a 9-cell. While in some ways similar to the Spectre, the Storm has a shorter snivel, a steeper and faster glide, wider speed range, and more dynamic flare. Looking for a reliable canopy that will keep you challenged? Have you been searching for the perfect wingsuit canopy? Considering some occasional CF, but not ready to buy a second canopy? The Storm is a great option for you.
 -
"Turn coordination" is a topic that, until recently, has been mostly unapplied to ram-air parachute aerodynamics. In simplest terms, this refers to the degree to which a flight vehicle is aligned to the relative wind during a turn. Another way to look at this is the degree to which a turning aircraft is pointed at the relative wind with regards to the yaw axis. A "clean turn", from an aerodynamic perspective, is one that keeps the nose of the aircraft pointed at the relative wind throughout the turn. When flying airplanes, this prevents the passengers from spilling their drinks, as well as saving fuel and preserving airspeed. In parachutes however, this aspect of turning has mostly been ignored. As parachutes become faster and faster, the time has come to begin thinking about this aspect of our canopy flight for several very important reasons. The first has to do with the ability of the pilot to level off at any point during the turn. Lets face it, sometimes the ground creeps up on us. Flying an aerodynamically sound turn increases the likelihood that you will be able to convert your airspeed into lift in a timely manner. If you are sliding sideways through the sky because you are simply jamming a toggle down, you are not prepared to interface with the planet. The relative wind is jumping across the bumps on your parachute, creating turbulent flow, while the suspension line load is getting shifted to one side of your canopy. When you attempt to stab out of an uncoordinated turn, there is a hesitation before the parachute begins to change direction and level off. If the ground gets to you before this happens you may find yourself watching Oprah in your hospital bed for a while (not that I have anything against Oprah). The second reason for flying a coordinated turn has to do with overall parachute stability. In an uncoordinated turn, the nose of your parachute is not pointed at the oncoming relative wind. It is sliding sideways. This means that the pressure in your wing is being compromised, in addition to the wingtip on the outside of the turn being presented to the relative wind. If you hit turbulence during this kind of "sloppy" turn, you are much more likely to experience a collapse of this side of the parachute. In other words, if you are turning right, your left wing more likely to fold under. Interestingly, when an aggressive, uncoordinated toggle turn is released, the opposite tends to happen. When the right toggle is released, the right wing surges forward as the drag is released and it is presented to the relative wind, opening the door for a collapse on right side of the parachute. Either way, this can result in way too much daytime TV. A fundamental problem...There is a fundamental problem with the way in which most of us were taught how to turn our parachutes. They said: "if you want to turn right, pull down the right toggle." Simply pulling on a toggle increases the drag on the right side of the parachute, retreating that wing tip. At the beginning of the turn, it is purely "yaw" energy. It is like the pilot of an airplane stepping on the rudder pedal. As a discrete action, steering toggles are an incomplete input. We need some "roll" energy. The harness is more than a way to attach the jumper to the parachute. It is also a way to manipulate the canopy itself. If the right leg reaches for the earth as the left hip reaches for the sky, the parachute will turn to the right. It is true that smaller parachutes will respond quicker to such inputs than larger ones, with elliptical canopies responding the quickest, but harness input will have an affect all parachutes. Most importantly, when used at the initiation of a turn, harness steering converts a toggle turn into a coordinated maneuver. This is true if you are under a Lotus 190 or a Samurai 95. When flying an airplane, all turns begin by initiating roll energy with the ailerons, (rotating the yolk), followed by an application of the rudder to coordinate the turn. The old airplanes had a string on the cowling (hood) to show the direction of the wind-flow, while newer ones have slip indicators on the instrument panel. If only we had such information while we were flying our canopies. Ah, but we do… Trailing behind your wing is all the yaw axis coordination data you will ever need. It is called your pilot-chute. If you are flying a coordinated turn, your bridle will remain parallel to the ribs of your canopy throughout the turn. If at any point it goes slack, whips around like a snake or drifts off to one side, you are not flying a clean turn. You are not carving your wing through the sky; you are skidding out of control. The relative wind is not following the valleys of your ribs; it is hopping over the bumps, tumbling into chaos. Try this on your next jump. Look up at your canopy while you are flying straight and simply yank a steering toggle down to the ½ brake position. You will immediately see what I am talking about as your pilot-chute swings off to one side. Next, lean in your harness, lifting one leg-strap to yield direct roll axis input. It may turn and it may not, depending on the wing. This is not important. Then, while holding the harness input, pull the steering toggle to turn toward the direction of your harness input. You will notice that the pilot-chute is trailing straight back, even in a sharp turn. Once you have experienced your first real coordinated parachute turn, it is time to develop new habits. This takes time. I find that when learning a new skill like this, it is best to have a simple way to remember the process. In this case, try using the following sequence for every turn you make: 1) LOOK, 2) LEAN and 3) TURN. This is mnemonic was taught to me by a great paragliding instructor and skydiver, J.C. Brown. Rather than thoughtlessly jamming a toggle down, look where you are about to go, lean in the harness to establish the roll, and finally, pull the toggle down to flow deeper into the maneuver. When you play with this kind of turn, you will find that the parachute simply feels better; that you feel more in control over the wing. You will also find that you can better bump both brakes down during the turn in order to reduce your decent rate, or even level off completely. While practice is necessary to perfect the technique, all parachute have the ability to transition from a descending turn into a level flight turn, into a soft beautiful landing. If you know how to carve your way out of a low turn, there will never be a reason to hook into the ground, ever. Although many skydivers still think of their parachute simply as a means to get back down to the ground after a skydive, learning how to use the system the way it was meant to be used will increase the chances that you will get back down to the ground safely. Gravity pulls equally on those who love canopy flight as those who abhor it. From twenty years of teaching parachute flight I have learned this: you can only become great at something that you love. The more you understand, the more you will explore. The more you explore, the more you will feel control. The more in control you feel, the more you will love it. And that, ladies and gentlemen, is what it is all about. BSG Brian Germain is a parachute designer, test pilot, advanced canopy flight instructor and author. Brian's book The Parachute and its Pilot has become the worldwide source for canopy flight information and is available at a gear store near you, or through Brian's website: www.BigAirSportZ.com
-
 Newarc AS announces the following changes to Aerodyne Research effective 12 May, 2008. Bill Legard has been appointed President and CEO of Aerodyne Research, manufacturer of the Icon container system, Smart reserve, and an array of cutting edge main canopies. Mr Legard has extensive management experience in Fortune 500 companies, leading business units with sales from $20 to $250 million. He holds a BA in Economics, and an MBA in Finance, both from the College of William and Mary in Virginia. Bill has also been an active skydiver and competitor for many years, with regional and national medals and several world records in freefall relative work. Under Mr Legard's leadership, the Aerodyne group will continue to bring innovative products and services to forefront of the parachute industry. Aerodyne is committed to continue to grow its business globally. Mr. Edward Anderson, who had served as President and CEO, has announced his resignation. He will be working with Mr Legard to assure a smooth transition of leadership and to ensure that our customers, distributors, and suppliers continue to receive quality support and service. Ole Petter Hjelle, Chairman of Newarc AS. (Dr. Hjelle is chairman of the Norwegian holding company that owns Aerodyne Research, and captain of the Norwegian 4-way team Arcteryx.)
 -
Powerful, small, and flexible, the new NeoXS from Parasport is the newest product in audible altimeters available to skydivers. If you’re a freeflyer, wingsuiter, speedskydiver, or a relative work skydiver, you’ve probably already recognized the need and value of a trustworthy audible. Slightly smaller than other audible devices, it is also slightly thicker. The casing is a combination of heavy-duty cast aluminum and plastic. The NeoXS fits inside of any skydiving helmet set up for an internal audible, and with a little work can be made to fit on the outside of any helmet set up for external mounting. Although there is no cradle currently available for the NeoXS, it should be easy to mount on goggles if jumping without a fraphat or helmet. The Right Stuff-Heavy and tough, this is one tool you won’t have to worry about dropping on the floor. The test unit sent to me survived several drops from an 8’ height onto carpet, linoleum, and concrete without missing a beat. The aluminum case is available in multiple colors, making it easy to spot in a gear box or bag, or on the ground at the DZ. It also makes it easy to engrave your name and license number for quick identification and loss prevention. With three alarms for freefall and three alarms for swooping modes, the NeoXS may be set up for any skydiving discipline. Alarms may be set to various volume levels, and you’ll want to be exceptionally careful with the highest levels of volume. This small package is LOUD when set to the high-volume setting. On one jump, I used standard foam earplugs to see if I could hear the device at full volume, and the cutting pitch and squeals easily penetrated the foam ear plugs. This can be of significant benefit to hard-of-hearing skydivers or for those that like to wear earplugs in the aircraft, and would prefer to leave them in during freefall. The NeoXS is slightly smaller than most audibles, but not significantly so. It'll fit the audible pocket in any skydiving helmet. Skydivers that enjoy multiple disciplines will appreciate the various profile modes the NeoXS offers. Going from a tandem to an AFF to a wingsuit jump? No problem. This unit stores up to four profiles, allowing very rapid switching from one profile to another. Simply push the joystick three times to enter "edit" mode, move the joystick to the left to change the profile, and put the NeoXS back in the audible pocket. The audible always resets automatically but can be manually reset. Another benefit is the always-locked modes of the unit, making it impossible to accidentally change profiles when the unit is left in a gear bag. The unit may easily be reset for new MSL altitudes, simply by entering the configuration mode and using the joystick, reset the zero point of the device. What You'll Love (in a nutshell) 3 freefall signals 3 canopy warnings countdown timer real time altitude display while climbing to altitude simplified programming of warning altitudes 4 user programmable profiles Can be set EXTREMELY LOUD (user selectable volume) May be programmed during climb to altitude It's heavy (durable aluminum). It won't crush in your gearbag The Not-So-Right Stuff-The owners manual could use some improvement. It’s not immediately clear how to program the profiles, or which profile is being used. Actually programming the unit makes the profile modes perfectly clear, however. The same may be said for swoop modes. Better diagramming might alleviate this small concern, or perhaps some on-line help. Once the programming dialog is accessed, the procedures for setting altitudes become readily self-evident. The only major concern with the unit is that the small joystick sits slightly higher than the recessed area in which the joystick is mounted. The recessed area makes it obvious that the manufacturer wanted to prevent the joystick from being accidentally knocked about, but the joystick does slightly protrude above the recess. The joystick is marginally elevated. Initially, this suggested a problem, but in working with the unit in real-world situations, it is not an issue due to the unit always being locked. Three button pushes are required just to unlock the unit, and then the joystick is used to enter programming modes. The unit also offers no backlight, making it difficult to set up for night jumps or in those wee hours of the morning. The LCD is clear and textually driven, however. What You Might Not Love Owners manual is weakly written Joystick button is slightly higher than body/recessed space No backlight for night-time programming It's heavy, weighs nearly double compared to other audibles (I personally like the heavier weight.) General Comments:Although the owners manual could use some improvement, the only real challenge encountered was figuring out how to unlock the unit. (This is achieved by repeatedly pressing the joystick until the lock icon first flashes and then turns off.) A quick glance at the owners manual was required to determine how to unlock the unit after a few minutes of trying to do it by instinct. Once I’d unlocked the unit, I put the manual down to see if I could self-start the programming procedure based. I could, and it was very instinctive once I’d reached the unlocked stage. The four main menu options are Profile, Swoop, Alarm, and Configure. Programming for Meters or Feet display is offered in the Profiles menu, with three altitudes available. Additionally, unique volumes may be programmed for swoop alarms vs freefall alarms. Alarm altitudes cannot be programmed lower than a subsequent altitude, thus preventing accidental programming errors. The NeoXS is easily opened with a normal screwdriver. No special tools or jewelers-sized screwdrivers are required. The unit does not need to be opened to change batteries (you can see the battery door in the housing), I simply like disassembling things to see what they're made of. The reason for the weight is obvious; this is not thin, easily crushed aluminum. *(Opening the NeoXS will void your warranty, do not try this at home, kids!) The alarms are varied, allowing for each alarm to play a distinct tone and pattern, thus eliminating confusion about what alarm is for what altitude. As a side note, I wouldn't mind seeing a manufacturer develop personally-created alarms such as one recorded by a user. Wouldn't it be cool to hear your own voice at the third warning saying "Hey buddy, it's time to pull?" All that would be involved is either a USB connection to a computer, or a microphone built into the audible. It would be difficult to output audio frequencies that cut through the noice properly, yet wouldn't a voice be more fun than a screech? But I digress... In evaluating the unit, the joystick could not be accidentally moved in “real-world” scenarios, but in putting it in the helmet and using fingers to move the unit around, I was able to “accidentally” hit and move the joystick but could not affect the programming modes, as the unit is virtually always locked. It is impossible to leave the unit unlocked, as it returns to a locked mode 30 seconds after programming input is ceased. Therefore, it’s impossible to accidentally change the modes by moving the unit around inside a helmet pocket or other location. The unit uses one CR2430 battery and offers a very long life. These batteries are easy to find at most any grocery or large retail store. All in all, I like this little audible. After having used it for a little over a month, I feel pretty good about the quality, durability, design, and how it functions. I’d first seen it when it was announced at Reno PIA 2007 when Paulo from Parasport overheard me complaining about a particular audible I had (A Cool n' Groovy Fridge Company audible) and its lack of adjustable features. When he set the NeoXS to screaming, it had everyone anywhere near covering their ears, it was so loud. The fact that it can be taken down to a nominal level is great for those that still have fully intact hearing. Levels may be checked on the ground, so it's not an exercise in aerial experimentation to determine which volume levels are best for you. At $170.00 USD, the price is right too, and makes it an accessible cost point for most any skydiver. Overall, this is a very tough, well designed and manufactured tool for skydivers and from my perspective, should be part of any consideration in purchasing an audible altimeter. ~douglas
-
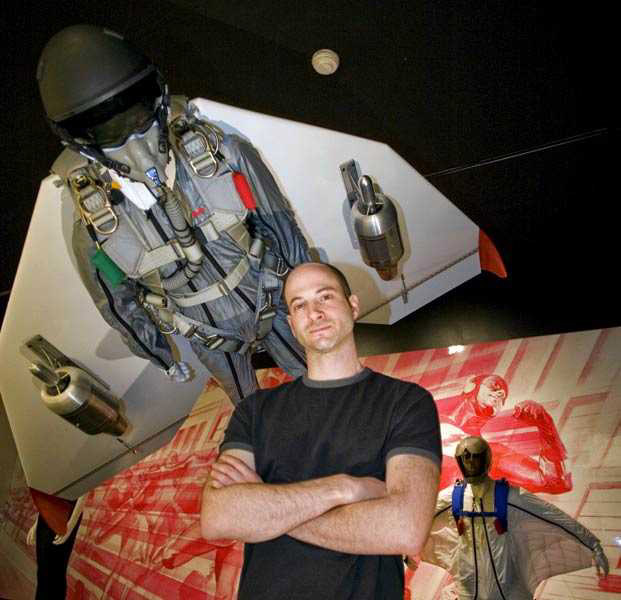 Atair Aerospace (Atair) was chosen by the New York Metropolitan Museum of Art to display two of its real-world innovations alongside high-profile superhero collections from Hollywood and the fashion industry. The Met exhibit includes Atair's EXO-WingTM, the world's smallest human-piloted jet airplane. Brooklyn, N.Y. May 14, 2008 -- Atair Aerospace (Atair) was chosen by the New York Metropolitan Museum of Art to display two of its real-world innovations alongside high-profile superhero collections from Hollywood and the fashion industry. The Met exhibit includes Atair's EXO-Wing™, the world's smallest human-piloted jet airplane. Exoskeletons for increasing human capabilities were once the subject of fictional comic book writers; now it has become real technology to enable human flight. This futuristic aircraft is constructed from advanced aerospace composite materials. The twin micro-turbine-powered EXO-WingTM is so small and lightweight that a human wears it like a backpack. The Met is also displaying Atair's AeroSuitTM, an engineered bat-like flexible wing suit constructed with advanced composite textiles. This high-technology garment allows a skydiver to glide to a target miles away from the drop point. The arms and legs of this garment include inflating webbed panels that form the elements of a wing which dramatically improves the aerodynamics of a skydiver, providing a safe and extraordinary flight experience. Both innovations are made from a new generation of composite textiles pioneered by Atair which are engineered to perform under extreme conditions. "I am a born and bred New Yorker and the Metropolitan Museum is one of the city's greatest assets," said Dan Preston, the CTO and Founder of Atair. "I am honored to be included in this exhibition and I am fascinated at seeing a parallel between fictional superheroes and the real technology we are developing." Although Atair has developed similar advanced products for its military clients, it declined to comment when asked for further details on its government projects. The exhibition at the Metropolitan Museum of Art features approximately 70 ensembles including movie costumes, avant-garde haute couture, and high performance sportswear to reveal how the superhero serves as the ultimate metaphor for the ability to transform the human body. The exhibition will run from May 7 through September 1, 2008. Headquartered in Brooklyn, N.Y., Atair Aerospace (Atair) is a high-technology prime defense contractor dedicated to modernizing military and government logistics by creatively solving complex aerospace and engineering problems that integrate the state-of-the-art in parachute designs, and guidance, navigation and control (GN&C;) systems. Atair's inventive products include the Onyx™ precision-guided parachute system, the Long Endurance Autonomous Powered ParagliderTM (LEAPPTM) UAV, the CircinusTM GPS-Integrated Inertial Measurement Unit (IMU), the Heli-ChuteTM, and 3DZTM Composite Parachute Technology. Atair's pioneering spirit and creative approach to research and development has resulted in contracts with the U.S. Army, DARPA, NASA, NRL, NSW, the Government of Israel, and many large defense contractors. For more information, contact Rick Zaccari at or visit the Atair Aerospace website at www.atairaerospace.com. Note: Atair's claim to having the "World's Smallest Human-Piloted Jet" may be questioned by the people at Birdman. Check out our article about the "First jet powered Birdman flight" ~ Ed
 -
 Imagine as a Dropzone Operator waking up at 7:30am on a sunny summer morning to discover that the dropzone has been broken into by thieves in the middle of the night and that all your student equipment is gone! On the morning of June 1st, 2007 Skydive Ireland received a serious blow when all of our student equipment was stolen in the middle of the night by thieves leaving us grounded and unable to take our customers skydiving. All of our Solo Student rigs and all of our Tandem equipment was gone just like that without trace leaving us completely disabled with very little options. I mean let's face it, in our industry the option of taking a trip to the local adventure store to replace your stolen parachute equipment just simply does not exist. Irish winters are really long and here we are having just arrived at the peak season of summer with the sun shining and an empty gear room with no manufacturers nearby and no friendly dropzone to offer assistance in our time of need, it is well and truly at that point you say to yourself…. We're F**ked! This is the type of scenario you wouldn't wish on your worst enemy and this disaster threatened the DZ's very existence since we were a new DZ and only a few months old at the time. We tried to remain composed and think of a clear plan of action to recover from this situation with our first instinct to go on the search for our brand new equipment that was lifted in the wee twilight hours of a summer's morning. The police were dispatched but the real truth of the matter was that the equipment was gone and our worst fear was that this was a specifically targeted job since no other valuable equipment was stolen. Whoever did it knew what they were coming for. There were mixed feeling as we found it difficult to believe another Skydiver could possibly be behind this hit. We figured if it was regular thieves that they would have found more value in expensive wide screen televisions and other similar types of equipment that would sell very easily on the street. With only two skydiving centers in Ireland who were these people planning on selling stolen student parachute equipment to? Having come to terms with the mornings events and dealing with the sinking feeling in the pit of my stomach I knew that we had to figure a solution fast and turned to the Skydiving Industry for support. What I suppose was the standard thing to do I did and that was to call the manufactures of the brand new equipment and surely they would be willing to use their resources to rescue us. The Tandem rigs we had were Paratec Next Tandem since we are based in Europe I figured it best to deal more locally for my Tandem gear. So calls were made to Paratec and the situation explained and the consequences of what would happen to us were easily understood. In naive hope I never thought that there would be an issue of support but I was greatly disappointed beyond words to be told by Paratec that there is no equipment they could dispatch to us to assist their customer and fellow skydivers recover this emergency and that they cannot part with their one and only Tandem Demo rig. I wasn't impressed. A cold chill rand down my back with the shocking realization that we were now isolated from other Tandem Equipment Manufacturers who were now all based several thousand miles away and now in the month of June the parachute manufacturing industry was in peak demand with typical 12-14 week delivery schedules. I hurried to dropzone.com in desperate search of some used Tandem Equipment in the classifieds but there was nothing there that was suitable or easily accessible. The other dilemma of course was that all of my Tandem Instructors were rated under the Vector Tandem program so we didn't exactly have the option of just going with any Tandem rig that was available. I'm sure you can start to appreciate the nightmare situation we were now facing and running out of options. It was time to revert back to the manufacturers and try to plead for their understanding to help them understand how serious this situation had escalated. I mean seriously, does it get much worse than this? I made the best move as a dropzone owner that I have done to date. I picked up the phone and called Strong Enterprises based in Orlando Florida. I was greeted by a very friendly Sales Manager named John Makoski who immediately begin to work a plan to dispatch replacement equipment without delay to get us back in the air. I mean this guy dropped everything he was doing and put Skydive Ireland on his highest priority and he just couldn't believe that something like this happened to us. It was due to his concerned response to our situation and seeing lighting speed response to getting this situation under control that I was finally able to regroup and feel the weight of a thousand elephants lift right off my shoulders. Here was a manufacturer who I had never bought a single piece of equipment from or never benefitted their business in any way begin to treat my small company like I was their biggest client. Within a few hours John had gotten approval from Mr. Ted Strong who everybody knows is the owner of Strong Enterprises and was authorized to immediately dispatch 6 Dual Hawk Tandem Systems from their large inventory of stock and make the arrangements to get them to Ireland without delay. I couldn't believe it! This was incredible and I just couldn't express how grateful I was to be picked up in the hand of this Parachute Manufacturing Giant and begin to feel that everything was going to be alright. Then suddenly I had an anti climax when I realized that none of my Tandem Instructors were certified to use the Dual Hawk Tandem. With this piercing feeling in my brain another whole began to bore deep when I thought to myself that perhaps this company might take advantage of me and demand a higher than normal sale price since I didn't have any other choice and finally I began to wonder how am I going to afford 6 new Tandem Systems in light of our break in and something I haven't mentioned yet was that our stolen equipment was not even insured. This is not good. So now I am wondering how this is going to pan out and that I still have to get 6 Tandem Rigs each weighing about 65 lbs to Ireland as fast as possible and at a price I could afford and then find someone who could just fire up a Dual Hawk Instructors Course to get us rated to use the equipment. This is when Mr. Tom Noonan, Strong's Tandem Course Director was introduced to me and in a friendly and supportive voice over the phone said that he had taken the initiative and booked flights direct to Ireland and will personally deliver the equipment and spend the time here to qualify all of my Instructors on the Dual Hawk Tandem and that they will provide the new equipment to me at a hugely discounted price and that they will allow a few months for me to be able to pay for the vast majority of it all! If any of you reading this has ever experienced an immense rush of extreme and unquantifiable feeling of gratitude, relief followed by a dash of excitement and an overflow of amazement at this level of concern and support it was actually quite hard to digest and realize that these guys were willing to do all of this for me. What an incredible level of customer focused service. This is mind blowing stuff and every Dropzone Operator should be seriously paying attention to this. I can honestly say that this is something I have never heard of another manufacturer do in this type of situation in my 13 years of Skydiving. Lets be honest and say that this was a huge risk for Strong in that what if I went bust because of this situation and was not in a position to repay them for their equipment and I had it in Ireland. But they weren't one bit concerned about this and only cared about getting my little DZ back up and running and the deal Tom made with me was that I would have to buy him a few pints of the black stuff in an authentic Irish pub. That was an easy deal to agree I can tell ya! It wasn't long before I was at Shannon Airport shaking hands with the man who flew through the night across the broad Atlantic loaded with Parachute Equipment for delivery and to provide immediate expert training and certification on the Dual Hawks to get us back in the action. This was now all starting to feel very surreal. With his surname being Noonan and being from Boston it was evident Tom was from Irish descent and had always looked forward to visiting his ancestors home. As we sat in a typical Irish Country style pub with symbols of the old Irish culture and harder times of the past it was about 7:30am it was time to start cashing in on our deal. So I ordered a few pints of the black stuff and Tom, Darren and myself toasted to a new chapter and to recovering Skydive Ireland and feasted on a full Irish Breakfast till we were as fat as cows. Now beginning to show signs of a long night spent travelling and with a fully loaded belly and a nice few pints of Guinness we headed back to my house so Tom could refresh and get some sleep. Darren and I unloaded the car and all our new gear was in black gear bags and it felt really good holding Dual Hawk Tandem Parachute Systems in my arms and feeling like everything is getting back on track. I don't think I will ever be able to explain the feeling accurately enough so I won't even try or I'll end up just babbling. So with Tom now out for the count I was anxious to try on our brand new Dual Hawks so we pulled out two of them and immediately begin to start dissecting the rig to discover it's features and to see how it feels. As a certified parachute rigger for more the n10 years I immediately begin to admire the workmanship of this parachute system and to examine its components which at first glance had me realize this was not just another Tandem System. With features such as the dual loop main canopy closure to prevent a nasty horse-shoe and the anti-line dump line stows. Even the fine detail of the position of the RSL to deal with a possible riser breakage to avoid a premature reserve deployment. I really liked the feature of the Master 400 sqft Reserve canopy which is comforting to know this canopy is thoroughly designed to meet the most demanding Tandem nightmare. One of the really exciting things about it was that they were all equipped with the brand new development from Strong which is the superb all ZP material SET 366 Main Tandem Canopy configured with Single Brake setup. I was not getting really buzzed about flying this new toy. It was obvious that this rig was built for Tandem Skydiving from the ground up and was rugged to last the test if time. We now had a serious set of kit that made our stolen Tandem Systems look like plain old modified sports rigs. I couldn't get over the size of the Drogue and what I immediately liked was the simplicity of the main and reserve deployment sequences. On our other Tandem Systems there seemed to be a confusing amount of handles which offered a great risk of causing the Instructor confusion in a high stress situation. I had always thought the more handles the better because of more options but then thought that simple is better given the statistics that ALL Tandem Fatalities were due to Instructor error. I was now keen to complete the Strong Tandem Instructor Candidate Course which for us would be the cross over from another Tandem Rating so it meant less jumps to become certified on the Dual Hawk then if we were starting out as new Instructors. Later that day when Tom arose from the dead we made a plan to get going the next day with the Course Material and waste no time in getting it completed. Throughout the course I found Tom Noonan to be an excellent Examiner to work with and what was most apparent was that not a single ounce of ego was present in his natural ability to make a person feel comfortable and help us understand the functions of the Dual Hawk and was patient with all of our questions and comparisons and scenarios with the what we had been used to jumping and now getting excited about jumping the Dual Hawk. I was anxious to feel what freefall will be like with the position of the Drogue attachment at the base of the Reserve Tray unlike the Vector 2 style system which gives a really nice position in freefall and makes for an excellent Student freefall position for the Video and Photos. I can honestly say from going as passenger that the Student Harness is the most comfortable out of all the harnesses which makes for some very happy customers. Tom did an excellent job at completing the course qualifying myself and my Instructors. He worked very hard and was very committed to his very high standard of safety and awareness and we all learned a lot of valuable skills and information from him. He is a true professional and loves what he does and I was glad that with his proud Irish heritage he was able to visit Ireland and Skydive at my DZ with beautiful views of lakes and mountains Tom became attached to the place and has since returned again to Ireland to spend time with us doing further training to qualify a Strong Tandem Examiner to make us more self sufficient. Tom has become a great friend and I will always be grateful for what Strong Enterprises did for my dropzone. Without them we were well and truly hammered. I could spend a few paragraphs telling you what I thought about the other manufacturers lack of support in our time of need but it would just simple take aware from the value of this story but what I will advise from our experience is that when choosing your equipment especially when you're living depends on it is imperative you choose a manufacturer who can back you up when the shit hits the fan. I have only good things to say about the Dual Hawk and with almost a year of full time jumping the Dual Hawk and sweet soft opening of the new SET 366 and zero cutaways I can only say you will look long and hard for a Tandem System of this caliber. Once you see past the fluff of the other Tandem systems with other manufacturers competing to be the most inventive it stands to this day that the Dual Hawk is the most proven Tandem system in the world and was designed by a great man who was the true pioneer of Tandem Skydiving, Mr. Ted Strong. Thank you all the Team at Strong Enterprises in Orlando Florida. You saved our bacon and have been a huge source of support and inspiration to my dropzone and you are to be applauded for your concern and the dropzone rescue operation you handles so professionally and I hope one day I can repay you. I am glad to report that some of our stolen parachute equipment surfaced in Eastern Europe in the country of Lituania which we were able to retrieve. The gear had been in use at a Skydiving Center and when I discovered this I made contact with the Dropzone to inform them they were using stolen Parachute Equipment. Investigations are pending to source that carried out this terrible crime and to ensure they do not do it to another dropzone again. Blue Skies, David Byrnes DZO - Skydive Ireland www.skydiveireland.ie
 -
 Skydive Airkix is proud to announce that the UK members of the BIRDMAN Factory Team – Top Gun (www.BirdManTopGun.com), will be permanently based at Skydive Airkix in Peterborough, with immediate affect. In line with Skydive Airkix’s commitment to bringing world renowned coaching and instruction to the UK, Top Gun members, Macca, Duncan, Steve and Dave will be available for first flight courses, coaching and load organising – for beginners, right up to already advanced wingsuit pilots. The team have a fleet of demo suits for instructional use or rental and whether you’re a solo flyer looking to join a flock, or a team looking for some coaching, you’ll find everything you need at our dedicated wingsuit facilities based at Skydive Airkix.Macca from the team comments, “As the team is spread across Europe, we have spent a long time floating around. It’s great to finally have a place to call home, especially one that offers £15 lift tickets and up to 15K of altitude! The team are really looking forward to making Skydive Airkix the number one choice for wingsuiters in the UK and offering skydivers quality wingsuit coaching and instruction” In addition to regular wingsuit activity, Skydive Airkix will also be holding dedicated wingsuit weekends this year, along with instructional evening seminars. The current requirements for wingsuit jumping in the UK are 500 jumps, or 250 in the last 18 months - at CCI’s discretion. There are also certain gear requirements, but if you’re interested in getting your flock on, get in touch to organise your flight: Info@BirdManTopGun.Com
 -
Below are true-size examples of the most commonly used banners on Dropzone.com: Leaderboard (728x90 pixels) Skyscraper (160x600 pixels) Standard Banner (468x60 pixels) Medium Rectangle (300x250 pixels) Half Banner (234x60 pixels)
-
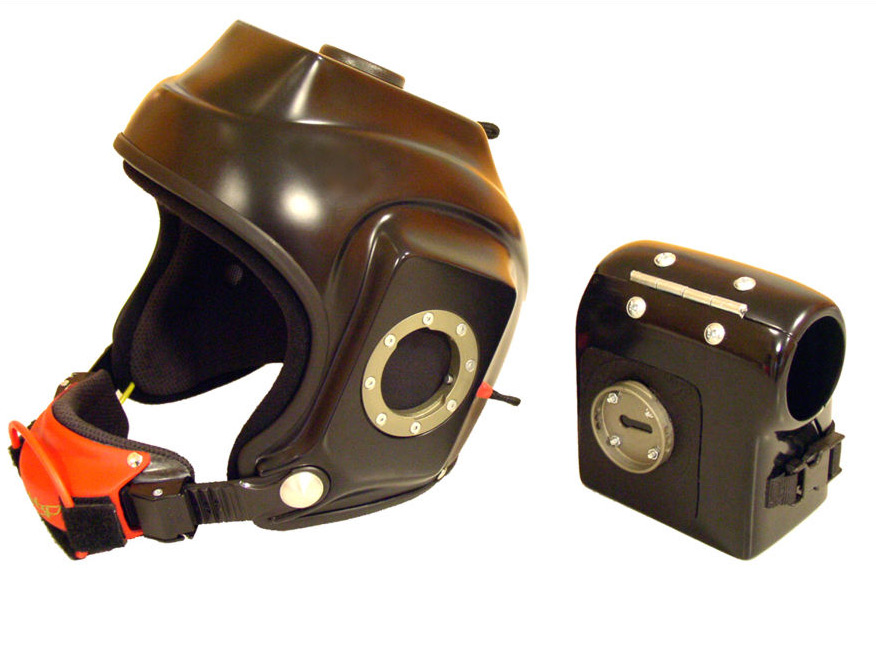 Action sports camera helmets are more than just protective gear that hold a camera, they're tools of the sports trade and action videographer. Just any old helmet can be used to hold a camera, and many videographers do exactly that. For those that are a bit more serious about their action photography, a helmet designed specifically as a camera mount system is needed. Tonfly is the newest player in the camera helmet manufacturing world. Hailing from Slovakia, this small manufacturer may be new, but they've researched the needs of the typical action sports videographer very well and offer a wide lineup of products. The staff at Tonfly are predominantly from Italy, and the design of the helmet is Italian. In this review, we'll look at a Tonfly Converter (CC1), which I purchased specifically for the purpose of wingsuiting. The Tonfly Converter is brilliant in its design, given how the camera mounts to the helmet, and we'll examine those features in a bit. First we'll dig into the very important features like the fit, design, and safety functions. The helmet fits well. It's quite thin, and one of the lightest helmets in its class. It's also very sturdy in spite of the thinness of the helmet. The helmet slips on easily, and is snug all the way around for an average head-type. I have a ponytail, and this helmet doesn't lend itself well to my hair being tied up inside the helmet without the helmet being too tight. People with shorter hair won't have this problem, of course, and Tonfly do offer various sizes. The Tonfly Camera Converter helmet is one of the most innovative designs available to action-POV camera operators today. Light-weight, strong, form-fitting, and comfortable, this helmet offers the most peripheral eye-space of any helmet in its class. Another favored aspect of this helmet that is easily overlooked, is how far back the side of the helmet is cut. The sides of the helmet allow for much greater side-to-side vision than most camera helmets do, and this is particularly an important feature when flying camera for tandems when others may be joining in. Freeflyers will enjoy the wide peripheral view as well. Ski goggles will fit well in this wide-view cut, as the sides of the helmet won't interfere with the larger goggle sizes. Built in pockets can hold audible altimeters for the skydiving videographer. The audible pockets come pre-cut for the typical sized audibles. A small bit of gaffers tape will hold the audible altimeter in place until the foam lining is replaced with the audible device in the pocket. The Tonfly Converter comes with the audible pocket already cut to fit most popular audibles. (Photo) A cutaway system is critical for many action sports, particularly for skydivers. This allows the helmet to be immediately removed/cut free from the body in the event of an accident that involves some sort of entanglement. The Tonfly cutaway system is a bit different than most as it has the cutaway handle facing upwards, which feels very natural and ergonomically placed. Unlike other cutaway systems that use looped nylon to release the latch, the Tonfly system uses a metal button that is drilled out. On initial inspection, this was a concern, but the truth is that the cutaway system works and feels no different from any other cutaway system. The metal containment system may even last longer. The Tonfly cutaway system is unique in placement and method, but works identically to any other cutaway system. (Photo 1, Photo 2) What makes this helmet truly unique is the way in which the camera mounts are inserted. Entirely flush with the helmet, the receiver side of the mount is installed so that if there is no camera mounted, the helmet can be completely flat (Tonfly provides small inserts that stick out approximately .25, but are smooth and pose no snag hazard). With the camera box mounted to the side of the helmet, the camera box is flush to the helmet and poses no snag hazard. I ran a bit of Spectra line over the edge of the helmet and there was no sticking/locking point of the line due to this very tight connection. The mate point for a still camera is identical, however the top of the helmet isn't as wide as a Canon Rebel XTi, so it is possible, although not likely, that a line could snag in the area where the top plate isn't as wide as the camera body. Another aspect of the Converter Camera mount is the ability to rotate the camera box in small degrees to compensate for head position when freeflying, doing tandem camera, or RW work. Each of the base ring (male ring) has a series of small holes drilled to fit a pin in the insert link (female receiver side), that is spring-loaded. The spring is very tight, there should be no worry that the pin will release on its own. Note the spring-loaded pin in the female/helmet side of the connection, and note the three drilled holes in the male insert. These holes allow for user-positioning of the camcorder or still camera mount. (Photo 1 , Photo 2) The pin isn't entirely responsible for holding the base ring. there is a rotational cuff that holds tight when the male ring is inserted in the female receiver plate, and it requires a full 90 degree turn of the male ring to remove the camera box or stills mount from the system, assuring that even in the event of a pin/spring failure, the box or still mount would not separate from the helmet. The pin is released by pulling back on a small nylon loop found at the back of each of the camera mount plates. Tonfly has responded to another potential snag point problem with remarkable simplicity. Many camera helmets have a possible snag point in the ladder/clip attachment at the chincup. This leads some videographers to cut the ladder strap short, which is no big deal, other than it sometimes affects the ease of attachment on some helmets. Tonfly have addressed this challenge by opening up the chincup, allowing for any excess from the ladder strap to be concealed inside the chincup. Any excess from the ladder strap fits neatly inside the chincup. (Photo) The Flaws:The helmet isn't entirely perfect and some changes could be made on the part of Tonfly, or perhaps by users themselves. For example, some of the options Tonfly offers could be more readily identified as "important." For instance, most buyers should want the Carbon Look finish or at the very least, ask for a lacquer coat. From the model I received, it became immediately apparent that the finish will scratch quite easily, and all I was doing was mounting a Schumacher removable ringsight bracket. Drilling a hole for the HypEye Mini cable further demonstrated this. Mounting the Schumacher articulating arm, I realized just how easy it is to scratch the flat finish. (Photo) Another aspect of the helmet that users will want to be mindful of; until the helmet is worn in, a small amount of silicon lubricant will help with the mating of the insert ring to the receiver plate. On my helmet, I found that the pin release loop is a touch small for my large fingers. Using a pencil or pen inserted to the loop helped me get a better grip on it. I'm sure once the spring is more worn in, it won't be quite so difficult. Small challenges aside, the Tonfly helmet is very well designed for skydiving and other action sports, offering a width of view and light weight that is very impressive. With prices ranging from around $500.00 USD to as high as $750.00 with all options, these helmets are investments rather than frivolous purchases. Until the dollar rises again, it'll be a while before they're competitive with helmets manufactured in the USA in terms of cost. Congratulations to Tonfly for a very well designed, well-built helmet. This is one camera helmet model that any POV sports photographer should consider when choosing a helmet mounted camera system. Check out the YouTube stream that shows how the Tonfly Camera Converter works.Built for: Skydivers Ski photographers Kayaking Rock Climbing Chase bicycles Mountain cyclists BASE Jumping Paragliding Ground launching Other hands-free sport photographer Rock on! -douglas spotted eagle For more reviews, video, audio, streaming and surround training visit VASST Tonfy CC1 website Write your own review of a TonFly helmet
 -
Fredericksburg, Va., Jan. 11 -- Things are looking up for the skydiving industry. According to the U.S. Parachute Association (USPA), America's premier skydiving association, 2007 made history as the year skydiving took a dramatic turn upward as one of the most popular adrenaline sports in the nation. USPA reports that 2007 was one of the safest on record with 18 skydiver fatalities -- out of over 2.5 million jumps. That number surpasses a 1962 record for skydiving's fewest accidents. Considering that in the early 1960s, USPA was only about 10% of its current size with 3,353 members and the aggregate number of jumps was considerably less than today's 2 million+ jumps, this record stands out even more as a testament to years of strict safety standards, training policies and programs. "This has been a group effort," said Ed Scott, Executive Director of USPA. "USPA policies have been applied by every skydiver in the nation, as well as coaches, instructors, safety/training advisors, drop zone owners, riggers, pilots, manufacturers and gear distributors. We should all take pride in the strides we have made in skydiving safety the past half century." And the good news doesn't end there. Significantly more people are taking up the sport. USPA membership soared in 2007, with a significant number of new skydivers joining its ranks. USPA ended 2007 with more members (31,264) than the previous year for the first time since 2002. The total number of new members in 2007 was 4,900, reversing a five-year downward trend; it's also the highest number of new members since 2003. The skydiving industry also saw an unprecedented upturn in the number of skydiving licenses issued by USPA; more than at any point in the last four years. USPA's 2007 Skydiving Review with additional stats/demographics will be released in early spring. USPA is dedicated to the promotion of safe skydiving nationwide, establishing strict safety standards, training policies and programs at 200+ affiliated skydiving schools/centers. The Federal Aviation Administration recognizes and supports USPA's successful leadership role in the self- regulation of skydiving. USPA hosts the National Skydiving Championships, the sport''s largest and most exciting annual competition, October 18-25, 2008 (Skydive Arizona). Information: 1-800-371-USPA, http://www.USPA.org. Source: U.S. Parachute Association Discuss it here!
-
Skydive Sibson re-launches as Skydive Airkix for the 2008 season and offers £15 jump tickets for regular jumpers. It’s all change at Skydive Sibson, now known as Skydive Airkix. 2008 promises to be an amazing season at the UK’s oldest and most respected drop zone where over half a million successful skydives have been made since it started as the Peterborough Parachute Centre at Sibson Airfield. Joining the Meacock family, who founded the club in 1971, are two new partners. David Turner has purchased 50% of the centre and will manage the business. Airkix plc becomes a 20% partner, and will introduce new systems and coaching programmes to the drop zone (DZ) utilising skills learned in one of the most successful vertical wind tunnels in the World. There will be cross-benefits for Skydive Airkix jumpers and customers of the Airkix wind tunnel in Milton Keynes. There are also other major changes happening at Skydive Airkix. Following a fire that burned down the clubhouse in 2006, a brand new, purpose-built bar, restaurant and clubroom is planned to be open in time for Easter this year as the new season kicks off. To haul jumpers, Skydive Airkix has a completely overhauled 16 place, fast climbing, turbine-powered, LET 410 that is permanently based at the DZ. The aircraft, which comes with a complete set of spares, is owned by two of the Skydive Airkix partners. Best of all is the new simple pricing scheme for experienced jumpers who can purchase a ‘high’ (max altitude) ticket for just £15, this is considerably cheaper than at other UK drop zones. New coaching programmes will make Skydive Sibson the centre of excellence for freefly as some of the best flyers in the UK work seamlessly between the Airkix wind tunnel and the drop zone. First time students wishing to learn to skydive will also find the Skydive Airkix programme quite unique through a specially designed AFF (Accelerated Free Fall) programme that utilises effective wind tunnel simulation and training. A normal AFF course of 8 jumps currently offers about 6 minutes of freefall time, a Skydive Airkix course will start at a minimum of 16 minutes and the gold programme over 60. The centre will be offering low price tickets in unrestricted airspace up to 15,000ft, allowing jumpers to get more airtime in a shorter period for less money. In a new move to the skydiving industry, Skydive Airkix will be the first DZ to offer jumpers the opportunity to Carbon Offset. By adding a voluntary £2 to each jump ticket, Skydive Airkix will pay into a recognised established offset programme. The new clubhouse complex will feature a restaurant serving meals at all times of the day, a fully stocked bar and comfortable areas for jumpers and visitors. In addition, free Wi-Fi will be available as well as bunkhouse accommodation, camping and shower facilities. For further information visit: www.skydiveairkix.com
-
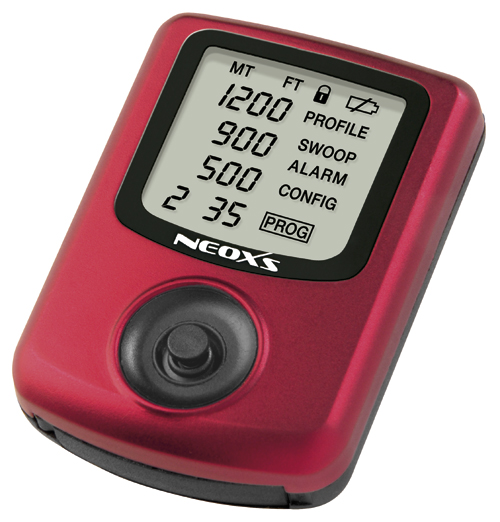 Introduced last February at the 2007 PIA Symposium in Reno, the NeoXs Audible Altimeter is finally available! The new Parasport audible has been designed to be inserted directly in the inner pouch of a helmet without requiring any option. The small size and the reduced thickness of the aluminium case of this instrument allows a perfect fit in almost every helmet, full face or open face. The wide size LCD is protected by a polycarbonate screen thick enough to avoid damages to the display. The NeoXs offers up to 7 distinct alarms with different powerful audible signals: 3 alarms for freefall warning altitudes 3 alarms for canopy warning altitudes 1 countdown timerThe freefall warnings are set with 100 feet (25 meters) increments. The canopy warnings are set with 10 feet (5 meters) increments. The loud alarms can be adjusted to be clear in any condition. Freefall alarms and canopy alarms have different volume settings too. The NeoXs is easily programmable on the ground or while climbing to altitude. Even easier to switch among the 4 customizable preset user profiles, storing warning altitudes for different uses (formation skydiving, freefly, tandem, AFF, and so on). By using its intuitive user interface and the ergonomic Navigation Switch you can easily control all the functions of the NeoXs. The NeoXs is currently available in 3 different colors: Lava Red, Aluminium Grey, and Night Black. For any further information or documentation do not hesitate to contact us. Features Microprocessor based audible altimeter Wide size LCD Intuitive user interface Ergonomic Navigation Switch Aluminium case Real time altitude indicator Up to three separate freefall altitude warnings Freefall warning altitude set with 100 feet (25 meters) increments Freefall altitude warnings go off only at freefall speed Up to three separate low speed altitude warnings Low speed altitude warning set with 10 feet (5 meters) increments Powerful audible signals, distinct and easily recognizable Countdown timer Up to 4 customizable user profiles Self-calibration (manual reset allowed) self-test, no power-on, ultra-low consumption Easily programmable on the ground or while climbing to altitude Batteries: 1 x CR2450 Size 39 x 55 x 12 mm Available in Lava Red, Aluminium Grey, Night Black
 -
 The ICARUS NEOS is the finest high performance canopy in the market today. Its innovative aerodynamic and structural design characteristics, the new ARC1 Bracing (Advanced Rib Construction), the innovative SICS1 (Synchronized Inflow Control System) and the ERAS (Enhanced Ram Air Stabilizers) mark a new era in ram air canopy design technology. Recommended Wing Loading: 1.8 to 2.4 PSF Available in standard sizes only.
 -
 So, Saturday was my day to celebrate 68 years on the planet by checking off a very much delayed personal experience on my list: a tandem free-fall skydive! It began with checking www.skydivenm.net to view a number of their tandem jump videos. They looked like what I expected so I picked up the phone and scheduled a date some three weeks in the future. This Saturday, "jump morning" began with a short drive from Albuquerque to Sky Dive New Mexico's hangar at Belen's Alexander Airport up on the East mesa. Shortly after I arrive, I am in a 45 minute, very professional and meticulous ground training by Tandem Master, Rich Greenwood. This is followed by a period of waiting until it is my turn to go up. I pass this time very pleasurably watching others go through their suit-up and check-out, their pre-jump practice, get into the plane, go up, float down, and then watching over their shoulder as they review the videos of their jumps and receive their "First Jump" certificates. All the while, there is a group of six to eight individuals in the hangar meticulously repacking parachutes for next jumps. I'm beginning to get that meticulous is a good thing in skydiving. Then…it's my turn! Kelly Wilson, my Tandem Master jump partner, hand picks a professional jumpsuit for me to put on. Kelly has been doing tandem jumps for a bunch of years and the folks he's taken up before me today have all been giggling and beaming afterward and saying it's totally awesome and that I'll do just fine and love it. Kelly meticulously straps me into my jump harness, which is like a full parachute harness except for two important features: four really heavy-duty clips on the back…and …no parachute. Kelly wears the parachute. And just before we exit the plane, he will attach me super snuggly to his front with those four clips and tighten everything with final web strap adjustments. Kelly puts me through three complete practice cycles of exit, free-fall, rip-cord pull, and landing firmly reinforcing Rich's earlier training. Then Kelly, Ron, Jason and I all head for the awaiting Cessna. Ron Weagly is our videographer (I want a DVD record to remind myself and prove to my kids and grandkids I really did jump out of a perfectly good airplane), and Jason Korrel is our commercially rated pilot. Kelly and I do an exaggerated John Wayne walk for Ron's video. John Wayne walk - remember I'm old enough to have seen the movies. We tuck ourselves into the cockpit and Don starts and revs the engine and we begin our rollout to the runway. After a somewhat noisy, twenty-minute, breathtakingly beautiful climb over the spectacular East mesa with the Rio Puerco River reflecting in the sunlight, we are 11,000 feet above the Belen Airport and the skydive landing zone. It's time for me to put on my goggles and jump headgear. Then in the not-any-too-big-for-four cockpit, I get on my knees facing forward so Kelly can hook me up and check everything out (meticulously). Next, Ron pops open the over-size right door letting a wave of really cool thin air to blast in. Ron steps out and hangs on to the wing strut with one hand and starts videoing Kelly and me as we begin "exiting the plane." I grasp a strap inside the open cabin door and slide my right foot from under my butt out into the wind and onto the large metal step. I follow that carefully with my left foot. A brief glance at the ground. A smile to the camera. Kelly reminds me to hook my thumbs under my harness shoulder straps and then says, "One. Two. ARCH!!!" and we "exit the plane" into a clear, cool, bright-blue New Mexico sky. I pull my head back and my feet up into as much arch as I can as Kelly deploys the drogue chute which will help stabilize and ever so slightly prolong our free-fall. Tap-tap on my shoulder and I unhook my thumbs and extend my arms and hands out in the free-fall "flying" position and check the altimeter strapped on my left wrist. Free falling from 11,000 feet down to 6,000 feet is totally unlike anything I have ever imagined or experienced! It is almost indescribable. Afterwards I will remember it as like flying without a plane, just body-wise, like in a really great flying dream. Kelly gently rotates our position to face into the sun. Ron floats down right in front of us and gives me a thumbs up which I return with a wave and as much of a smile as I can muster into 120 MPH free-fall wind in my face. Earlier, I've seen the other videos and I want to be sure to smile and wave into Ron's camera so the kids will think that Dad's cool. Heck … so Dad will think that Dad is cool! Too soon, it seems, the helmet beeper goes off in my right ear signaling we are falling through 6,000 feet. Kelly gives me a reminder tap on the shoulder and I reach down for the orange plastic ripcord handle on my right hip. Got it! Quick easy pull! Onethousandone, onethousandtwo, onethousandthree, and the canopy deploys with surprising gentleness --and everything goes mystically silent. I can stop looking into the camera and look around and see the entire Middle Rio Grand Valley and East mesa dangling beneath my feet. There just really aren't enough exclamation points to do this view and experience justice. The silence of hot air ballooning might come close, but we are 5,000 feet up, ever-so-gently falling, there is no burner noise, and we can steer! Ron, the videographer, has continued his free-fall so he can beat us down and set up to video our landing. Kelly asks how I'm doing. I say I'm doing great, but I don't tell him I'm darned near crying because of the sheer beauty, the silence, the majesty of it all. He pulls down on the left riser and we pirouette counterclockwise - then the right riser into a clockwise pirouette - pure magic and beauty. I see Ron's canopy way below us now, lining up his landing. The e. e. Cummings poetry quote, "The world is mud-luscious and puddle-wonderful," comes to mind. I look at my wrist altimeter and we are at 2,000 feet. At 1,500 feet Kelly says the folks on the ground in the landing zone can hear me if I holler loud - so I begin hollering and waving for the next couple of minutes just because it feels so good. Then we are at 800 feet and Kelly is heading us up into the wind, I pull my feet up for a butt-slide landing and the next thing I know -- I find myself comfortably seated on the ground in the landing zone -- Kelly has released the clips -- Ron is holding out his a hand to help me stand up, all the while videoing my very wide grin and asking me, "So, how was that for you?" It was great, stupendous, indescribable. Again, not enough exclamation points! He records some more banter and a high five exchange with Kelly, and we get into the Skydive New Mexico van for the 3-minute ride back to the hanger. Ron provides a quick preview of my video, and, hey! I look pretty good! (A little secret: smiling broadly, sticking your tongue out and waving at the camera in free fall looks way more cool than you can imagine.) Kelly and Rich and a couple of other skydivers congratulate me and then Kelly is handing me my very own personalized "Tandem First Jump Certificate." Then it seems like it's all over too soon. We walk back to our car for the short drive back to Albuquerque and dinner and home. A wonderful mirage-like memory and vision of what I've just experienced keeps playing over and over in my head: Ron pops the door open, I look down on the mesa and the Rio Grande Valley, Kelly leans me out into our free-fall, we stabilize, Ron floats in front of us with his camera, I pull the rip-cord, we float ever-so-serenely down to a gentle butt-plop landing and I feel myself grinning like a goose (geese do grin, don't they?). For days later I notice I can still easily replay these wonderful scenes in my mind and, I am still grinning like a goose. And that's how I did my first free-fall skydive. Life is good! Some day if you want to discover what your goose grin feels like, you can begin by going to www.skydivenm.net, checking out the neat tandem videos, and hooking up with Rich and Kelly at the Belen Airport … and you'll do just fine and love it! Post script: The mailman just delivered Ron Weagly's DVD of my jump and I slapped it into my PC for viewing as quickly as I could. All I can say is (1) he made me look sooooo very good, and (2) I'm thinking about going again. Copyright Tom Miles, 2007 Albuquerque, NM
 -
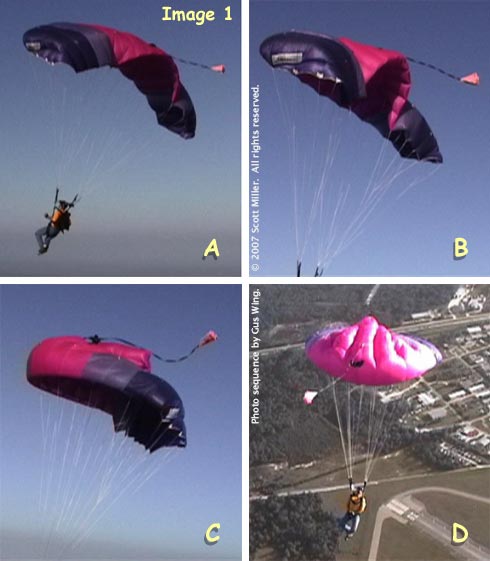 The advice Brian Germain provides in his article titled "Surviving the No Wind Landing" might help you achieve consistent, comfortable landings on days when the winds are calm. Unfortunately, other jumpers might not be as successful when trying to follow that same advice. Some of the techniques described in "Surviving the No Wind Landing" are slightly advanced, and jumpers who are just trying to perfect basic flaring skills might find those techniques difficult to use. Other information in that article might be helpful to people flying certain specific sizes and types of canopies, but we might discover that this information does not actually apply to a significant number of canopies in common use. The first piece of advice Brian offers is to "make sure you level off within touching distance from the ground." This can certainly lead to softer landings, particularly in calm winds. There is only one problem: if many jumpers fear no-wind landings, there are probably even more who are afraid of flaring too high. For some people the game is over at the instant they realize they have made that mistake: they expect the worst, stop flying, and start panicking. In an effort to always level off within touching distance from the ground some jumpers develop a habit of consistently flaring too low. Another common problem occurs when people reach for the ground with their feet, believing they are within touching distance when they are actually a few feet high. People who suffer from these habits are often pleasantly surprised, and see a remarkable improvement in their landings, when they learn that it is not actually necessary to level off with your feet right at ground level. Many modern canopies are actually very forgiving of a high flare. Understanding the StallA very common concern is that a canopy will stall if it is flared too high. Brian reinforces this concern when he mentions the importance of arriving at the ground "before the stall breaks." To understand why flaring slightly high is not necessarily a problem we need to take a closer look at the concept of a stall. "Stall" has a very specific meaning in aviation. It is a significant decrease in lift caused by a separation of airflow that occurs when a wing reaches its critical angle of attack. Understand? No? Okay, then imagine a car driving down the highway, heading toward a curve in the road. Most highways have gentle curves, for good reason, because cars tend to fly off the road if a curve is too sharp. Now think about the relative wind blowing in your face under canopy. Your canopy bends that relative wind to create lift. Pulling down on both toggles pulls the tail of the canopy down and bends the relative wind even more, creating even more lift. The further you pull the toggles down the more lift is created, up to a certain point. The "critical angle of attack" is the point where the curve becomes too sharp and the relative wind separates from the canopy like a car flying off of the road. This separation results in a sudden and dramatic loss of lift. The term "stall" refers specifically to the sudden loss of lift that occurs in this particular situation. Image 1 shows a canopy being intentionally stalled. In frame "A" the brave and handsome test jumper is putting the canopy into brakes, pulling the tail down and increasing the curve that the relative wind must follow. In frame "B" we see the canopy in very deep brakes, but not yet in a stall. The canopy is curving the relative wind sharply and creating a lot of lift. In this flight mode it is flying slowly through the air with a very low rate of descent. In frame "C" the canopy has reached the critical angle of attack. The lift is rapidly decreasing as the canopy begins to stall. In frame "D" the canopy has entered a full stall. When flaring it is obviously important to have your feet on the ground before your canopy stalls. But let's think about a student canopy. Student canopies are traditionally not supposed to stall when the toggles are held all the way down in a full flare. They are either specifically designed that way or are rigged with extra slack in the brake lines. What about a slightly smaller canopy, such as one that might be used by a novice or intermediate jumper? If the brake lines are set to the correct length specified by the manufacturer, many canopies in this category also will not stall when the toggles are held all the way down in a full flare. They will simply maintain a slow forward speed and low rate of descent, just like frame "B" in image 1. Even if they do stall it might not occur until the toggles have been held all the way down for a number of seconds: sometimes five or six seconds, maybe even more. Jumpers who fly these types of canopies don't really need to be too concerned about an accidental stall. You may be surprised to learn that some small, "high-performance elliptical" canopies also will not stall with the toggles held all the way down, or at least not until they've been held there for a few seconds. Whether or not a particular canopy will stall when it is held in a full flare depends on several factors, including the model and size of the canopy, the length of the brake lines, the length of the risers, and length of the jumper's arms. When held in a full flare a significant number of canopies will simply maintain a relatively low airspeed and rate of descent, at least for several seconds. This knowledge can be very helpful when we talk about flaring high. Look at image 2. In frame "A" we see a jumper reaching level flight with his toes about six feet above the ground. Tragedy? Not really. There are only three things he needs to do: 1) wait wait wait; 2) keep it straight; and 3) FINISH! "Wait" means stop pulling the toggles down as soon as you realize you've started flaring too high. Save the rest of the flare for later. "Keep it straight" is important, too. You want to look at a point on the ground out in front of you and keep the canopy flying straight toward that point, just like driving your car down a straight road. And when the canopy starts to drop you back toward the ground, just before your feet touch down, push the toggles down and FINISH your flare, as we see in frame "B." In most cases doing this will result in a reasonably soft, stand-up landing as we see from the last two frames. Even if you don't land softly, look at frames "B" and "C" again. What body position are you in when you finish your flare properly? Looks like you're ready for a PLF, doesn't it? Granted, you will achieve softer landings on calm-wind days if you level off right above the ground, but that is a skill that needs to be developed through practice. An important step in that process is learning to relax and stay focused if you do flare high. This will allow you to keep flying the canopy and finish the flare properly, which will improve your landings in all conditions. Practice at AltitudeWe can see the importance of knowing whether or not your canopy will stall when held in a full flare. How can you find this out? Yep, you guessed it. Under canopy, in your holding area, above 2000', after checking thoroughly for other canopies, push those toggles all the way down and see if that baby stalls. If you've never stalled a canopy before you may want to get some advice from an instructor or coach before trying it. So try it. Did your canopy stall? No? Makes flaring seem a bit less intimidating, doesn't it? Or was the canopy easier to stall than you expected? If so, you may want to have it checked out by a rigger. Some canopies are relatively easy to stall, even with the brake lines set to the correct length. If you are jumping one of these canopies then hopefully you've already perfected your landing technique under something more forgiving. If you can't stall your canopy just by holding the toggles down, does that mean you won't be able to get enough stopping power at the end of your flare? Some people believe so, and Brian touches on this point in his article when he stresses the importance of making sure your brake lines are "short enough:" Brake Line Settings "Most manufacturers set the brake lines to allow for a certain amount of slack so that when the front risers are applied with the toggles in the hands, there is no tail input. This, coupled with shorter risers... will prevent you from reaching your parachute's slowest flying speed." In reality, many popular canopies do not come from the factory with this much slack in the brake lines. For example, people who jump a Sabre2 from Performance Designs or a Triathlon from Aerodyne Research might prefer to have the brake lines lengthened a few inches beyond the factory setting if they use their front risers a lot. Even then, they might not lengthen them to the point where there will be no tail input all when the front risers are used. Even canopies specifically designed for swooping won't necessarily have the brake lines set that long. Is there really anything wrong if your canopy does have a bit of extra slack in the brake lines? Usually not. Even with the brake lines "detuned" on a student canopy, we still expect students to learn how to stand up their landings. In fact, many popular canopies used by experienced jumpers will also slow down enough for a comfortable landing even if you cannot reach the canopy's absolute slowest flying speed: plenty of people achieve soft stand-up landings in calm winds under canopies that will not stall when the toggles are held in a full flare. Even jumpers who have intentionally lengthened their brake lines for swooping can still achieve comfortable landings in calm winds. Is there anything wrong with shortening your brake lines? In some cases, yes! Especially if they are shortened so much that they pull the tail down when your toggles are in the full glide position. As an example, look closely at the tail of the canopy in image 3. It seems like the jumper is pulling the toggles down slightly, but a closer inspection reveals that his hands are all the way up. Having a canopy's brake lines set too short like this can significantly reduce the flare power on some canopies and make them noticeably more difficult to land, particularly on calm-wind days. Excessively short brake lines are more common than many people realize and frequently go unnoticed. It is a common mistake for someone to shorten a canopy's brake lines because it appears that the canopy "doesn't have enough flare at the bottom end," when the real problem is that the brake lines are already too short! If you're really convinced that your brake lines are too long there are a few steps you should take before having them shortened. On your next jump, after you've released your brakes, put your toggles all the way up against the guide rings and look up at the tail of your canopy. Don't forget to watch where you're going and look out for other canopies. If your canopy looks like the one in image 3 then forget about having the brake lines shortened. They probably need to be lengthened instead. If your canopy seems difficult to land you can also have a rigger measure the suspension lines and compare them to the manufacturer's specifications. It's possible that your canopy has simply gone out of trim and is due for a reline. Once these steps have been completed then get some of your landings videotaped and see if you are finishing your flare properly. Look at the jumper in image 4, just as he is touching down. Does he need shorter brake lines to get a better flare? No, he needs to push his toggles all the way down and FINISH flaring before he touches down. Most jumpers finish their flares at least slightly better than the jumper in image 4, but not finishing completely is one of the most common flaring problems. Brian makes a very good point about this: "the brake lines can only work if they are pulled." If you are still absolutely convinced that you need shorter brake lines then follow another good piece of advice Brian gives and only shorten them an inch at a time. Make several jumps, preferably in different wind conditions, before shortening them any more. And remember that you can significantly reduce a canopy's flare power by shortening the brake lines too much. There is usually some excess brake line left over when the toggles are tied onto a canopy, and there are front row seats in purgatory for people who cut this excess brake line off. That excess line should be finger-trapped back into the brake line or secured in a similar fashion in case the brake lines need to be lengthened later on. A qualified rigger should know how to do this correctly. What else might affect your landing on a calm-wind day? Brian discusses the importance of keeping the canopy flying straight during the flare, and not allowing it to bank or turn. He emphasizes this by stating that "any tilt in the roll axis will result in a premature stall of the parachute…. due to an effect known as 'load factor.'" Load FactorIf we are going to introduce "load factor" into our discussion then let's do the math. At a bank angle of 30 degrees load factor will increase stall speed by approximately 8%. A bank angle of 45 degrees will increase stall speed by 20%. The exact stall speed of a ram-air canopy will depend on several factors, but let's use 5 mph (8 km/h) as an example. In that case, a 30-degree bank angle while flaring will only increase your stall speed by 0.4 mph (0.64 km/h). To increase stall speed by 1 mph (1.6 km/h) you will need a bank angle of 45 degrees while flaring, which is a pretty sporty maneuver by most people's standards. While load factor might sound important, is a 0.4 mph increase in stall speed a significant consideration when landing your canopy? Probably not. Nonetheless, is it important to keep the canopy flying straight while you flare? Absolutely. Even without a stall occurring, banking or turning while you flare can cause you to touch down at a higher speed. You will probably also land with your body off balance, and fall over sideways. A bank or turn during the flare is most commonly caused by reaching for the ground with one foot. You can usually see yourself doing this on video, and might even feel yourself doing it while it's happening. This problem can easily be avoided if you focus on looking straight ahead, keeping your body straight, and flaring evenly. What should your feet be doing? Do you need one foot below you and one out in front as you prepare to touch down? That probably will happen naturally just as you stand up at the end of your flare without putting any extra effort into making it happen. And putting extra effort into making it happen could cause you to reach for the ground with one foot. If you need to think about anything while you're flaring, think about keeping your feet together as you get into level flight, and continue keeping them together while you fly the canopy in a straight line across the ground as far as possible. If everything is going smoothly then as the canopy sets you down you can just stand up as if you were getting out of a chair. Your feet know what to do. Look at image 5 below. We see a jumper flaring his canopy with his feet and knees together, knees slightly bent. Looks like he's simply maintaining a good PLF position, doesn't it? As he finishes his flare and the canopy sets him down, his feet come apart slightly to accept his weight. Harness Body PositionWhat about leaning forward in the harness? Is "freeing your body from the pitch of the system" a crucial part of flaring? Look at image 5 again. A pitch change does occur when the nose of your canopy tilts up at the beginning of the flare. This pitch change is what puts the canopy into level flight, and the pitch change is actually created by the movement of your body under the canopy. In fact, it can be extremely helpful to view your body as an integral part of the parachute system instead of separating yourself from it. Feeling your body swing in conjunction with the canopy's movement is an important part of doing effective practice flares. If you like to lean forward in the harness and it seems to help your landings, that's fantastic. It feels nice and looks cool. But it's also not a problem if you simply sit still in the harness and let your feet swing out slightly in front of you as you flare. Your body will rock up onto your feet as your feet touch down and accept your weight. You can either "lean forward into the experience," as Brian suggests, or maintain a more laid-back pose if you prefer. Whichever one feels more comfortable is the best one for you. The technique Brian calls the "Seagull Landing," where you dip down below standing height then rise up again at the end of the flare, also feels good and looks cool if you do it correctly. You'll do it correctly if you develop the technique naturally while you practice good basic flaring skills. Putting too much conscious effort into achieving a "Seagull Landing" is similar to the belief that you must level off right at ground level every time: it can result in the same problems and bad habits. Most canopies will slow down just fine if you level off a comfortable distance above the ground and simply maintain level flight through the remainder of the flare. In general, it might help to stop thinking about a "no-wind landing" as being significantly different from a "normal" landing. The basic skills that you use to land in stronger winds will also help you land softly in calm winds. Any bad habits you develop might not hurt your landings too much when there is some wind to slow you down, but those habits are usually still present and affecting your flare to some degree, and can be eliminated by practicing proper techniques. Eliminating those bad habits by keeping things simple, letting yourself relax, and focusing on good basic flaring techniques will go a long way to improving your landings in all conditions. Soon you'll be just as confident landing on calm day as you are on windier ones, and you may even start to prefer calm-wind landings. Experienced skydiving instructors and coaches, like those in any other sport, develop their own opinions, philosophies, and teaching methods. The advice you get from one person may be quite different from what someone else tells you. This can actually be a good thing sometimes, because the advice that helps one person may not be equally helpful to others. The most basic, fundamental principles of aerodynamics can be used to describe the flight of any wing, so some of the things you learn about one canopy will certainly apply to others. However, specific performance characteristics can vary greatly from one aircraft to another: a 210 sq. ft. canopy does not perform exactly the same way as a 107, and a Triathlon does not perform exactly like a Sabre2. A Sabre2 does not perform exactly like a Lotus, and a Lotus does not perform exactly like a Twin Otter. When discussing canopy performance and flying techniques the most important piece of advice I give my students is this: don't passively accept anything anyone says, including anything that I tell you. Think about it, and if it doesn't make sense keep asking questions until it does. More importantly, experiment in the air and see for yourself if it's really true. Also, remember to breathe. Scott Miller References: Direction of Commander, Naval Air Systems Command, United States Navy. Aerodynamics for Naval Aviators. Washington: Naval Air Systems Command, 1960. Revised 1965. Germain, Brian. "Surviving the No Wind Landing." Dropzone.com. Sep 05 2007. (accessed October 13, 2007)
 -
We expect that your clips be skydiving related in some way. We prefer videos of skydiving activities but we understand that the skydiving community take part and share in other activities that form part of the skyidiving world. You are welcome to post your social videos and clips as long as the events were related to skydiving. Feel free to post clips of you and your buddies doing whatever it is you do at the DZ, but refrain from posting clips of the rock concert you went to last night. Those will declined by the video editors. If you have a cool BASE Jumping Video, upload it at BASEjumper.com.
-
If you have a screen grab or image that you'd like to be used as a thumbnail image with your clip you can upload that in the field provided. If not, simply upload the clip and we'll automatically do a screen-grab 30 seconds into your video to use as a thumbnail.
-
You can use the DZ Linking browser to associate your clip with the DZ where it was shot. Videos associated with a DZ will be displayed in the Dropzone Database when users view the detailed listing of that DZ. To activate the browser, click on the [Choose] link. Browse down through the geographical hierarchy by clicking on the [+] next to a category to open and display the sub-categories. Click on the DZ name to complete the selection. Your video will be associated with that DZ once approved.
-
Playlists are a way to organize the videos you like into "albums" or "bookmarks". You can create as many playlists as you like and add either your own or videos by other users to these playlists. Once you've created some playlists you'll also have the option to add a video to a playlist at the time that you're uploading it. This can help manage your uploaded videos, saving you from having to go back and adding them to playlists after they've been approved.
-
To upload a video, log in and go to the Videos section by clicking on "Videos" in the main navigation bar. Click on "Submit Video" in the blue local navigation bar under the main navigation. You'll be presented with the Video Submission form. Use the DZ Linking browser to associate your clip with the appropriate DZ. Videos associated with a DZ will be displayed in the Dropzone Database when users view the deatiled page of that DZ. You will see a area where you can upload your video. Click on the "Browse" button and browse to the clip on your hard drive. Select the clip. Please note that your original clip may not exceed 100MB in size. Complete as much information as possible about the video. Remember to give credit to the videographer. Here are some additional options and flags for you to set: Adult Content (Nudity)While we allow the submission of videos that contain nudity (not porn!) we expect that you flag all clips with adult content as such. This enables sensitive users to disable these via their Adult Content Filter. Please be advised that content with nudity must still be skydiving related. Add to PlaylistIf you have created Playlists for yourself you can assign a video to any of them when uploading it.
-
You can rate any video on a scale of 1 to 5 (1=Low, 5=High). To rate a video, hover yor mouse over the 5 stars at the bottom of the video. The stars will turn ornage. Move your mouse left or right to select the rating you want and click to set your rating. If you have already rated a video your rating will be displayed. You can change your rating at any time bys imply repeating the rating process described above.
-
You can not change or edit and actual video clip. You can however update or change any of the associated fields like - description, videographer, DZ Linking etc. To update the video information browse to your video and click on the "Edit this Video" button below the video. You'll be presented with a screen where you can modify the existing video information fields.
-
To comment on a video click on the "Add a Comment" button below the video. You'll jump to the bottom of the page where there's a field for you to enter your comment. Note: Please do not abuse the comment feature by posting profane or unacceptable content. Abusing this functionality may lead to your username being disabled.