admin
-
Content
-14 -
Joined
-
Last visited
-
Days Won
1 -
Feedback
0%
Everything posted by admin
-
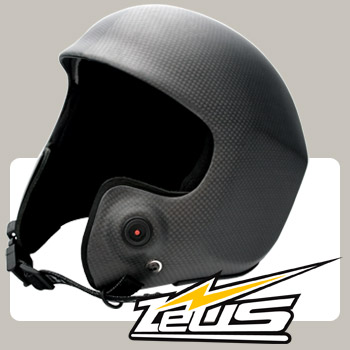 Take a walk on the wildside... Zeus is a new way to look at video helmets. The ZEUS from BoneHead Composites Is designed to be a versatile camera helmet with its flat side and a space provided for a Cam EYE II. One of the first things you'll notice about the ZEUS is the Retro-Roman styling. ZEUS provides more frontal facial coverage and a brim to keep the sun out of your eyes without being aerodynamically obtrusive. The ZEUS comes standard with BH's ingenious Thermal-Fit liner, our new buckle chin-strap closure and the great finish quality that you have come to expect from BoneHead. This helmet does not require a chin-cup and there is not a cutaway system currently available
 -
 The most popular composite helmet in skydiving... Now improved for CRW!! One of the first things you'll notice is the smooth curves and smooth styling of the helmet shell finished off with a Fastex buckled chin strap and leather covered chin strap. We listened to our customers and developed the CRW GUNER to meet all of your CRW expectations. You wanted semi-flexible, smooth curves and open ears.... AND YOU GOT IT with our new CRW GUNER helmet! The CRW GUNER comes standard with BH's ingenious Thermal-Fit liner, Fastex chin-strap closure and the great finish quality that you have come to expect from BoneHead.
 -
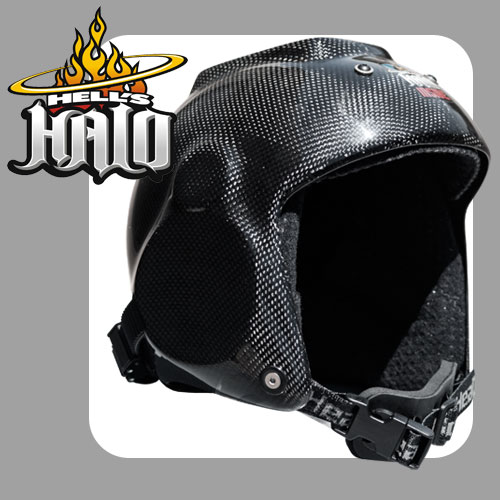 Hell's Halo is Boneheads latest and greatest camera helmet. There are 3 mounting surfaces for all your camera mounting needs. What makes this helmet stand out is an internal "halo" band that is adjustable using the ratchet clip on the back for last minute size adjustment. The helmet comes in two shell sizes along with our thermo-fit foam and an adjustable chin strap. If you still feel you need a chin cup, that accessory is also available. You can choose from our regular chin cup or our new concealed chin cup which hides the ladder straps!
 -
We're happy to announce that we've updated the Bonehead Composite gear page with plenty of new items. We've been somewhat out of date regarding some of the new helmets put out by Bonehead Composite, so there is lots to check out- some of which you may already be aware of or own. Though this gives you the chance to head over to some of the new items and rate them, should you already have experience with them. Here's some of the new items we have added: The ZEUS Helmet"Take a walk on the wildside... Zeus is a new way to look at video helmets. The ZEUS from BoneHead Composites Is designed to be a versatile camera helmet with its flat side and a space provided for a Cam EYE II. One of the first things you'll notice about the ZEUS is the Retro-Roman styling. ZEUS provides more frontal facial coverage and a brim to keep the sun out of your eyes without being aerodynamically obtrusive. The ZEUS comes standard with BH's ingenious Thermal-Fit liner, our new buckle chin-strap closure and the great finish quality that you have come to expect from BoneHead. This helmet does not require a chin-cup and there is not a cutaway system currently available" The FLAT-TOP NARROW Camera Helmet"The other choice of professional camera fliers from around the world… The FLAT-TOP NARROW from Bonehead composites is the trimmed version of our almost famous FLAT-TOP PRO. The FLAT-TOP NARROW is a great all-around camera helmet for any discipline in skydiving. RW, freefly, tandem video or competition freestyle can be captured with your FLAT-TOP NARROW. This camera helmet is a rear-entry system to give the user better camera stability without sacrificing comfort. This NARROW version of the FLAT-TOP PRO has been made to allow the camera flyer less surface mounting availability and air drag but keeps the stability of the rear-entry configuration. The FLAT-TOP NARROW has plenty of space inside to run wiring, camera buttons, etc. to keep as much of the snagable surfaces to a minimum. You have the choice of where you would like a ring sight post placed. The FLAT-TOP NARROW comes standard with BH's ingenious Thermal-Fit liner, still camera adjustable platform, NEW cutaway system, and "Riser Slap" release button protector." Hells Halo Camera Helmet"Hell's Halo is Boneheads latest and greatest camera helmet. There are 3 mounting surfaces for all your camera mounting needs. What makes this helmet stand out is an internal "halo" band that is adjustable using the ratchet clip on the back for last minute size adjustment. The helmet comes in two shell sizes along with our thermo-fit foam and an adjustable chin strap. If you still feel you need a chin cup, that accessory is also available. You can choose from our regular chin cup or our new concealed chin cup which hides the ladder straps!" The MAMBA Helmet"Welcome to BoneHead's latest addition to Full-Face Flip-Up Helmets. The MAMBA from Bonehead Composites is a great choice for RW jumpers with its full face security and the ability to flip open the lens quickly and easily without sacrificing keeping closed in freefall. The new lens closing mechanism requires the jumper to squeeze the lens together to allow the closing pin to be released from it's locking position at the forehead area in order not to make a push-in button on the chin susceptible to knock and unwanted lens openings during the most intense skydives. The MAMBA features dual internal audible pockets on the inside of the helmet, great peripheral vision, a heavy neoprene neck liner to help with fogging lenses and noise, a FASTEX chin strap closure with padded strap, front Chin-Dam wind deflector to keep unwanted wind flow out of the inside of the helmet and a shape that allows full head movement and the ability to see and locate emergency handles. The MAMBA comes standard with BH's ingenious Thermal-Fit liner, chin-strap closure and also comes with the lens coated with anti-fog direct from the factory." The ALL-SPORT Helmet"Refined Sleek Shape For All Types of Skydiving. The ALL-SPORT helmet from Bonehead Composites is now available from your favorite retailer! Customers all over the world wanted a helmet that was simple, sleek and of course had the quality and design that has made BoneHead Composites famous in the skydiving world.. and we delivered! The ALL-SPORT features a very simple shell design that is flatter on the left and the right so that camera mounts can be added easier. We took all the best attributes of the Guner and Mindwarp and combined them to make the ALL-SPORT. Internal audible pockets have been integrated into the helmet so that there is no need to build out the sides of the shell to accommodate audibles and still keep the interior comfortable. The ALL-SPORT comes standard with BH's ingenious Thermal-Fit liner, neoprene padded leather FASTEX chin-strap closure. " These are just 5 of the new 10 helmet and helmet items added today. Head over to the Bonehead Composite gear page to see the rest.
-
A mid-summer skydiving celebration honoring the "first man in space" is the centerpiece for one of the biggest fundraising events yet planned for the National Skydiving Museum. Fifty years ago, Air Force Capt. Joe Kittinger exited at 102,800 feet from a helium balloon over New Mexico, reaching a speed of 614 mph during a four-and-a-half minute free fall. The record still stands today, although there have been several attempts to better it. The "National Skydiving Museum Weekend Honoring Joe Kittinger" will be held in DeLand, Florida the weekend of August 13-15. Kittinger’s jump was on August 16, 1960. Kittinger, who retired as a colonel and is now 81, plans to attend, as well as other skydiving luminaries. There will also be several activities during the weekend benefiting the Boy Scouts of America, another cause Kittinger supports, to commemorate their 100th Anniversary. Joe Kittinger outside the gondola from which he took his historical jump.The Saturday evening dinner will be devoted to honoring the initial class of inductees into the National Skydiving Museum Hall of Fame. A special committee carefully selected eleven honorees, culled from a list of skydivers who made major lifelong contributions in equipment design, free fall techniques, and those who excelled in national and international competitions. This fundraiser is part of the National Skydiving Museum’s $5 million capital program that will raise the necessary funds to build the museum in Fredericksburg, VA. (story contributed by Doug Garr) Show your support and join us! Skydiving Activities and Exhibitions... Here are just a few of the events that will honor Joe Kittinger and celebrate 50+ years of skydiving history including giving special recognition to other pioneers for their contributions to our sport. (schedule subject to change) Jumping for Joe 50-Way Formation Skydiving Exhibition This 50-way formation with some of the best skydivers in the country will celebrate and symbolize 50 years since Joe Kittinger’s record breaking jump. Canopies opening in an almost simultaneous rhythm will have the audience cheering until the last skydiver lands. Swooping Exhibition Swooping truly shows how far parachute equipment has come over the years. Swooping is gliding a high performance parachute across the ground or water for long distances, generally a slalom type course, to show the skill of the canopy pilot. The exhibition will have some of the top swooping demo jumpers in both individual and team exhibitions. Accuracy Competition Accuracy goes way back in our history but didn’t get the recognition it deserved until the Sixth World Parachuting Championships held for the first time in the U.S. at Orange, MA. Accuracy canopies in those days were modified military surplus equipment with very little steerability. Today, high performance accuracy canopies and the skill of jumpers make for exciting and competitive accuracy contests. Skydiving Demonstrations Precision skydiving demos the world famous Army Parachute Team (Golden Knights) and the Air Force Academy Parachute Team. Wingsuit Flying Exhibition Grand finale and tribute to Joe Kittinger wingsuit flying truly exhibits the dream of human flight. Ten to 15 of the premier wingsuit flyers in the world will fly formations across the sky with smoke to add to the effect of this spectacular jump. Source - http://www.skydivingmuseum.org/
-
 It is no secret that skydiving is bad for the environment, it doesn't take rocket science to figure out each load is using fossil fuel which is essentially damaging to the environment. Many companies, people and organizations around the world continue to try become more 'green' in an attempt to slow down emissions, an initiative which has been strongly inspired by the global warming buzz which has been increasingly present over the past decade or so. Skydiving has been put on the list of most environmentally damaging hobbies/sports activities a few times, this because of the fuel used in each load. Though it's certainly not that black and white, and one has to look at little bit deeper, down to that layer of thought called logic. To quote a member of the dropzone forums in an environmental thread. "While skydiving may consume more fuel per participant then, say, soccer. He (the writer of the article that the thread is discussing) ignores the fuel consumed by the millions of fans who drive to soccer stadiums around the world every week. Therefore, the impact of soccer as a whole, makes skydiving look like a drop in the bucket." Let's quickly look at some numbers and see just how 'bad' skydiving is in comparison to other sporting events. In soccer for example, the world’s largest spectator sport- stadiums can hold from 40 000 to in excess of 100 000 spectators, and often these stadiums are full. The FIFA World Cup this year is in South Africa, and the South African chief organizer of the World Cup is suggesting a possible 300 000 foreign visitors. Including flights to the country, local flights between games and transport that's a lot of fossil fuel! This is of course just one example of a sport where the transportation of the spectators seems to outweigh the emissions of skydiving. The fact that skydiving is an activity which is based around aeroplanes often tends to trigger people into thinking that conventional sports are a lot less damaging to the environment. But it is important to take into account the details and nature of each activity and not just look at which one appears at first glance to be damaging. Trying to become more environmentally aware does not mean that one must stop all activities that are harmful to the environment, because with that logic one would likely never leave their room. It's about trying to make a difference, looking for greener ways to continue what you're currently doing. There will be times when you will have to sacrifice comfort should you want to become more environmentally friendly, though this is a personal choice you should make on your own. With that said; There are dropzones who are getting into the green swing of things and attempting to cut their emissions the best they can, while at times positively enhancing the dropzone as well. Skydive Lake Wanaka is just one dropzone who has recently purchased a P-750 X-Stol jumpship. They stated in a press release they have upgraded their current Cresco to the Cresco P-750 in an attempt to cut down on the amount of loads done per day by increasing the size of their aircraft and doubling the amount of possible passengers per load. This is just one case where a small investment allows for progressive environmental support while at the same time increasing the quality of the dropzone. The P-750 is not only larger than the current Cresco, but it is more comfortable, has larger windows and a quieter engine. The current Cresco has an average fuel consumption of 180 litres/h while the P-750 X-Stol has an average fuel consumption of 192 litres/h, an increase of just 12 litres an hour while being able to hold twice the amount of passengers.
 -
 The Quick Reserve 400 is a 9-cell rectangular tandem reserve canopy made from 0-3cfm fabric. Construction and design are optimized for the latest generation of tandem containers. It provides low packing volume and excellent, reliable openings under all circumstances. The Quick Reserve 400 is also licensed (Airworthiness Certificate) as a tandem main parachute.
 -
 The new Rush 7-cell reserve canopy was developed for the demands of today's skydiving. The construction is the result of high 2D/3D technology. The performance of the Rush reserve was researched, tested and fine-tuned through a multitude of vertical high-speed droptests, G-force measurements and additional flight tests and experiments. The result is one of the strongest, most stable reserves on the market. Max. deployment speed of 150 KEAS.
 -
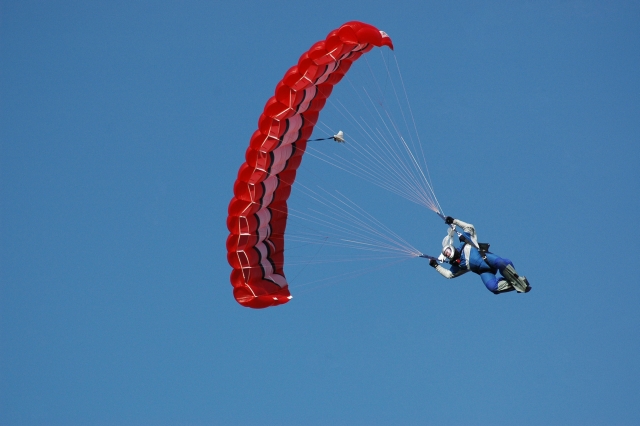
 The new Firebird Tandem Main Canopy is a slightly elliptical Zero-p canopy, which is outfitted with 1050 lbs Vectran lines unless requested otherwise. While developing this canopy we set a high value on soft openings, low steering pressure, agility and good landings. Guaranteeing a relaxed flight, the steering force and agility of the Firebird Tandem can almost be compared to those of a solo canopy. It opens very smoothly and with a great stability in direction. You'll notice the complex new graphic design of the Firebird Tandem.Our Laser Cut Technology and a new sewing technique guarantee the highest quality in production.
 -
 Our Student Canopy EXIT ONE especially for students. It's real fun to fly with this canopy. In spite of its agility it's easy to handle - even for beginners. Its dynamic handling and its security is unique in this class. With this canopy a beginner can get used to a modern parachute while he's still in training. The EXIT ONE is a rectangular canopy with inflated stabilizers made of our new light ZP material like all our new canopies. The Lines are Spectra. Comes with collapsible slider.
 -
 The High Performance canopy for the experts skydiver. It's pricisely balanced agility makes flying with the Chilli a pure pleasure. Don't be afraid to swoop this canopy or land it straight in, it's great for both. Every landing with the Chilli glides longer over the ground and lifts you up remarkably with great bottom end flare. Additionally you get safe and smooth openings that are on heading with the Firebird Chilli. And the icing on the cake is the new exclusively for the Firebird Super-Light-Edition produced zero porosity material which is about 35 % lighter and thinner than the obvious canopy material. Because of this the Chilli has a significant smaller packing volume and lighter weight than comparable canopies of other manufacturers.
 -
 Made of our new super light canopy cloth, with new designed profile, inflated stabilizers and our new unmistakable design. Innovation, quality and safety are the concept for our new Cayenne light. The New Profile of the Cayenne light combines simple, precise handling, quick reaction, dynamic and liveliness with stability and a high security standard. That's how an intermediate canopy should be! Power must be controllable - especially concerning an intermediate. Our Cayenne guarantees fun of flying.
 -
 During development of our Evo Student System, we had in mind a Sport System of the most modern construction and functionality. All handles are mounted in exactly the same places as on a sport system, enabling a quick transition for the student to his own sport system. Standard features: • Harness quick-fit ring with adjustable length control • Stainless-steel hardware • HD pocket BOC • Type-17 Riser • Main deployment bag • Reserve bag & springloaded pilotchute • AAD setup with inspection window • Quilted back pad
 -
 Many new extras make this rig safe, freefly friendly and incredibly comfortable. Special padding is throughout the harness and leg pads. Inside the main container are flaps that make it impossible for lines to stick under the reserve tray. Easy closing main container with excellent bridal coverage. Standard features: • Harness quick-fit ring with adjustable length control • Stainless-steel hardware • HD pocket BOC • Type-17 Riser • Main deployment bag • Reserve bag & springloaded pilotchute • AAD setup with inspection window • Quilted back pad
 -
When I started skydiving round parachutes were the only parachutes available. The landing under a round canopy had a high straight down component. Although Para Commanders had a noticeable forward speed under no wind conditions, landing in winds over 10 mph were again straight down. Due to straight down landings most injuries were to the ankles because one tended to sit down on the ankles during a less than perfect timing of the landing techniques required by round parachutes. Use of the Parachute Landing Fall (PLF) greatly reduced the extent and severity of landing injuries. Virtually all successful skydivers were experts at PLFs because not every landing was executed perfectly, no matter how many jumps one had, and sooner or later one had to land a round reserve. In the classroom it required a block of at least two hours to teach landing the parachute because so much of the time was devoted to teaching an actual PLF. The complete PLF technique is not a natural, readily apparent procedure. During the actual jump about half of the students would perform a PLF and the other half wouldn’t no matter how much time and practice was spent on PLFs. The injury rate was quite high. About 1 in 20 first jump students would suffer some type of ankle injury. With the advent of square parachutes, and particularly with the advent of placing students under square parachutes, the landing injuries changed. Each experienced person reading this article will realize that the injuries from landings that we see today are not limited to ankles. This is because the parachute is moving the jumper across the ground in almost all circumstances. However, there are cases were a person would be descending straight down even today. A high or rapid or deep flare by a student would be one example. In this case the PLF position for landing would definitely influence the ability of the student to walk away from their mistake. In my opinion there are instances when use of a PLF for a botched landing is NOT beneficial to the jumper. A downwind landing is such an instance. The PLF introduces a roll and a square parachute introduces a large amount of speed. For the sake of this example, assume the wind is blowing at ten mph. The jumper has made a mistake and is landing downwind. He/she has the presence of mind to have the toggles at his/her ribs (half flight) for an air speed of ten mph and a ground speed of 20 mph. Please bear with me for the easy math. 20 mph = 20 mph X 5280 ft/hr = 105,600 ft/hr 105,600 ft/hr = 105,600 ft/hr divided by 60 minutes/hour = 1,760 ft/min 1,760 ft/min = 1,760 ft/min divided by 60 sec/min = 29.33 ft/second At 20 mph ground speed a person is moving 29.33 ft per second across the ground. At half flight the downward speed (3 to 5 mph) would be somewhere between 4.4 ft/sec and 7.33 ft/sec. I believe that in this example the best outcome for the jumper would be to try to absorb as much of the initial downward velocity as possible with their legs (knees bent and pressed tightly together) and then NOT ATTEMPT A PLF. The danger inherent to a high speed roll/tumble is a direct result of the laws of physics. An example using a cylinder will illustrate the principle. I am 52 inches around the shoulders so let’s talk about a perfectly round cylinder, 52 inches in circumference, moving in the air just above the ground and oriented perpendicular to the line of flight. At touchdown the cylinder is going to pick up a rotational (angular) velocity based upon the speed across the ground (linear velocity) divided by the circumference of the cylinder. Excluding friction, which will slow the cylinder by scraping, the cylinder will initially roll across the ground at 29.33 ft/sec divided by 52” (circumference) per rotation. 52 inches divided by 12 inches per foot = 4.33 feet (circumference) 29.33 ft/sec divided by 4.33 ft / rotation = 6.77 ROTATIONS PER SECOND!!! If this seems quite a lot, it is. However, this is why occupants of a rolling vehicle are thrown so far from the vehicle in a rollover car accident (buckle up?). In the rollover case the rotational speed (angular velocity) of the vehicle rolling is translated to the linear velocity of the thrown body. The thrown objects, including unbuckled occupants, are thrown hundreds of feet. Returning to the skydiver, I am not a perfect cylinder. I am more of an imperfect ellipse (oval) seen from above. This is not to my benefit in a rolling landing as the ground (not perfectly smooth) will have a tendency to turn me into a round object by attempting to break off my protrusions (shoulders, arms, knees, etc.) This is complicated by the fact that the PLF was developed using round parachutes which did not have flare capability. As such the arms in a round canopy PLF were above the head, elbows bent and cushioning the head from the sides. This positioning essentially extends the arms along the long axis of the cylinder. With a square parachute our hands are down at our sides (hopefully) controlling the flare. During the rotation of a PLF, and particularly a rotation of 6.77 rpm, the hands and arms are thus exposed to quite a bit of trauma due to impact with the ground, more than once, as the roll proceeds. What one hopes for is the best case scenario where the jumper is rolling from shoulder to shoulder across the ground. The worst case scenario would be tumbling head to toe across the ground. Unless one is a trained gymnast this would expose the head and neck to several impacts with the ground. A real life roll/tumble would probably fall somewhere between these two extremes. At a rotational speed of 6.77 rpm a PLF would risk head and neck injury. At a rotational speed of 6.77 rpm, even a perfect PLF has great risk to shoulders, arms, hips and legs. There is a solution to this downwind landing possibility. It is easy to train and easily understood by newcomers and experienced skydivers alike. The simplest way to prepare for as many landing scenarios as possible is to assume the PLF position, fly the parachute and slide on one hip in the event of a forward motion, high speed landing. I teach our students to envision holding a dollar bill between their knees and squeezing a quarter between their glutes (“feet and knees, dollar and a quarter”). Actually doing so puts one into the PLF position. When the person discovers a downwind mistake has been made, he/she should assume this PLF position. At touch down the jumper should try to absorb as much as possible of the downward impact with their feet but lean back in the harness. Under no circumstances should the person allow themselves to be thrown head first. The jumper wants to stay on their feet as long as possible, tending to sitting down. As the person sits down he/she wants to transition (during the squat) onto a hip. One does not want to impact directly onto the butt. The spine will tolerate torsion (bending) but very little compression. Sitting down directly onto the butt could cause spinal problems on its own (disks and vertebrae). Absorbing the actual butt touchdown with the hip will allow the spine to flex. Hitting a rock with the tailbone while sliding across the ground could be quite painful as a likely result is a cracked tailbone. Hitting a rock with the hip while sliding across the ground might possibly bruise the hip, an easier recovery than any spinal injury. The jumper should perform a baseball slide into second base ensuring that they remain sliding feet first. The person will get dirty. Done properly, one may see damage to the leg strap cover on the hip, but a dirty/torn jumpsuit and/or a dirty/scraped hip cover will be all that one sees. During a proper landing (into the wind) and under reasonable conditions, if a person is in a PLF position (feet and knees, dollar and a quarter) accompanied by a flare anywhere near half–flight, the parachute will lay the student down in the first half of a PLF. This is all that is necessary with a properly sized square canopy. The “lay down” is a result of the fact that most students are not true into the wind at touchdown and thus the square parachute almost always imparts some degree of forward AND sideward motion to the student. The occurrence of downwind landings is relatively rare. However, bear in mind that most of these are done by a jumper off student status (off radio assistance). This person has received very little if any formal instruction since the first solo landing class. So the technique must be simple to learn, retain and execute months after the initial training. Since I began teaching this concept, decades ago, I have not had a single jumper injury related to downwind landings when my advice was put into practice. My motivation for writing this article comes from the words that I hear when traveling to other drop zones and the words that I read in articles such as “Incident Reports”, “…you should have done a PLF”. This is not always the case, particularly with today’s parachutes. A PLF is no longer a panacea for all conditions. I also want to point out that, in my opinion, the instructor showing a first jump student a PLF accomplishes nothing at all. Having each student perform a PLF on the ground is no better. For a person to learn a PLF requires repetitions by the student, MANY repetitions, from an elevated platform. A person or publication telling anyone that he/she should have done a PLF, which the person has never actually learned, is not accomplishing what the student needed and the knowledge that the publication is trying to disseminate.
-

-
 A beginners guide to filming competitive 4-wayThis article is for jumpers that already have some experience flying camera and are trying to expand on their knowledge of how to film formation-teams in a competition setting. I will focus mainly on 4-way, because I believe it to be the most difficult FS discipline to film (aside from VFS), due to the many different exits and faster key speeds. However, once you have a firm grasp of shooting 4-way, the same principles can be applied to 8-way and larger formations. During a competition, whether it be a local meet or the nationals, it is vital that you give yourself all the advantages you can to do the job right. It is advisable that you jump with two cameras with differing wide-angle lenses. Film the team with the tighter view in mind, so if a grip goes out of frame, you can always revert back to the other camera with the wider view. The difference between first and second place can come down to only one point. So our goal is to have an “NJ free” (Non Judgeable) competition for all 10 rounds. If at any time during a jump a grip goes out of frame, the videographer can cost the team a point or more. Jumping with two cameras is not necessary for training, however you want to do a few training jumps before a meet with the exact set up that you are planning on using. This may expose any flaws or issues with your equipment. Training should be more difficult for you than competition. Push yourself to fly close to the formation. Train with your back up wide-angle lens, this will force you to be closer and more aggressive in getting the shots you need. This will make every competition feel much easier. Do not be afraid to try new things. Sometimes we have to leave our comfort zones to learn something that may benefit us in the long run. Climb OutIn most cases the camera flyer is in charge of the spot. Not having to worry about this little detail allows the team to focus on their jump. As you climb out on the camera step, think of flying your body as soon as you expose yourself to the airflow. Even though you are on the airplane, miss-presenting yourself to the wind can make your job a lot more difficult. You can practice climbing around on the airplane while it is parked. Get a feel for where everything is. Continue to practice until you can climb out of the plane in a smooth and controlled manner. Speed will come with time. Do not forget to practice climbing back into the plane. Sometimes you will find yourself climbing out right as the red light turns back on. If possible, one of your teammates can block some of the wind and help you get back inside. Remember to become familiar with different aircrafts when you travel to another drop-zone to train or compete. Freak OutNever trust an exit count! It is easy to get impatient on the camera step, waiting for the team to get ready. Teams can sometimes take a while in the door to get ready, especially if they are trying something new. Do not interpret a “wiggle” as a count. Be patient and watch for other signs like a helmet releasing a head jam. Every team’s exit count is different. Before every jump, most teams will take the time to dirt dive and practice their exit from a mock-up. You can learn a lot about the team by just simply watching them on the ground, so take as many opportunities as you can to learn the exit count and timing. Leading or Peeling?The exits covered here are from an otter, a left-handed door. Keep in mind that your relative position to the team is much closer on the aircraft than what it will be in freefall. You will need to create this gap quickly during the exit by falling slow. This is where camera wings and strong legs can be very helpful. Teams and coaches prefer the leading exit over the peel exit, because it gives them a great view of their timing, presentation, and heading. This method is much more conducive for the video debrief. For this exit I have my left foot on the camera step and my right hand on the handle. (When you have your right foot on the step, you expose more of your body to the exiting team.) After the team has given the count and is in the process of leaving the airplane, I find it helpful to try and run my right hand across the fuselage. I try to feel the rivets of the plane as I kick off the step. This helps ensure that I am in the correct position relative to the formation. As for your timing on this exit, you will know you have left too early when you can see the bottom of the airplane, and you will have left too late if you make contact with the team. For all exits, this is where your timing becomes crucial. Peeling is usually considered the safer choice of the two exits, because you leave right after the team. This way, you will not leave too early because of a misinterpreted count and you do not have to worry about the teams burble. For this exit, I have my right foot on the step with my right hand on the handle. I swing my body back so that my left foot is touching the fuselage. Now all I have to do is wait for them to come out the door. Leave with the last person and follow the team down the hill. Remember to present your hips correctly into the relative wind and keep the team in those cross hairs. Chill OutAfter the exit, all you have to do is keep the team’s grips in frame for the next 35 seconds. Remember that the different formations rarely stay in one place. As the team transitions from one formation to the next, you may have to adjust your own relative position to the team to keep them all in frame. Improving your individual flight skills will allow you to make these necessary corrections quickly and without thought. Although the “hard part” is over, you still have to be in the right position to get a judgeable video. Being close enough is the first part, but probably more importantly is being “steep” enough. Your angle in relationship to the formation is crucial. The steeper you can get, the better. It is very difficult to see all the grips when you are shallow. This is especially true on exit. If at any point, other than the exit, you can see sky, you are not steep enough. You should also only be able to see the top/back of the team’s helmets (no faces). The distance from the team will vary on the size lens you are using. An additional detail to pay attention to is the background. As the videographer, you can make the judge’s job easier by turning to a heading with a solid background, such as a forest, lake, desert floor, etc. Multicolored backgrounds, such as buildings can make the image very distracting and the formations harder to judge. Doh!Making contact with the formation can occur either on exit or in free fall. We want to avoid this scenario at all costs; however, accidents can and do happen. If you find yourself falling towards a formation, get as big and flat as you can! The last thing you should do is ball-up. Your natural reaction is to protect yourself, but by doing this you will only make things worse. Not only have you sacrificed all your lift and will now impact the team with greater speed, you have also given up on the chance that your airflow may be returned to you as the formation continues to move to the next point. I think that it is a good idea for camera flyers to understand what the team is exiting and how the formation will fly. I believe that a deeper understanding is necessary than just to know whether a formation is long or round. Being able to anticipate a formation’s movements, direction, and timing will greatly improve your video quality. Be pro active! Ask your team what formations they are going to perform. It will take some time, but being able to “speak” a little 4-way will not hurt. You can educate yourself on these formations by reviewing the IPC dive pool online. Memorize how each formation flies as it comes out the door; more importantly, think about how they might block your airflow. As the team debriefs their jumps, you should do the same. Take a look at your own timing, framing, and distance. Strive to make each video jump better than your last. Competition vs. TrainingWhen it comes to competition camera flying, there is a big difference between a “Gun for Hire” and a Teammate. In order to make this transition, you need to change your approach and mind-state from just being there for the ride, to being part of the action. As a teammate, you are taking on much more responsibility than a “gun for hire”, such as: archiving and cataloging all media footage, taking pictures, submitting photos to magazines and sponsors (if applicable), checking in with manifest for calls, spotting, chasing down cutaways, etc. Your team needs to be able to depend on you to do all of these things. Creating a great training environment becomes key. The more the team can focus on their training, the better. Helping a team to perform at their best can also aid you in achieving your best. Being able to perform at your peak during a high-stress competition can be very satisfying and rewarding. A positive attitude and an eagerness to learn is the start of becoming a good competitor. Hard work and embracing the training process is what will turn you into a great competitor.
 -
Although many long time jumpers remember the Mirage harness/container system from the early 1980's, the current system has been entirely designed from the ground up to represent the state-of-the-art in harness / container design. Our latest version truly represents all we know about rig design, and all that a select group of highly experienced staffers and associates have to say about making the safest, most functional and comfortable rig ever offered. We did this so you can spend your skydiving time having fun, not worrying if your equipment is going to perform. When you exit, you're putting a lot of faith in your gear. We take that very seriously.
-
Yes, I know who you're talking about. It is these crazy guys, who jump out of perfectly good aircraft with the bunch of ropes and fabric in their backpack. The only reason why they are allowed to do this is the fact that the pilot wants to get rid of them. Badly. Having a cabin full of freaks which are laughing, kicking out the jokes only they can understand and giving each other high five from time to time... you know, I can understand the pilot. Some of these guys are so untolerable so the pilot makes them to get out in the middle of the way up (sometimes at 3,500 ft). The crazy bastards call this "hop and pop". Aha. Hop'n'pop. You know. Hop! And pilot turns the red lights. I believe this is because skydivers almost never listen to the pilot so he has to give them a visual cue. Most of them are still allowed to drive a car so the red light still rings the bell. Surprisingly, this bell tells them "the fun is about to begin"! Green light follows. Pop! The guy is popped from the plane. I suspect, sometimes, this happens not without a good kick to the ass from the humble bros and sisters. Why would they call it "pop" otherwise??? Then, there is always somebody who is curious if the pushed out guy got his lesson - you can always see a few heads out of the plane looking at the guy tumbling in the air. No, they had not been such freaks from the very beginning. In the beginning the innocent guys and girls were lured into the small room full of weird stuff: worn out harness containers hanging on the ceiling looking like just taken from a dead body, creepy plane cabin imitation, tables on the wheels with soft tops looking very... very... suspicious. The whole place looks like a mideval torture chamber. Then, during several hours they are asked to do a lot of strange things: hang in the harness and partially disconnect it from the hanging ropes, falling down like been hanged, assume strange poses on the soft table, fall and roll on the floor while other yelling "PLF, PLF!!!", memorize a lot of motions which doesn't make much sense for any decent person who got used mostly to the movement of glass with beer to the mouths. I think, "PLF" must be an abbreviation for Practice Leaning to the Floor. But why jump from the small stair for that??? All this is sometimes interrupted with the videos showing multiple ways how the parachute doesn't work. And such videos for some strange reason are supposed to be encouraging. No way! After a few hours, when the instructor ensured the guy is driven crazy enough already, they get with the student on the plane going up. While it is the beginning, no normal person is going to jump out of plane, but these bastards got a trick for it: one of them holds the poor guy on one side, another - on the other side and then they suggest "just to look at the prop". Yeah, they are trained well so it is easy to push the relaxed guy into the air. During the freefall their favorite joke is to tease the guy in the middle with quite inappropriate gestures. The most popular is the gesture which the Rome Ceasers showed "death to him" to the gladiators at the arena: big thumb down. Some other gesture is the way people in the Europe say "you're an ugly goat" - two fingers apart. When the student screams and kicks legs, they just tip the big thinger to the palm showing "shut up". And when they sick and tied of the guy, they point to him, which will mean "fuck off, pull now so we cannot see your ugly face any more around". Do you know why they give the guy the radio on the first jumps? They always say "it's a one way radio" but actually they enjoy listening to the screams of the student. It is obvious that after such a treatment the guy goes nuts completely and gets an inevitable desire to repeat. However, some of them reasonably try to get rid of instructors on the jump (who wants these freaks around, really???). The most popular ways are: don't give an exit count or exit in the middle of count, tumble like a bitch on the exit, hoping that the instructors will be lost, assuming the unusual positions in the freefall hoping the guys aside will not be able to hold on. Apparently, this almost never works – in the most successful cases the best achieved result could be the one instructor lost only. With the time, guy's craziness goes deeply and it is only one instructor needed to make him out of plane. To check that the process of madness goes well, instructor requires the guy to do weird things on the jump: put the head completely out of plane and look for aircrafts, roll and rotate while falling, try to hit the small piece of land while landing. The advancing on that way is almost completed when the guy decides to jump out of plane alone. However, after a few jumps alone almost all of them got a bit better and prefer to get out with a coach, trying to hang on him during the freefall. Obviously, it is safer to hang on something firm while in the air! They call it "docking". The progressing in that is recorded in the special (I believe, medical) sheet (white or yellow) and then submitted to the organization which tries to keep account of the sick bastards. The organization is named USPA which is apparently the abbreviation for US Psychiatric Advisory. In 25 jumps and when all the symptoms are listed, USPA classifies the guy and assign him a first "A" number in the sad history of sickness. The progressing classifications are: A - Almost Hopeless B - Better Be Avoided C - Completely Crazy D - Dreadfully Mad It took time for USPA to figure out exact symptoms of progressing from one category to another. However the common anomalies were noted and listed (like jumping into the water, jumping in the middle of the night etc.) It is noticed that many guys prefer to exit from aircraft not alone (some prefer to have as many jumpers as possible surrounding them). And this is a natural fear - and it is not a rare to see multiple jumpers hanging on each other in the sky. Sometimes, by chance, their formation looks even nice. However, within a minute they realize that hanging on the other guys don't help them from getting close to the earth and they break off and fly do the different directions, obviously scared. I personally saw 30 such guys at once, flying from each other as fast as they could. Some of them try to pretend nothing unusual happens and flying sitting - like they were at home on a sofa. Some prefer to have some roof over the head and flying head down. Anyway, all of them soon realize that something goes wrong. "Most probably", they think, "it is that heavy backpack drags me down to earth" and the obvious decision is to get rid of it. For some unknown reason all of them start with ripcord or BOC pilot chute... In a few seconds the parachute opens and now they have the desire not to get down to earth somehow satisfied. Poor bastards! They could have simply stayed in the plane instead! Any reasonable man can confirm that having as big umbrella as possible above you is safer under the open sky.Who know, what can fall from it on your head. Especially, when you are flying. So, obviously, the most experienced skydivers land with two parachutes over them. They call their parachute "canopy". "Canopy" must have came from Russian “konoplya” and in Russian it means "cannabis" - something that gets you high, which obviously is associated both with the parachute and the whole process itself. "Get high naturally!" - they say, - "Skydive!” Hmm... I think skydiving should be declared as a controlled substance too. Note, while under canopy these guys are very dangerous and do not hesitate to use their awful knives (designed in the best traditions of Jack the Ripper) if somebody else decided to join them. Even if another guy just wanted to chill out together! The separate branch of the symptoms is the animalizing. Some of these guys (and their number is progressing with the years) decide that they are not humans but the... birds. Yes, birds!!! I suspect birds flu has something to deal with it. They take on the bird-like costumes. Sure thing, somebody is making money on this heavy mania, selling the bird suites to them. Then they jump out of plane. Another proof of the animal-like anomaly is then they get and fly together. They call this "flocking" - what else needs to be said! Sure think, not all of them so unreasonable. There are some guys who recognize their “mental change” and do the best to make it safe. The best of them do not get on the plane to jump on awfully high altitude with heavy backpack stuffed with two parachutes. They know that it is safe to jump from low, unmoving object. They know that two canopies introduce exhaustingly big number of options: which to pull? So they jump from very reliable, unmoving, low bridges, buildings and cliffs. With one canopy only. These ones are obviously less crazy and the other skydivers call them BASE jumpers - they are nuts too, but only basically nuts. Yeah, and, of cause there are some guys who enjoys to see the normal people dropped from the plane. These are very smart and persuade the good citizens to do this, proving on the ground that there is nothing scary in that. "You even don't have to wear this heavy ugly backpack. I can do it for you. But put this harness on so my boss would not suspect anything." While in the plane, they sit behind the poor guy and, unexpectedly, grab his harness and tie up to his one. He get close... very close... to the guy or the girl. And I personally saw how they pushed the poor one to the aircraft exit in front of them, telling them: just cross your hands on your chest, there is nothing else you can do now... Yes, I was the one of the guys dropped out of plane that way. But this... hmm... close relationship doesn't last long - in 6-7 minutes they are on the ground, and giggling, seeing as normal people runs from them, screaming on their way. "They are excited!" they say. Yeah, right! If the guy doesn't run away - here we go, he is another candidate for AFF (see what I wrote about it before). Oh, yeah, AFF is obviously for Awfully Freaked Fella - the student. So, when you are going to marry a skydiver, don't even hope that he or she is going to be around you all the time. Sky and jumping will be the on the top of his/her list of priorities. And if you want to get to that list not far after sky, jumping, boogie, bonefire, beer, new container, try a wingsuit, new reserve, freeflying, freeflying jumpsuit, wind tunnel, night jump, audible alti, jump from balloon, big ways, CRW, hook turns, swooping, go to Florida to jump in winter, spend vacation on drop zone in New Zealand, high-altitude jumps, sleep sometimes, try weight, try that cool new canopy on boggie, jump from the cliff in grand canyon, dogs... then you have to become a skydiver too! Wanna have him or her around more often? It is simple. Do RW with them! Blue skies!
-
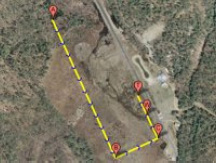 Landing Pattern is an interactive computer simulation program for ram-air parachutes. It is similar to flight simulators, such as Microsoft Flight Simulator. One can fly a landing approach of a parachute in different wind conditions. Currently only Skydive New England is available in the simulation as a virtual drop zone, but more will be added in the future. Usually the landing pattern is shown to the students on top of an aerial picture or a satellite image. The pattern has an entry point around 1000ft, then the turn to the base leg around 500ft, and then the turn to the final around 300ft. The altitudes for these points are kept constant, while the position of the canopy relative to the landing target changes depending on the wind conditions and canopy parameters. Static Line Interactive released a free online service Landing Pattern Estimator that shows you the landing pattern above the satellite image from google maps. Landing Pattern allows you to fly a landing approach. Landing Pattern comes with tutorials that explain each leg of the landing approach. You can pick the wind direction, wind strength, starting altitude, position for the jumper, and the type of the altimeter to use (digital or analog). You control the left toggle by pressing the left mouse button and moving the mouse up and down, and holding down the right mouse button allows you to control the right toggle. If you hold both mouse buttons together you control both toggles at the same time to flare the canopy. You can experiment with normal and flat turns. It is possible to switch between top view, side view, first person view, and free camera. You can show or hide the landing approach guides. Top view allows you to see the the movement of the jumper from above, which is useful to see the general shape of the pattern that you are flying. It is easy to see when to turn to the base leg or to the final leg. Side view allows to see the difference in altitude between the jumper position and the proposed landing approach. It is also useful to see the changes in the canopy pitch as the flare is performed. After understanding how to fly the approach using the top and side camera views you can use the first person view. This is how you would fly a canopy in real life. You can look at the analog or digital altimeter mounted on your chest. You can also see the proposed landing approach to follow. Use the mouse to look around and locate the target. Free camera allows you to fly the camera around so you can find the perspective that helps you the best. At the end of the jump you can flare the canopy for landing. After touchdown, you will see the speed of your landing as well as other statistics about your jump. You can review the trajectory of the jump and compare the current trajectory with trajectories from previous jumps. Author Information: Alexander Shyrokov is the founder of Static Line Interactive, Inc.
 -
 Flight Concepts introduces the latest in high performance, the Rage. Flight Concepts has combined years of research to provide you with the best in total elliptical performance. From clean, consistent, soft openings to brisk turns, penetrating speeds, and long swoops, the Rage has it all.
 -
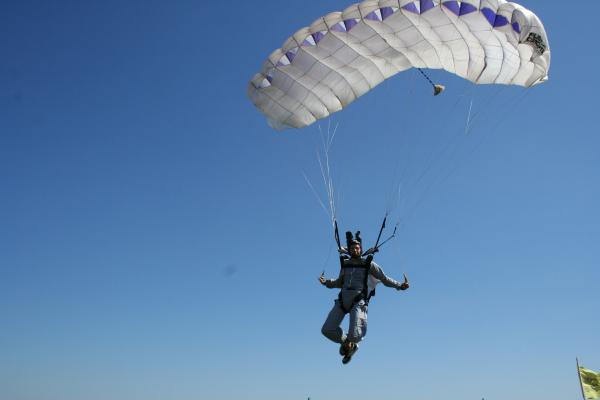
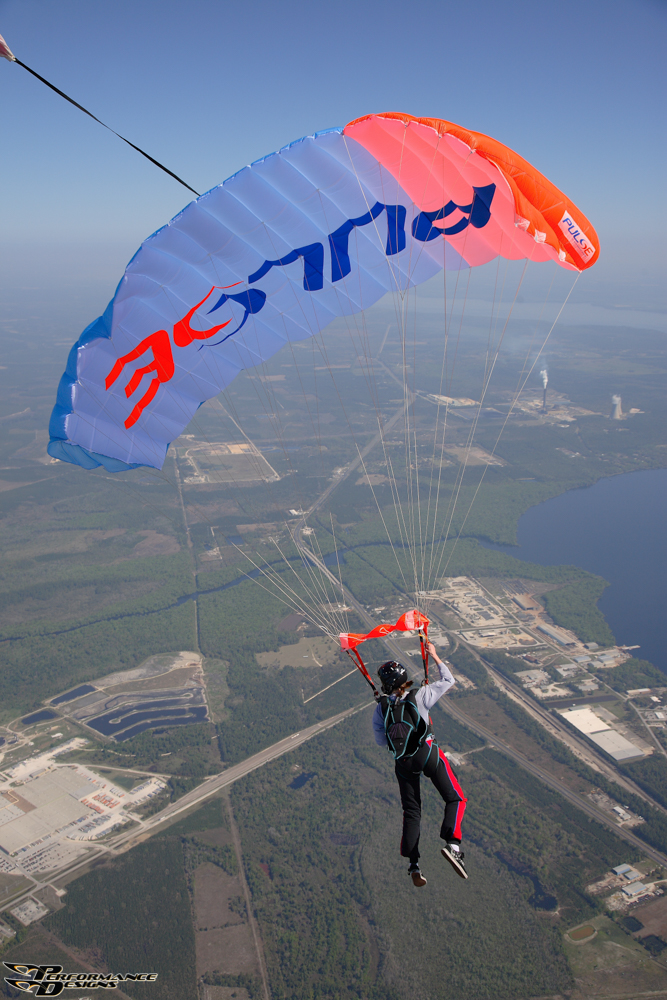 From openings to landings, the Pulse is stress-free fun. It is a lightly-elliptical 9-cell canopy designed for novice to experienced fun jumpers. Pack volume has been reduced significantly by combining PD’s proprietary low- bulk fabric technology on the bottom skin and ribs with zero porosity fabric on the top skin. The Pulse offers soft, consistently on-heading openings with a shorter snivel. It has a very flat glide, short recovery arc, and easy landings. It is highly responsive, very capable, and lots of fun to fly!
 -
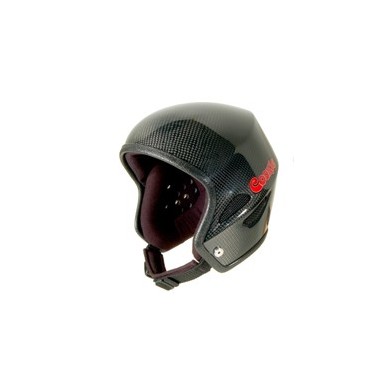 With a new aerodynamic design, the ROK has been developed to maximize your senses. Fly further, swoop longer. The ROK will also have the ability to transform into a fully loaded camera mounting platform for both video and still cameras. Carbon Fibre composite design Core sensory perception. The ability to hear more!! Extreme head protection. Lower forehead design Riser ramp technology for camera equipment Superb comfort with 2 shell sizes and 6 liner designs Single internal audible pocket included
 -
 By Peter Pfalzgraf In the early days of CReW (as canopy formation skydiving used to be called) I wrote and published a little booklet for those who were interested in learning the new sport. Things have changed a lot since then. So, I found it necessary to publish something new to make general information on our sport available to everybody interested. This essay combines techniques and hints from Europe and America. The latest input came from the training camps for the new canopy formation world record attempts aiming for a 100-way formation. Canopy and Harness (Figure 1) The times are gone where they had all-around canopies that could be used fairly well for any kind of skydive. Such canopies as the Cruisair, ¬U¬nit, Pegasus, Cruislite and Fury were once very common. Today, the best parachutes for canopy formation parachuting (briefly known as “CF”, in the old days) are 7-cell canopies. These parachutes are the safest concerning deployment and stability in flight, especially in turbulent conditions. It is no coincidence that reserve parachutes and canopies for BASE jumping are mostly 7-cell canopies. Triathlons and Spectres with Dacron lines can be used for casual CF jumps, although Lightnings are the CF canopies of choice. If you intend to do a CF jump today you are well advised to use a canopy that has been designed for this kind of activity. As a compromise for your first attempts, you may use a 7-cell canopy with a thick profile (for instance a student or accuracy canopy). Never attempt CF jumps with elliptical canopies, canopies with wide wing spans (in comparison with the depth of the profile/length in direction of flight) and/or a low profile. Today’s CF canopies are available in different sizes for different weight classes. It is important that people intending to join a CF jump use the same type of canopy with the same line length and trim. Furthermore, the wing loading (weight under canopy per square foot) should be reasonably identical to guarantee similar flight characteristics. The container of your harness should be big enough for the packing volume of the canopy to make sure it can be closed properly (safety!). There should be no handles, container flaps, pop-top pilot chutes or anything else sticking out that could get caught in another jumper’s lines. Those things could result in unintentional reserve openings or problems on separation. The bridle should be short or even better, self retracting to prevent your pilot chute from being caught in the other jumper’s lines while you are in a formation. You can imagine that separating a plane formation with one jumper’s pilot chute entangled in the other jumper’s lines will most certainly result in serious problems. Additional Equipment The altimeter should be worn in a way that makes sure it does not get snagged and can always be seen while you have your hands in the toggles. The helmet should provide not only head protection but also allow good hearing. It should not cause wind noise that might affect your hearing. Every CF jumper should carry a hook knife that can be used in case of an entanglement or wrap. Sometimes it only takes one line to be cut to get free and save a reserve ride. The hook knife of course should also be worn in a way that prevents it from being caught or ripped away. Your shoes must not have any hooks. They should fit loose enough that you can get rid of them if need be in order to get free. It is very useful to wear long socks to protect your legs against bruises and line burns. Aerodynamics of the Airfoil Lift is the force that keeps a canopy in the air. Opposite to a round canopy that only creates a big air resistance to slow down your descent using a large area of fabric, the square parachute, or airfoil, really produces lift like the wing of a glider for instance. The square footage of an airfoil is approximately one-sixth to one-quarter of a round canopy, and yet has a far lower rate of descent. The lift of the airfoil consists of 1/3 high pressure under the profile (similar to the round canopy) and 2/3 low pressure on the top surface created by the undisturbed airflow. This effect is the important matter for us. The physical reasons for this effect aren’t pertinent to this particular discussion. What is most important is to know that the main part of the lift depends on the undisturbed airflow on the top surface of the square canopy, forward speed and the shape of the profile. The lift increases with forward speed and grows with the thickness of the profile. The air resistance of the canopy slows the forward speed down. Due to the different pressure at the upper and lower surface of the profile air will flow around the sides of the canopy from the bottom to the top following the pressure difference. This effect reduces the lift and is called induced resistance. As a consequence of this, the maximum lift is in the centre of the airfoil. The stabilizers on either side of the profile are designed to reduce the loss of lift by hindering the airflow from the bottom to the top surface. Another way to reduce the loss of lift is to make the airfoil very wide so that the percentage of wing area being affected becomes comparably small. A good sample for this solution is the paraglider. This shape of airfoil is, of course, not good for CF activities. Because of the airflow around the sides and also around the tail, a parachute gliding through the air leaves a track of turbulence. The side turbulence creates a zone of turbulent air on either side beginning at the trailing corners of the airfoil. The turbulence of the tail creates a turbulent zone rising from the trailing edge of the canopy. It is clear that a parachute or canopy formation flying into such a turbulent zone will be affected by losing lift. Even aircraft flying through the turbulence of a canopy formation will lose considerable altitude. Figures 2 and 3 show the shape and position of the zones of turbulence. In a formation these phenomenon cause effects that can be noticed clearly. Just the top canopy in a formation gets only undisturbed airflow and has the maximum possible lift. All canopies having a body in front or on a front corner will lose lift due to the turbulence caused by the body out in front. Aerodynamics of the basic Formation Types Knowing the things mentioned above, we can predict that any type of formation cannot perform as well as a single canopy. That is useful for building formations as it gives the single canopy the potential to approach and dock on a formation due to its extra lift and forward speed. In principle all formations consist of a few basic types. Let’s look at the conditions in these. The Stack The stack (Figure 4) is the most basic formation. To build a stack one jumper sits on top the other jumper’s center cell and hooks his feet behind the center A-lines of the lower canopy similar to sitting on a chair. There will be some tension on the lines because the lower canopy in this type of formation will have a little less lift. In a stack the body of the top jumper is in front of the center cell of the lower canopy. The turbulence of that body meets the airflow of the lower canopy exactly at the point where the main lift is created and leads to a considerable loss of lift. This means that a stack will sink far more than a single canopy. The Plane The plane (Figure 5) is created out of the stack. The top jumper climbs down the center A-lines and hooks his feet behind the front risers of the lower jumper underneath the slider. The lower jumper supports him by putting on some brakes to increase the lift of his canopy. For this formation type one or two cross connectors are required, which either connect the front connector links (one line) or two lines that connect the front and rear connector link on either side. Otherwise the top jumper might slide back up due to his plus of lift and pull up the slider, which would result in a collapsed lower canopy. In a plane formation, the turbulence/loss of lift effect is not as strong. As the top jumper’s body is beneath the two canopies, one might think there is no loss of lift at all, yet the line contact causes deformation in the lower canopy and additionally forces both canopies into a new aspect ratio. This leads to a loss of performance. A single canopy will perform better than a biplane. If a plane becomes bigger there will of course, be canopies with bodies in front of them. Planes with more than four canopies will sink faster as the plane formation grows larger. The Stairstep In a stairstep formation (Figure 6) the top jumper is positioned outside of the lower canopies end cell. He takes a foot grip on the outside A-line. Flying the stair step requires much more experience than flying a stack or plane formation because the link is not as stable. It is more of a pivot point than a stable connection. The lower jumper has to compensate for the influence of the upper jumper’s body to the flight of his canopy. To prevent the lower canopy from coming up and around you can put some tension on the outside front riser of the lower canopy or the lower jumper can stretch the outside leg while lifting the inside leg. The stair-step is far less turbulent than the stack and plane. The body of the top jumper only causes turbulence on the outside corner of the lower canopy and that is a part of the airfoil that contributes only a minor amount of lift. That means that a stair step formation is only slightly less efficient than a single canopy. Because only one side of the lower canopy is affected, the other side will perform better and cause the canopy to rise and drive forward. If the lower jumper does not compensate for this, his canopy might come up and around, leading to a wrap. To prevent that the lower jumper will start to compensate for the difference as soon as the top jumper has taken his grip. Possible ways to compensate include putting tension on the outside front riser and stretching the outside leg while lifting the inside leg. One might also apply some slight inside brake. You can determine how much trim is needed by easing up on the risers or brakes after the canopy is set. Sometimes the formation will fly well with only slight trim or none at all. Nevertheless, the lower jumper should keep a watchful eye on his canopy to immediately compensate, if necessary. That wraps up part one. Join Peter in a week or so for Part 2, when we'll dive deep into building and controlling these formations.
 -
 Re-run with USPA permission. After years of effort by USPA and the Parachute Industry Association, the FAA has approved a new final rule that will lengthen the parachute repack cycle from 120 days to 180 days. The final rule appeared in the Federal Register last month, and will take effect on December 19, 2008. The effort had more twists and turns than a funneled 20-way, but the change happened when PIA and USPA joined together and finally convinced the FAA to grant a 180-day repack cycle. USPA initiated the first run at the change in 1998 when its board of directors approved a motion authorizing USPA to petition the FAA for the rule change. At the time, the FAA was preparing to revise Part 105. However, the FAA declined to include the lengthened repack cycle as part of its Part 105 revision in 2001, saying the initiative didn't have full industry support. In early 2005, Allen Silver, a well-known rigger and PIA’s Rigging Committee chair, initiated discussion with the FAA about accepting a petition for an exemption that would allow a 180-day repack cycle. Getting FAA agreement, PIA and USPA formed a task group to develop the petition language. This resulted in an effort in which all aviation groups, whose pilots used emergency parachutes, including the Aircraft Owners and Pilots Association, the Experimental Aircraft Association and the Soaring Society, among others, to join PIA and USPA in jointly petitioning the FAA for an exemption to the regulations addressing those parachutes. The exemption requested a 180-day repack cycle for the emergency parachutes worn by pilots, as well as the sport parachutes used by skydivers. The joint PIA-USPA petition was submitted in July 2005. Ironically, while the FAA saw good cause for a lengthened repack cycle, the agency said its own rules prevented it from granting an exemption to so many beneficiaries; exemptions were intended for small groups. The FAA denied the petition for exemption. However, acknowledging the support of so many pilots, riggers and skydivers, the FAA declared that it would publish its own Notice of Proposed Rulemaking to lengthen the repack cycle, which it did on May 22, 2007. At urging by USPA and PIA, nearly all of the hundreds of comments to the docket were in favor of the proposal. The end result is a final rule published this week granting the lengthened repack cycle. "This result shows what can happen when two organizations like USPA and PIA decide to work together on common goals," said USPA Executive Director Ed Scott. "We look forward to doing even more together for the benefit of skydivers." PIA President Cliff Schmucker said, "The 180-day repack rule change is a fine example of what PIA and USPA can accomplish working as one. Together we will endeavor to continue improving safety for parachute users.” For answers to frequently asked questions about the new Rule, please visit either the USPA or PIA (.pdf) online.