Freefall Emergencies
Accelerated FreeFall (AFF) Emergencies
As you get ready to leave the aircraft, you are supposed to do a pre-exit check to make sure that your jumpmasters are ready to exit too. If you make an error in your exit count, you can fool your jumpmasters (JMs) into thinking that you are about to leave and they may end up pulling you off the aircraft before you are truly ready to go. If you leave at the wrong time in the count, you could be taking your jumpmasters in tow. This could lead to some awkward flying if you are not arched. You may be positioned in a reverse arch (like a cat standing on top of a toilet bowl) which will attempt to send your butt to earth. The exit timing depends upon you doing the exit count right so that your jumpmasters can exit with you, not before or after you. If you find yourself looking up at the sky or tumbling, arch hard for stability. Your jumpmasters will be doing their best to assist you in getting back to the proper belly-to-earth position.
AFF:Loss Of One Jumpmaster
If you sheared off one jumpmaster during the exit or one let go because he was not contributing to the stabilization of the formation, arch for stability and check with the remaining jumpmaster during your circle of awareness. If you get a headshake of “NO,” it may mean that the jumpmaster holding onto you is not quite comfortable with your stability at that time. On the other hand, it may mean that he doesn’t want you to go to the next portion of your tasks because the other jumpmaster is just about to re-dock on the formation and he wants that jumpmaster in the correct position before you continue with your tasks. You may or may not feel the other jumpmaster re-dock. Whenever you get a “NO,” simply arch a bit more, wait a few seconds, then do another circle of awareness. If you get a nod of “YES,” you may continue on with your skydiving tasks regardless of whether or not you have just one of both jumpmasters firmly holding onto you.
AFF: Loss Of Both Jumpmasters
You are in an extremely hazardous environment if you don’t have a jumpmaster holding onto you. The moment you realize this, arch and pull immediately.
The following emergencies apply to either AFF or S/L program freefalls. Of course, in the S/L program, a jumpmaster might not be in the air with you during your freefall.
Five-Second Rule For Loss Of Stability
Here’s a good rule for AFF or freefall. It is called the Five-Second Rule. If you are out of control, attempt to regain control by arching hard for five seconds. If you don’t recover stability by the end of that five-second period, pull your ripcord immediately (which one depends upon your altitude). This rule is normally taught to AFF students when they start their Level III training and it is applicable to all freefall students.
Loss Of Altitude Awareness
If you can’t determine what your altitude is because you can’t see your altimeter and you can’t see either of your jumpmasters’ altimeters, arch and pull immediately. The worst of all situations is to go into the ground at a high rate of speed simply because you didn’t know where you were.
Goggles
If your goggles weren’t tight, they may come up off of your eyes and cause sight problems. You could simulate a practice pull position and try to hold them in their proper place, but it is probably better to end the freefall once the situation occurs. There is nothing worse than a distraction to disorient you and cause you to lose track of time and altitude. When in doubt, whip it out.
Exit Emergencies
Exit Hazards-static Line
When climbing out onto a step for a S/L exit, you need to firmly plant your feet on the step so that you don’t trip over yourself and fall off. If you do find yourself prematurely exiting the aircraft, merely arch hard for stability. Don’t grab the pilot chute or parachute as it comes by you. To do so may cost you your life.
Exit Hazards-AFF
When climbing out for an AFF exit, your jumpmasters are supposed to have good control of you. If you start to stumble, they will probably help you into position. If you do prematurely exit, at least one of them should have a hold of you and you will need to arch hard for stability.
When climbing out, make sure your hands stay away from the jumpmaster’s ripcord handles. Occasionally a jumpmaster is launched off the step when a student grabs for the jumpmaster and snares a handle by mistake.
Dangling Static Line
After the jumpmaster dispatches each student, he will unhook the static line and stow it in the back of the aircraft or under the pilot’s seat. If he forgets to disconnect the static line, it is one ingredient for another horror story. During the scramble to exit, jumpers have managed to get those long pieces of webbing half-hitched around their ankle. The result is a surprising and abrupt halt just a short distance out the door. Due to the weight of the gear and the wind, it is impossible for the jumper to climb back up. There should be a knife in the plane to cut you loose and, of course, every experienced jumper in the plane should be carrying one. If there aren’t any knives handy, you will hope the pilot is sharp enough to think of breaking some glass out of one of the instruments in the panel because your alternatives are not terribly pleasant. Either you can pull your ripcord and risk jerking your leg off, or you can wait it out and suffer severe runway rash when the plane lands. One jumper caught in this situation lucked out, he was jumping a helicopter. The pilot set him down gently and red faced in front of everyone on the DZ.
Student In Tow
One of the more dramatic problems is the static line hang-up or student in tow. It occurs when you or some part of your equipment entangles with the static line preventing separation. You wind up suspended about ten feet below the aircraft by the long nylon web. This emergency is extremely rare and if it does occur, it will probably be because the static line is misrouted (perhaps under the harness). Maybe the error was missed in the equipment check, or you and the jumpmaster failed to keep the line high and clear as you moved into the door to jump, or you performed some wild gymnastic maneuver instead of a stable exit and became entangled in the line. Some students, despite all their training, yell arch thousand and then let go with the hands, leaving the feet firmly planted on the step, thus they perform a backloop upon exit.
The in-tow/hang-up situation presents all of you with a perplexing situation. The jump ship will be more difficult to fly. In fact, the pilot may be unable to maintain altitude because of all the extra drag. Just as with the dangling static line situation, you do not want to pull the reserve or land with the plane. As with other emergencies, there is an accepted procedure. You, your jumpmaster and pilot must be familiar with it.
The pilot will be diverting the aircraft to a safer, open area and will be trying to gain altitude. If you relax, you will probably assume a stable towing position either face or back to earth which is better than twisting in the wind.
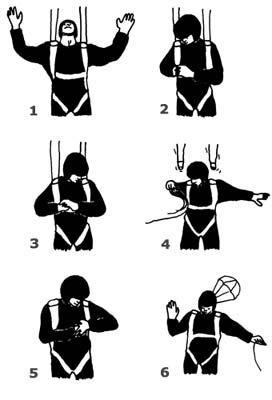
If you are conscious and your arms have not been injured, signal the jumpmaster by placing both hands on top of your helmet. Your hands will show you understand the situation and are ready to take corrective action. Your jumpmaster will signal he is ready too by holding up a knife. Now, your jumpmaster will cut the static line and you will fall away. Pull the reserve ripcord. Be sure you are cut loose before you pull.
If you are unconscious or otherwise incapacitated, you won’t be able to give the OK signal to your jumpmaster. Your static line will still be cut but your jumpmaster (and you) will rely on your automatic activation device to deploy your reserve parachute.
Back when reserves were worn in the front, jumpmasters could lower an unconscious student by unhooking their own reserve and attaching it to the static line. The static line had to have an extra ring for attachment to the reserve to make this method of rescue possible.
There is also a second type of main canopy in-tow emergency to be considered. Normally, you fall away from the step so quickly that it is virtually impossible to tangle your canopy in the tail, but if one of your parachutes opens when you are on the step, entanglement may occur. If you find yourself in this situation, look up and determine which parachute is fouled on the aircraft. If it is the main parachute (which will be attached to risers that can be disconnected from the harness), look at your reserve ripcord handle, jettison your main and pull your reserve ripcord immediately, per the procedures that you were taught to use.
If it is your reserve that is entangled on the aircraft, pulling the reserve/SOS ripcord would not change your situation but it will make your main canopy useless as it would be disconnected at the risers, therefore don’t pull the reserve ripcord handle. The fouled canopy may just self-destruct, putting you back into freefall, in which case you will need to deploy your main parachute to save your life. (If you deployed your main parachute while the reserve is fouled on the aircraft, you can assume that major structural damage will occur to that aircraft and anyone left inside that aircraft will have to perform their own emergency procedures.)
Static Line Not Hooked Up
Occasionally, despite all procedures, a student exits the jump plane without being attached to it. While hooking up the static line is the jumpmaster’s responsibility, you must verify that it is attached prior to exit. If you forget to check this and find yourself in freefall, follow the procedure for a total: pull your reserve ripcord.
Pulling High Is Dangerous
Everyone else expects you to pull below 3,000 feet. If you pull higher, another freefalling skydiver could hit you. An open canopy descends at about 1,000 feet per minute and jumpruns are usually a minute apart. If you plan on pulling higher announce your decision to all before leaving the ground.
How do you calculate the Top 10 DZs
We are using the same true Bayesian estimate formula used by the Internet Movie Database, for calculating average ratings.
weighted rank (WR) = (v / (v+m)) * R + (m / (v+m)) * C
where:
R = average review rating for the DZ = (Rating)
v = number of reviews for the DZ = (votes)
m = minimum reviews required to be listed in top 10
C = the mean review rating across all DZs
This formula normalizes scores, that is it pulls a particular score (R) to the mean (C) if the number of reviews is not well above m. In other words, if a particular DZ has only a few reviews above the minimum required reviews to be listed in the top 10 (m), the average score is decreased a little if it is above the mean, or increased a little if it is below the mean in accordance with the normal distribution rule of statistics.
Here is an example:
WR = (17 / 32) * 3.2 + (15 / 32) * 4.6 = 3.86
| | | | | |
v v+m R m v+m C
The formula normalizes the average rating of a relatively low rated DZ/Tunnel from 3.2 to 3.86 since the number of reviews (v=17) is only slightly above the minimum required votes (m=15) and the mean across all DZs (C=4.6) is quite high. If, in the future, this particular DZ/Tunnel gets more reviews, the difference between R and C will increase as the number of reviews increase. The idea is that the more reviews, the more representative the average rating is.
By admin, in Dropzone Database,
Deployment Emergencies
Common ripcord and hand-deployed pilot chute malfunctions are the lost handle and the hard pull.
Submitted by plante
Lost Handle
Lost handle or out-of-sight hand-deployed pilot chute. Some ripcords are held in place by elastic webbing or Velcro® cloures. If the ripcords come out of these places, they may be blown out of your sight. Some puds (knobs or handles for hand-deployed pilot chutes) attach with Velcro closures, and some are stowed in elastic pockets. There are pros and cons to where these pilot chutes and deployment handles should be mounted. Either one may separate from the container and blow up behind you. Search for the ripcord (one time only) by following the harness to the ripcord housing with your hand. Search for a hand deployment device (one time only) with your hand by following the container to the area where it is supposed to be mounted — perhaps even as far as the closing grommet. If you can’t locate the handle immediately, pull your reserve ripcord. Practice this on the ground periodically.
Lost handles and hand-deployed pilot chutes can also occur after the pull if you fail to pull far enough. Make sure you pull the ripcord all the way out of the housing, or if using a hand-deployed pilot chute, pull the pud to arm’s length before you release it.
Hard Pull
The hard pull may be caused by a bent or rough pin, a hand-deployed pilot chute bound up in its pouch, or you may have packed more canopy in the center of the container instead of filling the corners. If you feel resistance to your pull, give it two more quick tries (perhaps even with both hands while maintaining the arched body position) and then if that doesn’t deploy the main parachute, pull your reserve ripcord immediately. After a number of jumps, it is normal to become somewhat complacent about the pull; you may give it a relaxed, half-hearted jerk. The pull may take as much as 10 kg (22 lbs.) of force, so pull again. If continual hard pulls are bothering you, you might choose to spray a non-petroleum-based silicone or Teflon® fluid on your ripcord cable or your closing pin and your closing loop. This will make quite a difference and it will last for many jumps. You may occasionally have to do it again as dirt and grime builds up on your pin or ripcord cable system. Inspect your system for any signs of roughness. If they exist, get a rigger to replace the rough component with a smooth one.
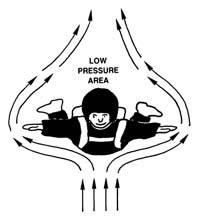
Pilot Chute Hesitation
A problem you could have with your reserve deployment, or a main with a spring-loaded pilot chute, is the common pilot chute hesitation. Hesitations can happen to hand-deployed mains but they are not as common. Hesitations occur when the pilot chute momentarily flutters in the low-pressure area behind you rather than catching air. The hesitation may be caused by a bent or weak pilot chute spring, but usually the pilot chute is just sitting in the dead air space created behind you when you are in the stable position. Sometimes the pilot chute jumps upon release but fails to travel far enough to get a grip on the air rushing past you. It may drop back down on your back and just bounce around or just lay there. If it was hand-deployed, you may not have given it a good throw.
To correct the problem, you may turn on your side during the post exit or pull count, allowing the airflow to inflate the pilot chute and pull it free, you may peek over your shoulder after pulling the ripcord, or you may sit up to dump (deploy your canopy). This last method of pulling, then sitting up (almost the start of a backloop) also reduces the opening forces on your shoulders, but it can lead to other problems such as trapping a tight-fitting deployment bag in its container. Consult with an instructor who is familiar with your system prior to attempting this type of maneuver.
Pull-out v. Throw-out
The pull-out and throw-out pilot chutes are preferred by experienced jumpers, but students (except IAD students) use the ripcord and coil spring pilot chute combination. For a detailed explanation of these three systems, see the chapter on equipment.
Trapped Pilot Chute
If the pilot chute is not properly stowed in its pocket, it may bunch up and jam when you try to extract it. The trapped pilot chute results in a hard pull that may or may not be cleared. If you find you have a hard pull, try one more vigorous pull before you go for your reserve.
Pilot Chute In Tow
Pilot chute in tow may be short or long. It is short when the pilot chute bridle is looped around something such as a harness strap. (A proper gear check could have avoided this problem.) If you have one of the rare bellyband mounted throw out models, make sure that the bellyband is not twisted. If the pilot chute bridle is wrapped around the harness (such as on a twisted bellyband or leg strap), tugging on it will only result in a (short) trailing pilot chute. Check the bridle routing during packing, have it checked in the equipment check prior to boarding the aircraft and check the routing again prior to exit. Twisted bellybands and twisted leg straps are a significant cause of pilot chutes in tow.
The pilot chute in tow is long when the pilot chute pulls the bridle to its full extent but does not pull the pin securing the main container. The failure may be due to a damaged pilot chute (producing insufficient drag), a rough pin, a tight main container (canopy stacked too high), or a closing loop which is too short. The long pilot chute in tow is more likely on sub-terminal velocity jumps.
Make sure the bridle-pin connection is not worn, that the pin is smooth and curved, not straight (unless it is supposed to be such as in pull-out pilot chute systems), and that the locking loop is not too short.
If you are faced with a long pilot chute in tow, never try to clear it. A recent USPA article (Parachutist, June 1997) stated that if you have a pilot chute in tow, deploy the reserve immediately. Therefore, it is treated as a total malfunction. Other experts in the field take the position that if there is anything out behind the container, including a spring-launched or hand-deployed pilot chute, execute a cutaway and reserve deployment immediately. Note: Most student equipment is Single Operation System (SOS) oriented. This means that pulling the reserve handle will execute the cutaway (disconnect the main risers) then deploy the reserve all in one smooth action. A two-handle system requires a separate cutaway handle to be pulled to disconnect the risers, followed by a pull of the reserve ripcord.
How to handle a pilot chute in tow has been the subject of great debate and much beer has been consumed discussing it. While there are exceptions and strong feelings about what has been stated above, time is usually too short to consider them. After the reserve starts to deploy, the main container may go slack enough that whatever kept it closed is no longer doing so, therefore the main may start to deploy. If the main was disconnected from the harness by the action of a cutaway, it will probably not be anything more than a temporary nuisance. However, one must always be prepared for possible entanglement of the two canopies whether a “cutaway” has or has not been performed.

Parachute Malfunctions
A malfunction is any failure of the system to provide a normal rate of descent and this includes loss of canopy control. Malfunctions are normally caused by one or a combination of the following: bad packing, poor body position during canopy deployment and/or faulty equipment. There are some malfunctions, however, that just happen (Acts of God); parachutes are good but not perfect. Failures of the main parachute can be divided into two areas. Either nothing comes out and you have a total malfunction or the canopy starts to open but something is wrong with it and you have a partial malfunction. Each of these two areas will be broken down still further in this chapter.
It is because of the possibility of an equipment malfunction that the USPA’s Basic Safety Requirements list the opening altitude for students at 3,000 feet AGL. (For tandem jumps, it is set at 4,000 feet AGL. For A and B licensed skydivers, it is set at 2500 feet.) The BSRs and the FARs require that a second (reserve) parachute be worn for all sport jumping. It is important that you are drilled in its use. But even with the stated opening altitude safety margin or cushion, you must be aware of the time, speed and distances involved. If you exit the aircraft at 3,000 feet AGL, for example, you will begin to accelerate; you start off at zero vertical speed and then fall faster and faster until you reach terminal velocity (more about that later). If you didn’t have a parachute, it would take you about 22 seconds to reach the ground. In the case of a partial malfunction, you will have a little braking from your canopy and this means even more time. But even if you have a total, allowing for reaction time, you should be open under your reserve at well above 1,500 feet. In fact, while it seemed like an eternity to you, your friends on the ground will tell you that you performed your procedures quickly and efficiently; you will be surprised at how fast you react to a malfunction. Your main parachute takes 3-4 seconds to open and the reserve may be just slightly faster. Even at terminal velocity, which in a face-to-earth,stable position is about 110 mph, (the fastest you can fall in that position), four seconds translates into about 700 feet.
If you haven’t been jerked upright by the sixth segment (second) of your exit or pull count, you should already be into the emergency procedure for a total malfunction. Static lines not hooked up, in-tow situations, lost or hard ripcord pull or pilot chute problems have already been discussed and won’t be repeated here.
Total Malfunctions
Of all the possible equipment malfunctions, the total (pack closure) is the safest to deal with because there is no other garbage over your head to interfere with the deploying reserve. While the total is the easiest malfunction to rectify, remember it also presents you with the least amount of time in which to act. Do not spend time trying to locate a lost handle; you do not have time. Do not waste time breaking away; a loose riser could tangle with a deploying reserve. When in doubt, whip it out. (Pull the reserve ripcord.)
Partial Malfunctions
A partial malfunction is one in which the canopy comes out of the container but does not properly deploy. The canopy may not inflate (e.g. a streamer that hardly slows your descent at all) or it may take on some air and be spinning violently (e.g. a line over or slider hang-up). You could have an end cell closure that will probably slow you enough for a safe landing. So, partial malfunctions may be major and minor. An additionally important consideration is that they may be stable or spinning. Most partials can usually be attributed to an error in packing or poor body position on opening. Some partials, however, just happen.
Some partials are so minor, most instructors do not even classify them as malfunctions; they call them "nuisances." Some of these things that just happen are line twists, end cell closures and a slider that has not fully descended. These are correctable problems which you will be trained to handle.
A good canopy is rectangular (square) and flies straight once the slider is down and the brakes are released. It is stable through the flare and turns properly with the correct toggle inputs. (Remember the controllability check?)
Major partial malfunctions. Ones that you don’t waste time to correct.
Bag lock presents you with trailing lines, bag and pilot chute but the canopy will not come out of the bag. This problem is not likely to clear itself. Breakaway and pull your reserve.
Horseshoe. This malfunction can result from bad maintenance, failure to check equipment and incompatible canopy/container systems. It can happen when the locking pin or ripcord is dislodged from the closing loop, allowing the bagged canopy to escape before you have removed the pilot chute from its stowage pocket.
The horseshoe can occur if you tumble during the deployment sequence, allowing the pilot chute to catch on your foot, your arm, or some other part of your body, but these are rare occurrences today. Another possibility is a poor launch of a pilot chute from your container, allowing it to fall back into your “burble” (the partial vacuum behind you) where it can dance around and snag on something, preventing it from properly deploying. Improper hand deploy procedures can lead to the pilot chute being caught on your arm.
The danger of a horseshoe malfunction is that a pulled reserve may tangle with the horse-shoed main as it tries to deploy. If you experience a horseshoe, and you are using a hand deployment technique, pull the main’s hand deploy pilot chute immediately. Then, and even if you can’t pull the main hand deploy pilot chute, execute a breakaway and deploy the reserve. Chances are that there will be enough drag on the lines and canopy to separate the risers from their attachment points and present only a single line of “garbage” for the reserve to clear (rather than a horseshoed main).
Violent spin. Unless you can tell immediately that you have an unstowed brake, breakaway and pull your reserve. If you have plenty of altitude and the problem is not compounded by line twists, push the toggles down to the crotch for two seconds, then let up slowly. If the spin continues, break away and pull your reserve.
Line overs can occur when a brake lock releases during the opening sequence allowing one side of the canopy to surge forward over itself, or due to a packing error or an Act of God. If you are on a very high clear and pull, you may try to pull down on the end lines (by the risers) to make the other lines slip off. However, if you deployed at the normal pull altitude, you do not have time for this maneuver on the main. Break away and pull your reserve ripcord. If this happens on a square reserve, pulling down on the side the lines are over is your best hope, along with a great PLF.
Partial Malfunctions That May Be Majors Or Minors
Partial malfunctions that may be majors or minors. You may have time to make a decision as to how to handle them.
Rips and tears are not common on ram-air canopies and may usually be ridden in. Even a rip from leading edge to trailing edge on one surface can probably be controlled. Internal rips may not be visible. See whether the canopy is controllable with toggle pressure no lower than your shoulder. If your controlability check indicates a serious problem, break away and pull your reserve ripcord. If the check does not indicate a serious problem, make slow, shallow turns and flare slowly for landing.
The snivel is a slow, mushy opening. The canopy’s fabric weave opens up slightly after a few hundred jumps and becomes more porous. Higher permeability leads to sniveling. Look up after pulling to watch your canopy open. Learn to distinguish a slow-opening snivel from a never-opening streamer. Sometimes replacing the pilot chute will lead to quicker openings. Try packing the nose of the canopy in different positions but check with a rigger before you experiment. Contact the manufacturer about resetting the brakes two inches higher. Then the canopy will take to the air with the tail somewhat higher giving the leading edge a better bite of air.
Slider hang-up, at the canopy. The slider may hang up at the top of the lines because it is caught in the lines or caught on the slider stops. Grommets become battered and rough as they slide down and hit the connector links at the risers. The links should be fitted with plastic sleeve buffers. Make sure the grommets are smooth. A slider hang-up at the canopy is a high-speed malfunction and will be hard to clear. You may be upright but you are descending quickly. There is little time to deal with a slider hang-up at the canopy, so jettison your main and pull your reserve ripcord.
Slider hang-up, halfway. A slider hang-up halfway down the lines will slow you down but possibly not enough for landing. Check your altitude and if there is time (you are still above the decision altitude for emergency procedures), release the brakes and pull the toggles down to your crotch for two seconds in an effort to stall the canopy and relieve some of the spanwise spreading of the canopy. Repeat if necessary, pump the steering lines up and down. If the slider descends to within 10 or 12 inches of the connector links, that is close enough. Sometimes, the slider is caught higher in a suspension line or steering line. Let both toggles up to determine whether the canopy will fly straight. If you have to pull down the opposite toggle to more than shoulder level to maintain straight flight, the canopy will probably be unstable. If you don’t gain total control of the canopy by the decision altitude (sometimes called the hard deck), break away and pull your reserve ripcord.
If the slider comes down the lines halfway and stops, the canopy has probably changed in some way. After you are safely on the ground, measure the line lengths and compare opposite lines. Check the slider grommets for damage. Bring the canopy to the equipment manager (if it is student gear), your rigger, or send it to the manufacturer for inspection.
Broken suspension line(s). Most line breaks only put the canopy into a slight turn. Correct the turn with opposite toggle pressure. Occasionally the broken line causes the slider to hang up. Do a controllability check. If there is any internal damage to the canopy, it will not perform as expected. Failing a controllability check will dictate a breakaway and a reserve deployment.
Minor Malfunctions
Minor malfunctions are more like nuisances that can be dealt with and don’t threaten you unless they get worse or are complicated by other problems.
Line twists. Sometimes, the bag rotates a few turns as it lifts off. Now you may find it difficult to get your head back to look up at the canopy. The problem is that the risers are closer together and twisted instead of spread. These twists can happen with or without your help. If you are kicking, rocking or twisting just as the bagged canopy lifts off, you can impart a twist to it. The principle is the same as when you give a Frisbee disc a flip of the wrist on launch. Line twists are more common on static line than freefall jumps.
Determine quickly whether the canopy is flying straight, your altitude and which way the lines are twisted. Reach above your head, grab the risers and spread them to accelerate the untwisting. If necessary, throw your legs in the twist direction. Line twists are worse on a ram-air canopy than a round because you cannot pull down on the steering lines to control the canopy until the twists are cleared and this may take up to 30 seconds. If the canopy is spinning in the same direction, you may not be able to untwist faster than it is twisting. Do not release the brakes until untwisted. While you have the risers spread, check your canopy to make sure nothing else is wrong with it. A spinning canopy descends quickly. If you haven’t untwisted the lines by 1,800 feet AGL, break away and pull your reserve.
Premature brake release. Ram-air canopies are packed with their brakes set to prevent the canopy from surging on opening. If one brake releases on opening, the canopy is likely to turn rapidly which can escalate into a spin and/or an end cell closure if not corrected immediately. If the canopy doesn't have line twists, grab both toggles and pull them down to your waist. (Grabbing both eliminates having to choose which one to pull.) This maneuver will release the other brake, reduce your forward speed, stop the turn and let you see if any lines are broken. If the premature brake release is compounded with line twists, releasing the other brake may have some or no effect. Be aware of your decision altitude and try to unspin from the line twists. If you are sure that just one steering line is still set in its deployment setting, you might try to release it.
Broken steering line. When you find one of your steering lines has snapped or floated out of reach, release the other brake and steer the canopy by pulling down on the rear risers. Do not try to steer with one control line and the opposite riser. The turns will be inconsistent and you may find yourself in a dangerously low turn when you flare for landing. Pulling down on the risers may be hard but it will steer the canopy. The canopy will probably want to turn in the direction of the good control line. If you cannot make the canopy fly straight with the opposite riser, break away and pull your reserve. If the broken line wraps around the slider, do not try to pump the slider down any further. It will only make the turning worse. Reserve some energy to pull down on both risers at about ten feet from the ground to flare the landing. You want to start this flare lower because pulling down on the risers results in a more pronounced flare.
Steering line(s) won’t release is similar to dealing with a broken steering line, except that one may release while the other won’t. If neither steering line releases, simply fly the canopy to a safe landing using the rear risers. If only one releases, then you can pull that steering line down to the point at which the canopy will fly straight, then control the direction the canopy flies by either using the rear risers or using the one working steering line. Quite often, you will have time to grab the riser of the steering line that won’t release and work towards getting it released. Be mindful of your altitude as you work on the problem. You don’t want to steer yourself to a hazardous landing while you are distracted with this release challenge.
Pilot chute "under/over" problems. The pilot chute may fall over the leading edge of the canopy and re-inflate underneath, usually causing a turn in the distorted canopy. Attempt to stall the canopy slightly so that it backs up, possibly allowing the pilot chute to come back up and over the front of the parachute. If the canopy cannot be controlled with toggles, break away and pull your reserve ripcord.
End cell closures occur when the pressure outside the canopy is greater than the pressure inside. They usually happen during canopy surge on opening but they can also be caused by radical turns or turbulent air. Turbulence can occur on hot, no-wind days, on windy days downwind of trees and buildings, and during stormy conditions. Lightweight jumpers under large canopies (called low wing loading) will experience end cell closure more frequently. To avoid end cell closure, fly with one-quarter to one-half brakes. To counteract end cell closure, push the toggles down to your crotch for a few seconds, until the cells inflate, then let the toggles up slowly. Repeat if necessary. End cell closures are not a major concern. Keep the canopy and land it if it is not spinning. If the end cells collapse below 200 feet, do not try to re-inflate them.Pull to half brakes to stabilize the canopy. When you flare for landing, the cells will probably pop open.
Combination Malfunctions
When confronted with more than one malfunction, correct for line twists first. The canopy will be uncontrollable until the twists are removed. When in doubt, whip it out, especially if you are at or below decision height (1800 feet AGL).
Two Canopies Open
You may find yourself confronted with two fully open canopies. This can happen in several ways: The automatic activation device on your reserve could fire when you are happily flying your canopy through 1,000 feet; you may have reacted very quickly to a pilot chute hesitation without effecting a breakaway; or the main release system may have failed to separate during an emergency procedure.
If the two canopies take off at different times, they may not deploy into each other, but you need to be prepared to handle that possibility. At the Parachute Industry Association Symposium in Houston in 1997, a detailed report was presented on the performance of two ram-air canopies out — a very dangerous situation.
First, quickly check the condition and position of the main and reserve canopies, then make your decision based upon the following:
If the two canopies are flying side by side, steer yourself to a safe landing area by using gentle control inputs on the larger canopy. Due to the nearly doubled surface area supporting your weight, the effective lift of the parachute system will make flaring the canopies unnecessary. Flaring one could create a hazardous situation, especially close to the ground.
If the two canopies are both flying downward towards the ground (called a downplane), jettison the main. Note:Certain reserve static line lanyards may have to be disconnected so as not to foul the reserve parachute when the main is disconnected. Ask your instructor about the specifics concerning your system.
If the canopies are flying one behind the other and in the same direction (called a biplane), make gentle steering inputs with the lead canopy (which is usually the main). Do not release the rear canopy’s deployment brakes. Do not flare the landing.
If the reserve container has opened but the reserve canopy has not yet, or not completely deployed, make gentle steering inputs with the main and try to haul in the reserve and stick it between your legs.
Tandem Jumping Malfunctions
Tandem jumping malfunctions may be aggravated because the weight is doubled while the effective drag area of the two falling bodies is not. As long as the drogue pilot chute has been deployed properly, freefall speeds are about the same as a single skydiver. If the drogue is not deployed or fails to work properly, the terminal velocity will be much faster than that of a single skydiver (110 mph); perhaps as much as 160-170 mph. The greater speed places a much greater strain on the parachute system and on the jumpers.
Large Ring And Ripcord Handle
Older harnesses used a plain round ring for the largest of the rings in the 3-Ring canopy releases. When the main canopy is jettisoned, the largest of the riser-release rings remains on the harness. If the rings flop down on the lift web, the one near the reserve handle may be mistaken for that handle. Both are large silver rings and the reserve handle may have shifted from its normal position. Some jumpers have broken away only to tug on the wrong ring. Some never lived to tell about it. Newer equipment may have a shaped large ring or a smaller (mini) ring that is more difficult to confuse with the reserve handle. If you have older equipment, you should be aware of this potential problem.
Change Of Emergency Procedures
Anytime you change your equipment or emergency procedures, make sure you are thoroughly trained. Practice in a suspended harness until proficient on the new equipment. Each corrective procedure is different and you must not waste precious seconds in an emergency thinking about what you should do. You must act automatically and quickly. Review your emergency procedures prior to each jump and touch all your handles before you proceed to the door.
Breakaway Training
Breakaway training is essential to assure that it will be accomplished completely, quickly and well. Training must take place in a suspended harness that is easy to rig up. Simply tie an old set of risers to an overhead beam and attach them to your harness. The drill must be repeated again and again until it becomes mechanical and automatic so that you will perform correctly and without hesitation should the time come. When you take your reserve in to be repacked, ask your rigger if you may practice the breakaway to include the reserve pull. It is a valuable experience and in this controlled environment, it is safe for your gear.
Emergency Priorities
Think about and review the seven priorities of skydiving:
Pull - Open the parachute.
Pull by the assigned altitude or higher - whether stable
or not.
Pull with stability - to improve canopy-opening reliability.
Check the canopy - promptly determine if the canopy has
properly opened and is controllable.
If necessary, activate the reserve - perform the
appropriate emergency procedures if there is any doubt that the main canopy is
open properly and is controllable.
Land in a clear area - a long walk back is better than
landing in a hazardous area.
Land safely - be prepared to
perform a PLF with the feet and knees together to avoid injury.
Canopy Collisions
Let’s assume that your canopy has just opened properly and you are reaching up for the toggles when suddenly, you look ahead and see another canopy coming directly towards you. What should you do? If the collision is avoidable by steering to the right or left, choose the right. The turn to the right is virtually universal in all forms of navigation. If the collision is unavoidable, spread your arms and legs out to absorb the impact over the most surface area possible. Chances are that spreading out will allow you to bounce up and over the lines and canopy you will be colliding with. You may get a bit hurt, but you will be alive so long as you don’t make full body contact with the other jumper. If you find yourself entangled with another parachute, the general rule of thumb is that the lower person has the right to perform emergency procedures first. Communicate with each other as to what you want to do, what you’re going to do, then do it while you still have enough altitude to do it safely.
Most canopy collisions occur during the landing phase of the skydive, when too many people are trying to get into one tiny area all at the same time. Vigilance in canopy control and choosing a less congested area can help avoid this emergency. If you do end up tangled at an altitude too low to break away (less than 500 feet AGL), ride about half brakes and get set to do a fantastic PLF.
Canopy Emergencies: Breakaway
Jettisoning The Main Canopy
Before we talk about the series of problems you may encounter with your main canopy, it is important to discuss the types of cutaway (main canopy disconnection systems) that are in common use and their procedures. The breakaway or cutaway is an emergency procedure that involves jettisoning the main canopy prior to deploying the reserve. Originally, the cutaway was performed with a knife and the lines were cut to separate the canopy from the harness. Today, we use canopy releases to breakaway. The breakaway procedure should be executed immediately under rapidly spinning malfunctions because ever-increasing centrifugal forces will make arm movement difficult, and may cause you to lose consciousness (red-out) due to the blood flow to your eyes.
The decision altitude for the breakaway is 1,800 feet. This is your safety margin, above this it is safe to try to clear the malfunction but at this point, all clearing work must stop. Watch your altitude. The breakaway must be commenced above 1,600 feet to assure you plenty of time to get the reserve out. Under high-speed malfunctions, you may be just seven seconds off the deck at this point, and it may be necessary to forget the breakaway and just pull the reserve.
To breakaway, spread your legs (for lateral stability and push them back as far as possible while bending your knees about 45 degrees (only). Arch your back and pull your head back but keep your chin resting on your chest and your eyes on the handle(s). On release you will fall into a stable, face- to-earth position.
Body position during the breakaway is very important. If you are not falling away correctly, you may become entangled in the canopy and/or lines of your deploying reserve. Even with good body position, breaking away from a violently spinning malfunction may throw you tumbling across the sky.
The breakaway procedure is as follows:
Two Action System(TAS)
The TAS has two handles: Pull the first one (usually a Velcro-attached pillow handle located on the right-hand main lift web), to release both risers (a single point release). Then activate the reserve by pulling the other handle (usually located on the left-hand main lift web).
A. Total malfunction (nothing out)
Do not waste precious time breaking away; just pull the reserve.
LOOK at the reserve ripcord handle and arch.
REACH for the reserve ripcord handle with both hands.
PULL the reserve ripcord handle with both hands.
B. Partial malfunction (canopy out but not working properly)
There are two schools of thought on how to perform the breakaway action using this system. The first one presented is in the USPA’s Skydivers Information Manual, “Section 8-3.16.” While it states “Look at the reserve ripcord handle...” (step 3), it says nothing about the choice of one hand or both on the breakaway handle. It is as follows:
LOOK at the breakaway handle and arch. The arch should keep you from making a backloop when you jettison the main.
REACH for the breakaway handle (presumably with both hands).
LOOK at the reserve ripcord handle before breaking away.
PULL the breakaway handle and throw it away while continuing to keep your eyes on the reserve handle.
REACH for the reserve handle with both hands.
PULL the reserve ripcord.
CHECK over your shoulder for a pilot chute hesitation.
CHECK your reserve canopy, look around and prepare to land.
Note: For student equipment, and something that is becoming more popular on experienced jumper equipment, there is a device known as a reserve static line lanyard RSL (sometimes called a Stevens lanyard). This is a piece of webbing attached from the right side riser (or both risers on some systems) to the reserve ripcord cable. It is designed to pull the reserve ripcord out of its locking loop(s) as you fall away from the main parachute after that main canopy is cut away, thus allowing the reserve to deploy. When installed and operating properly, it will usually beat you to the manual deployment of the reserve. However, it should not be relied upon, for after all, along with an automatic activation device (AAD — described in Chapter 7), it is merely a back-up device to your proper execution of emergency procedures. This system can be disconnected (if necessary) by personnel who know what they are doing.
It is a possibility that when you perform a breakaway using both hands on the breakaway handle, there is a fraction of a second of disorienting instability as the maneuver is executed. Although you are supposed to be looking at the reserve ripcord handle, you still need to move one or both hands to it from whatever position you are in at the conclusion of the breakaway-handle pull. The ripcord handle may move from where it was (on the harness) under the tension of the partial malfunction to a different position during this moment. It is a possibility that there may be an additional second or more of elapsed time as you reach for the reserve ripcord handle.
Therefore, there is a second school of thought about performing the breakaway, which is, if you are about to execute a breakaway and you put your right hand on the breakaway handle and your left hand and thumb through the reserve ripcord handle, there will be no lost time reaching for the reserve ripcord after the breakaway is executed. Here is a typical scenario:
LOOK at the breakaway handle and arch. The arch should keep you from making a backloop when you jettison the main.
REACH for the breakaway handle with your right hand.
REACH for the reserve ripcord handle with your left hand, placing your thumb through the handle to ensure that you have a firm grip on it.
PEEL and PULL the breakaway handle to full right arm extension. Throwing it away is optional.
Immediately after you’ve pulled the breakaway handle with your right hand, PULL the reserve handle out to full extension with your left hand.
CHECK over your shoulder for a pilot chute hesitation.
CHECK your reserve canopy, look around and prepare to land.
In this scenario, there is no hesitation in looking for a reserve ripcord that may have moved, thus it may save a second or two of precious time.
The Single Operation System (S.O.S)
The Single Operation System is a one-handle/one-motion system. The S.O.S. has a combined handle, usually on the left main lift web, to release both risers and activate the reserve. The S.O.S. has a reserve static line lanyard (Stevens lanyard) from one riser to the reserve ripcord. The purpose of the S.O.S. is to eliminate one the motions in the breakaway sequence; that of separately pulling the cutaway handle. By pulling the reserve ripcord all the way, you accomplish both the breakaway and the reserve-ripcord pull in one complete action. With a two-action system, half a breakaway is worse than no breakaway at all unless you have an RSL.
The S.O.S. usually produces full deployment of the reserve canopy in less than 100 feet. If you find an RSL on your piggyback harness/container assembly, you should leave it on. When you and your instructor develop enough confidence that you will pull the reserve after a breakaway, you can do away with the line if you wish.
Total or Partial malfunction
In the event of a total or partial malfunction:
LOOK at the combination release/ripcord handle and arch.
REACH for the combination handle with both hands.
PULL the combination handle with both hands to full arm extension.
REACH back with one hand, grasp the cables where they come out of the housing.
PULL AGAIN to clear the cables and
CHECK over shoulder for a pilot chute hesitation.
CHECK the reserve canopy, look around and prepare to land.
Never depend on the reserve static line device (Stevens lanyard). Always pull your reserve ripcord cable all the way out of the housing immediately after breaking away.
Canopy Transfer
Canopy transfer is a third type of breakaway procedure sometimes used in Canopy Relative Work by those who believe something is better than nothing. If your main canopy becomes damaged or tangled on a jump and it is still flying forward, you may pull your round reserve and drag it behind you, full of air. Once the reserve canopy is inflated, jettison the main. This maneuver is extremely risky with a square reserve canopy as two squares may fly around and into each other. This type of problem is discussed later on in detail.
Harness shift
When you jettison the main canopy, your harness will shift downward taking the reserve ripcord location with it. Therefore, it is essential that you keep your eyes on the reserve ripcord handle, if your hand is not already grasping it, when jettisoning the main canopy.
Now that we have covered cutaways (breakaways), let’s discuss when and where they are used.
Briefings And Safety Considerations
Hazard Briefings
Emergency procedures will vary from drop zone to drop zone to fit local conditions. There may be trees, rivers, power lines, hostile neighbors, prisons, highways or a girls’ school. In fact, those DZ’s lacking certain hazards may touch on the corrective action for every emergency but lightly. Therefore, when visiting a new DZ, it is imperative that you get a briefing on the area.
Alcohol And Drugs
In order to achieve the greatest enjoyment from your skydiving experience, you will want to approach it with an unfogged mind. This means going to bed early the night before and going easy on the booze. Even the common cold will trouble you due to the changes in atmospheric pressure. If your mind and body are not operating at 100%, you will react with less efficiency in an emergency and you will enjoy the jumping less. Remember, the lower pressure at altitude amplifies the
affects of alcohol and drugs.
Health Concerns
Jumping with a head cold can lead to ruptured sinuses and ruptured ear drums. The inner ear and the Eustachian tubes do not take kindly to large pressure changes when they are plugged. Infections in these areas can produce debilitating pain under normal jump conditions. In a few words — if you are sick or under the weather, don’t jump. Loading up on antihistamines and decongestants can cause other medical problems. There is always another day to enjoy a jump in good health.
Scuba Diving Alert
There is no problem in descending into the water within 24 hours of jumping or flying, however, there is trouble waiting in doing the reverse. Scuba divers know to stay away from air travel for a period of 24 hours after their last descent below 30 feet (one atmosphere’s increase in pressure) so as to avoid the bends (nitrogen bubbles forming in the joints and blood stream). Since skydiving involves air travel, the same rule applies.
Some Fear Is Good For You
It has been said that the difference between fear and respect is knowledge. Most people fear skydiving because they don’t understand it. Fear is the result of ignorance and it is part of nature’s protective mechanism; it warns us to beware when we are on unfamiliar ground. The best way to cope with problems is to prevent them in the first place. The key is education. It is unfortunate when someone is injured while engaging in sport, but it is tragic when a second person is hurt for the same explainable and preventable reason.
Airport Safety
Never smoke around aircraft, hangers or pumps. Both aviation fuel and aircraft dope present a great fire risk.
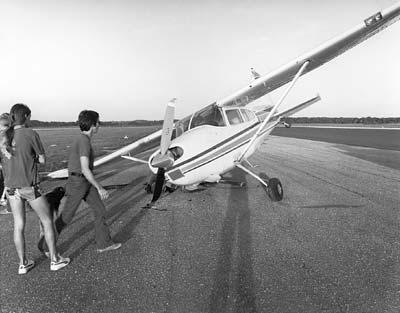
When moving light aircraft, be careful where you push. They are covered with very light fabric or metal and are easy to damage. The pilot will show you where it is safe to apply pressure.
Beware of the prop. It is difficult to see and will make quick mincemeat of anyone who walks into it. Always walk around the back of fixed-wing aircraft and in front of helicopters. Stand where the taxiing pilot can see you; his or her forward visibility is not good. Get into the habit.
Leave the dog and the children at home, the airport is not a nursery. If a play area is made available to children at the DZ, remember that they are still your responsibility.
If your airport has more than one runway, stay off the active one. It will normally be the one running the closest to the direction of the wind. Remember that planes usually takeoff and land into the wind so look for them downwind. Rules change from airport to airport and at some you will not even be allowed to cross the active. Do not walk down any runway and do not fly your canopy over one under 500 feet.
Be nice to all the pilots, they have a lot of clout at the airport and you may need one to fly the jump ship. Be patient with the whuffos (spectators), they are public opinion.
Emergencies In The Aircraft
Airplane Problems
Engine and structural failures. If the engine is going to fail, it will probably do so when the pilot reduces power after your full throttle takeoff. If the engine quits, he will attempt the best landing he can, straight ahead off the end of the runway. Since you are helmeted, padded with gear and strapped in, you need only assume the proper position to be prepared. Draw your knees up, tuck your head down, fold your hands across the back of your neck and hold your head down to resist whiplash. As soon as the plane comes to a stop, get out FAST. If you are nearest the door, get moving. There are people behind you who want to get out. There is always the danger of fire, particularly if the aircraft has suffered structural damage on impact. Watch where you step, the plane may have clipped through some power lines. They can zap you and they start grass fires. Remember that the wings of the airplane usually contain flammable fuel.
Occasionally, the jump ship suffers a structural or other mechanical failure. Twisted-on parts sometimes twist off or a canopy may get draped over the tail jamming the controls.
Depending upon the situation and the altitude, your jumpmaster will select one of two commands: PREPARE TO CRASH or GET OUT (jump). The dividing line is usually set at 1,000 feet above the ground since at this altitude there may be enough time for an orderly exit and the pilot will probably be able to land his glider on the runway. The jumpmaster might tell you to jump and pull your reserve on the theory that it is somewhat more reliable and may deploy faster than the main and/or he may be concerned about the setting of your AAD. His instructions will depend on the circumstances of the situation.
So, if you are below 1,000 feet when the challenge occurs, you will land with the aircraft. If you are over 1,000 feet when the rubber band breaks, your jumpmaster may direct you to make a normal static line jump, but you will do it all a lot faster; swing out onto the step and go. Student freefallers may be directed to make a jump and pull; this is where they will open their mains as soon as they clear the aircraft, or the jumpmaster may sit them in the door, pull their reserve and simultaneously push them out. It all depends on the altitude at the time of the emergency. Licensed jumpers are next, then the jumpmaster and, in the case of severe structural failure, the pilot. The purpose of getting out of the plane is not only to remove you from the area of danger but to lighten the load making the aircraft easier to control. The jumpmaster goes next to last because he must take care of those in his charge. The pilot goes last (he wears a parachute too) so that he may wrestle the jump ship to keep it flying until you are gone.
The above rules are general and are for students. Experienced jumpers may elect to exit lower. For example, if the aircraft is at 500 to 1,000 feet, an expert skydiver may elect to jump and pull the reserve (which presumably opens faster).
Of course you will follow the instructions of your jumpmaster, but sometimes you have to make the decision yourself. In the excitement of solving the engine failure or other problem, the pilot may allow the airspeed to drop, stalling the plane and allowing it to spin. In this condition the aircraft drops fast and the centrifugal force may pin you against the side or ceiling. Now is the time make the decision to scramble and get out.
Depending on the size of your jump ship and the procedure at your drop zone, your static line may be hooked up on the ground, at 1,000 feet, or on jump run. Whether or not your main is hooked up may determine what type of escape you can make in case of an aircraft emergency. For example, if you hook up prior to boarding, and the plane crashes on takeoff, when you unbuckle and get out, you can expect to unpack your main about eight to 15 feet from the door (the length of your static line).
The final point to remember is to watch and listen to your jumpmaster for instructions. When you receive them, carry them out quickly and without panic.
Open Parachute In The Airplane
Several times in the past, jumpers have been pulled through the side of the jump plane when a container opened and a canopy escaped out the door. Rarely does this result in a fatality but usually there is severe damage to both the jumper and the aircraft.
If either the main or the reserve open prematurely in the aircraft, one of two things will happen; the pilot chute and/or canopy will either start out the door or remain in the plane. You have only one course of action for each situation.
The jumper whose reserve escaped out the door of this aircraft was lucky; he survived.
If the main container opens in the aircraft,
it is usually the result of excessive movement by a person in the aircraft. This could happen when you constantly shift positions, rubbing the static line and/or closing flap on an interior surface or snagging the static line on something during movement in the aircraft (from one position to another). With the Instructor Assisted Deployment (IAD) method, these hazards are real because hand-deployed pilot chutes use small closing pins. With long plastic coated cables for a main ripcord, the hazard is much less likely, especially when the ends are tucked into housings on a closing flap. If the main container opens,
it is a simple matter to move backward pinning the errant canopy against a wall or flat surface. Show the problem to your jumpmaster immediately. Once satisfied that you have it well secured, disconnect the main canopy from your harness by operating the canopy releases (the method depends on the type of system you are using — your jumpmaster will probably do this for you as well as disconnect your reserve static line device). This is so that if it should somehow get out the door later, you won’t be connected to it. Now sit on the canopy and pilot chute so they won’t get away and ride the plane down.
Sometimes the reserve container will burst open while you are in the back of the plane. The pin works its way out, or perhaps since you are in the back of the plane, you are not vigilantly guarding your reserve ripcord handle and it is snagged out as you move around trying to find a comfortable position. Grab the reserve pilot chute and canopy, cover them and hold them tight. Call the jumpmaster’s
attention to the problem immediately. The reserve creates a greater potential danger than the main because it cannot be quickly disconnected from the harness.
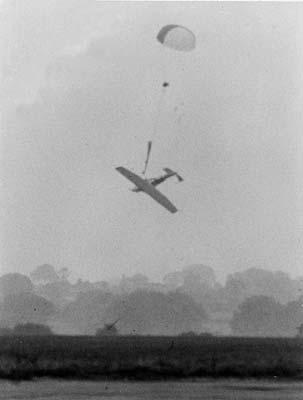
The deploying reserved canopy pulled the static - line student off the step.
If, however, either of your canopies start out the door while you’re attached to it, you will follow it out. You have, at most, two seconds, and if you hurry you will experience a near-normal canopy ride to somewhere in the vicinity of the airport. But if you are slow, the developing canopy will act as a giant anchor, extracting you not just through the door but, more than likely, through the side of the aircraft too, causing great injury to you, damage to the aircraft,
and exposing others still in the aircraft to great danger.
The best solution is prevention. Always guard and protect your static line and/or your ripcord(s), canopy release handle and pins.
Classifed Ad Listing Guidelines
The Dropzone.com Skydiving Classifieds is a FREE service to the global skydiving community. It has grown to become one of the most popular places to buy and sell skydiving gear. We plan to keep it that way and will continue to add new features but we ask that you help us by following a few simple rules and guidelines to keep this place tidy.
1) Your ad must be skydiving related
The Dropzone.com Classifieds are for skydiving related ads. Any ads that does not relate to the sport or industry of skydiving will be removed.
2) List your ad to a single category only
Please pick the most appropriate category and list your ad in that. Any multiple posts will be removed - all of them, not only the duplicate. Ads that are in the wrong category may be moved or removed. No SPAM will be allowed.
3) No UPPER CASE SUBJECT LINES
Do not post subject lines or ads in upper case letters. Upper case letters are rude and considered shouting.
4) No HTML
You are not allowed to use any HTML anywhere in your ad. Any ads containing HTML will be deleted.
5) No ==>"Eye Catchers"<==
Do not use "eye catchers" in your subject lines to try and draw attention to your ad. Examples are adding characters like ==> <== or ** ** around the subject. Please type a clear descriptive subject only. These characters make a classifieds board look tacky and is not in line with the Dropzone.com brand of providing clear un-cluttered content. Help us keep it tidy. Ads that use this practice will be removed.
6) URL or Links only
Your ad has to contain material and substantive information about the item you are selling. The Dropzone.com classifieds is a free service for people who want to list their gear for sale. It is not set up as a "links directory" to external sites where gear is being sold. Premier Members has the option to add an external link to their ads.
7) Ebay links
If you choose to sell your gear on Ebay then please do not place and ad on Dropzone.com with a link out to EBay only. See the guidelines above. Ads like this may be removed.
8) Duplicate ads
If you decide to post something that has already been posted again then you have delete your original post first. If a duplicate ad for the same item is found both will be removed.
9) Companies advertising
While skydiving gear sellers are at this stage welcome to list items in the classifieds we ask that you not abuse this privilege. Do not spam the classifieds with items and please list proper information about each item for sale, not just links to your site or a general "sales" announcement. If gear sellers abuse this privilege access to the classifieds for all companies may be suspended. please work with us on this. :-)
10) PayPal Fee Compensation
It is against the PayPal terms of service to request that the buyer compensate for PayPal fees included in the transaction. We recommend that the seller include any PayPal compensation he requires into the price of the actual product.
That's it for now...
We reserve the right to refuse service and remove any ad without providing a reason. Repeat offenders and spammers will have their usernames disabled.
Thanks for supporting Dropzone.com and thank you for helping us keep the Classifieds tidy and easy to use for everyone.
By admin, in Classifieds,