The GoPro Hero
Last
week GoPro sent me one of their new Hero cameras to test in a variety of
environments. I’m somewhat of a snob when it comes to cheap camcorders,
and the people at GoPro knew this from the start. In fairness, this is the least
expensive camera/camcorder I've ever reviewed, and not expecting to be impressed.The
camera arrived in a complete configuration; batteries, 2GB SD memory card,
and the standard box that the GoPro comes with. Opening the GoPro package
requires a degree in disassembly if the box is to be kept in more than one
piece. It took three people nearly 10 minutes to figure out how to open
it. If the box is any indication of how tough this camera is…it’s gonna be a great
little camera.
The GoPro Hero Wide
Physical Characteristics:
The
camera includes several mounting options, including a rubber headband that
resembles a jockstrap. It’s not much to look at, but it’s also not going
to be the common use (I hope) for most users. The camera mount on the
“jockstrap” can easily be removed and connected to more substantial
webbing.
The water housing is impressive. Very impressive for the price, in fact. I’ve
paid more for a cheap housing than for this entire camera, and this
housing is more nicely built than a housing I once paid $350.00 for. This
is a good thing, because the mount for the camera is integrated into the
waterproof/protective housing of the camera. The system is not designed to
be used without the camera in its waterproof housing.
The
camera itself feels “plastic,” even though it is made of light aluminum
and plastic. The plastic lens is fairly exposed; all the more reason to
keep it in its waterproof case and keep the case in a soft bag when not
being used, in order to protect the lens from damage/scratching.
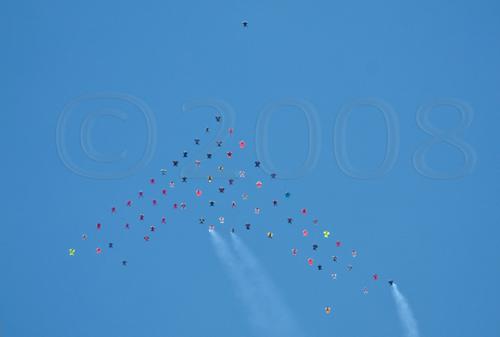
This shot was one of 92
still images captured in a single skydive.
With
a plastic pressure-release mount, there is some fear that a hard strike
will cause the unit to be torn from whatever mounting device it may be
attached to; this is a positive feature rather than negative factor, as
safety is the primary concern of all active sport enthusiasts.
The
plastic mounts are plentiful; GoPro provided three stick-on mounts with
extra double-sided adhesive material. In addition, GoPro provides a pair
of extra mount clips, and a mounting arm that allows for a 90degree
rotation of the camera when mounted to vertical objects such as the mast
of a kiteboard, paraglider, or similar. It’s much like an Israeli-arm used
for higher end cameras, excepting that it’s exceptionally lightweight, and
plastic.
The camera comes with
several mounting devices/replacement parts.
Technical Characteristics:
The
camera has a very small sensor size, I believe it is 256 x 192 with
doubling, but I was unable to receive confirmation of this from the
relations department at GoPro. The sensor is a CMOS imager, which is
somewhat obvious by the lack of dynamic range (see image with large black
spot in center of sun).
Sporting an output frame size of 512 x 384, broadcast, output to DVD, or
other full-frame display will be difficult to do with any degree of image
integrity. For web or fun review on a computer in small viewer, it's
perfectly appropriate and will give a lot of enjoyment to the sports
enthusiast that isn't chasing professional results.
GoPro encodes to an MJPEG codec in AVI container (will be .mov on Apple)
and will require an MJPEG decoder in order to read/edit. Most NLE software
includes an MJPEG decoder, and they are available from several providers
around the web. The encoder compresses the video data to 4800 Kpbs, which
is approximately the same compression ratio found on many hllywood DVDs.
However, bear in mind that Hollywood DVDs are framesized at 720 x 480, and
are sourced from film or HD cameras. I mention this, as some of the
marketing commentary on the GoPro Hero compares technical data with that
of a DVD. They’re not remotely the same. Additionally, DVDs are encoded
with a PAR (Pixel Aspect Ratio) of .909 or 1.333. This means that pixels
are elongated in either a horizontal or vertical configuration. The GoPro
records a PAR of 1.0 (this means the pixels are square, and are not
stretched, which is a benefit). The display is a Standard Aspect Ratio,
otherwise known as 4:3. This is the “old” format of screen display, and is
no longer available in television displays. GoPro might consider
providing widescreen in an anamorphic format in their next camcorder
models, as widescreen displays are now the world standard.
30Fps Progressive frames means the image will be smooth for playback, and
clear on computer monitors.
Audio is recorded in Mono @8Khz/64Kbps stream. The audio is useless for
anything other than reference. It should be pointed out once more, that
this camera is aimed at the sport enthusiast that wants to capture
exciting moments for the web, not for broadcast or professional use.
Still images may be captured at the rate of one still every two seconds
for up to 65 minutes (over an hour) on a 2GB SD card. Larger cards may be
used. The stills are 5MegaPixels, and for some, this is going to be a
“wow” factor. However, there is a difference between stills captured
through a low-cost plastic lens and a reasonable quality glass lens as
found on most 3-5MP hand cameras. In other words, the megapixel count is
only a small part of the actual picture quality. (More megapixels don’t
assure better pictures in any event.)
SD
flash card is the format in which this camcorder stores data. SDHC cards
do not improve the performance, speed, nor quality of the camcorder.
The
camcorder package also includes a proprietary cable connection that
outputs to USB and video composite signal.
Note the hot-spot in the
middle of the sun. I was able to consistently reproduce this artifact
with any bright light source in a high latitude shot. Even a 100 watt
lamp could create this anomoly in a reasonably lit room. I believe
this is a problem with the sensor; it cannot manage high latitude.
Operational Characteristics:
The
camera is easy to operate. The multiple-press menu button that provides an
icon-driven LCD panel doesn’t provide immediate feedback, and requires a
review of the owners manual to decode the iconography of the display. In
my first operation, I captured video from a skydive, but accidentally
deleted the files as a result of not being clear on what the different
icons were indicating.
Additionally, it wasn’t immediately clear on how to turn off the
camcorder, and when left on without operation, the camcorder eats
batteries fairly quickly. With regard to batteries, only Lithium batteries
should be used with the GoPro Hero. They’re a little more expensive, but
this device eats alkaline batteries like they are candy. Rechargeable
batteries may not be used.
The GoPro Hero Wide uses SD
memory cards. The black strip on the back is a rubber isolator to keep
the camera tight in the waterproof housing.
There are only two buttons on this camera, it’s not like it’s a challenge
to operate once the owners manual has received a glance or two. One button
for shutter control/record functions, and one button for menu control. The
beauty of this camera is found entirely in its small size, price, and ease
of use.
Summary:
This camcorder
isn't going to light the professional's eyes up like a professional POV
camera will, but it won't burn the amateur's wallet like a professional
POV camera costs, either. I've tried all the various POV "sport cams"
currently on the market, and for sub $200.00, this is clearly the winner.
There simply is no camera in its class that can compete. GoPro should be
proud of themselves for designing a camera with this quality in this price
range. At $189.00 it certainly isn't a toy, but it is a very fair cost of
the fun this camcorder can record for the sport enthusiast. Mounted to
handlebars, helmets, struts, pedals, forks, kayaks, paddles,
fenders, wrists, feet, belly, or other body part, the GoPro Hero is a hit
in my book.
-douglas spotted eagle
The Future of Wingsuiting:
In November 2008, 71 wingsuit pilots flew in a stealth-bomber-shaped formation over Skydive Elsinore.
It was the largest slot-specific formation in the short history of this emerging
discipline. But how did the event, which was billed as a “Wingsuit World
Record,” change the future of wingsuit flying (if at all)? In a discipline still
unrecognized by the FAI and the Guinness Book of World Records, what does it
mean to try setting new standards?
71: Achievement and Frustration
The idea of a big-way wingsuit record was not new. The most notable previous
event was in Cochstedt, Germany in July 2006. Organizers there sought Guinness
recognition for the largest number of wingsuits exiting on a single jump run,
out of an Antonov 72.
In contrast, the 2008 71-way at Skydive Elsinore was a purely invitational event
focused on slot-specific flying in a four-plane formation. A diverse
international team reflected a worldwide growth in the discipline and a global
desire to achieve something recognizable within our sport. Hailing from as far
as South Africa and Russia, participants from 14 countries qualified for a
chance to fly in the big-way by demonstrating their skills at official camps and
through a referral system. Five were women (the few, the proud, the only gender
not to have a single member axed from her slot!).
The skydiving press (the French
ParaMag, British
Skydive The Mag and American
Parachutist, among others) extensively documented the event.
The 71-way marked significant achievements as well as frustration. In the
achievements column, the team flew a new, wider spacing that reduced oscillation
and movement within the unlinked formation. This led to multiple smooth and
on-level jumps that looked beautiful from the ground.
The previous slot-specific record recognized within the wingsuit community was a
16-way diamond. Like that formation, most small groups had employed a
“head-to-foot” spacing technique that encouraged proximity but usually resulted
in trailing flyers at the back and reactive vertical motion within the flock.
The scope and level of organizing, while it left much room for improvement, was
also a check in the achievements column. While there was some initial grumbling
about the level of seriousness and the pushing of safety standards in
communications to team members prior to the event, most participants expressed
relief that the 71-way jumps would be a focused record attempt and not “just
another boogie”.
Frustration arose when it came time to judge whether the group had succeeded in
setting a “world record”. The initial goal was to have each wingsuit pilot
flying within three-square-meter boxes arranged in a grid that would be
superimposed over still photographs of the formation. The organizers’
proclamation of success was based on a photograph where all flyers were either
fully within or touching at least one edge of their three-square-meter grid
square. However, without an outside judging structure, heated discussions
escalated the meaning of “success” and the best way of judging unlinked
formations into a full-throttle debate.
Beyond R&D;: 100 over Elsinore
The debate about how to judge large wingsuit formations will continue unabated
until an outside governing body agrees to recognize one set of objective
criteria. The 71-way was destined to be a “work in progress” since it had never
been done before. With the lessons learned from the experience, an expanded
organizing team is preparing for a 100-way wingsuit event at Skydive Elsinore
from November 7th to November 13th, 2009.
While some ask whether trying to set records before there are established
categories is futile, skydiving is not a sport that waits for mainstream
approval in order to change and grow. Wingsuiting is an especially
entrepreneurial and fast-growing subculture. The hope is to continue safely
demonstrating what is possible. In doing so, organizers strive to create events
that excite new skydivers and unite those already committed to wingsuit flight.
Armed with evidence from last year’s judging attempts, big-way organizers are
prepared to continue lobbying both the FAI and Guinness.
The 100-way five aircraft formation is invitational. Skills camps are planned
between now and July, when official qualifying events begin. A specific Skills
Checklist sets out minimum jump requirements and what exit, flying, and canopy
skills potential participants need to practice and perfect in order to gain a
spot on the team. For more specific information about the 2009 Wingsuit 100-way,
go to www.wingsuitworldrecord.com.
Numbers and Recognition
Official recognition of wingsuit flight as a skydiving discipline will bring a
clear judging regime – and therefore, is ultimately necessary for long-term
growth. Competition drives our sport, and desire to achieve recognizable goals
is at the heart of every team. Whether with the versatility and creativity of
vertical relative work or the sheer size of the formation World Team, standards
and rules (some made to be broken) compel excellence and progress.
In the current vacuum, setting new standards and claiming achievements without
official rules is difficult but necessary. The 71-way, for all its
imperfections, spurred the wingsuiting community to more seriously consider how
it wants to be judged. It also demonstrated that such events have the potential
to recruit serious sponsorship and interest from both new skydivers and
experienced jumpers in other disciplines. That’s the future.
By Deleted, in Disciplines,

An Insiders View of Team X
By Ian Drennan
I wasn't really sure what to expect when arriving at Deepwood Ranch in Deland for the PDFT Tryouts. So much of my skydiving career had been spent preparing for this moment, yet when it finally arrived I felt very unprepared. I can't deny that going into the event I was in competition mode, not sure what to expect, but sure I was going to give 100% no matter what they threw at us. Little did I know that this would feel, and be, nothing like a competition, and nothing like anything I'd ever experienced before...
After a brief welcome by the PDFT we were all taken to a house where we were given free rein to divide our living space as we saw fit. The mood was good; everyone was excited, and nervous, as to what the coming days would bring. Surprisingly when it came to picking living space, most people gravitated towards the people they'd never met or had spent limited time with. There were of course, requirements for each area - thankfully our space was dubbed the "No Snoring" zone :) I had expected the atmosphere to be tense; there was so much unknown and so much riding on this event for each and every person there. Yet the mood was upbeat and encouraging - the tone for the week had been set.
We woke on Tuesday morning, way earlier than any human should have to be awake (that's 6am for me... what can I say, I'm not a morning person!) - still, the rooms were abuzz with excitement and everyone anxiously scurried out to start the day. After breakfast the introductions began, lead by the PDFT and John LeBlanc (who blew off a meeting to spend more time with the group!). As the introductions progressed, each participant revealed more and more about their background, upbringing, and motivations behind pursuing this dream. This 3+ hour experience flew by as, surprisingly, people quickly took to a "heart on the sleeve" approach, laying out their innermost insecurities, fears, thoughts, and dreams.
Once the introductions were done, we were assigned groups (picked by the PDFT) of 5 people. Each of the 3 teams was then assigned a task: prepare a group presentation on a set topic (each group had the same topic) within the hour, and each team member was required to spend an equal amount time speaking. This exercise quickly allowed groups to get a feel for personality dynamics within each team and, hopefully, learn to work as a group. Well, I can't speak behalf of the other groups, but Group 3 rocked the house :) I was lucky to be paired with a fantastic group of people, all bringing different strengths to the table.
The groups were not just responsible for a single presentation, but rather were together for the week and assigned different duties for each day - dish washing, cooking, or grounds maintenance that would be done in between the scheduled activities for the day, and interviews.
Tuesday night was brought to a close by the group’s first rock session. Much like the Native American Talking Stick tradition, this concept allowed people to voice opinions – uninterrupted - discussing themselves, their teams, the day, or anything that sprung to mind in a positive, or negative, fashion. Once again each individual surprised me with their honesty, and their ability to take constructive criticism. Around 11pm, after a long day, we packed it in and went back to the house - exhausted.....I don't think I've ever seen so many skydivers in bed at such an early time :)
Wednesday we woke to poor weather, so the group took the opportunity to do their individual presentations. We were entertained with a variety of topics, from cooking, to building water towers, to snowboarding, juggling, fresca ball, and even how to hot-wire an airplane! Each member added their own personal flair. I think it was here that it really struck me what an amazing job the PDFT had done selecting the 15 members. I remember looking around and realizing how level the playing field was. Each individual was strong in different ways, and it was clear that the team could pick any 4 and still have a spectacular outcome. After the presentations, everyone blew off some energy by playing some of the newly introduced games or learning to juggle. It was quite a sight to behold.
Group 3 took to cooking that evening, and with little deliberation began the cooking assembly line. Surprisingly, Travis Mills (from group 2) joined us in our food preparation. Travis, a onetime sous-chef, took the time to help us rapidly prepare our ingredients (that man is a chopping machine!!). I began to notice how well we were working together. As usual, after dinner, everyone sat around the fireplace, chatting, trading stories, etc. It was here that JC took it upon himself to introduce Zip-Zop. Every single person participated in the game (despite enormous suspicion), including Jay, Ian, and Shannon from the PDFT! I won't ruin any surprises, but needless to say - JC is a prankster....oh, and JC if you're reading this....I'm plotting my revenge...
On Thursday we woke to beautiful weather. The energy levels were almost uncontainable....we were finally going to JUMP! The team had something special in store for us today: We were going to do a mini-competition. After a few practice rounds the competition started - interestingly enough, the mood wasn't competitive; it was supportive. I can't speak for others, but I've never felt so relaxed before. Each round was just downright fun. The highlight, for me at least, was the expression round - not an event I normally do well in, so needless to say, I was elated with the final outcome. After the competition it was back to chores where our group was to help Kim, the land owner, chop wood for his house (and our fire pit). It was here that what was happening really became clear to me. Our group was unable to audibly communicate, since Tommy D was using the chainsaw to cut wood. But somehow we still needed to work together to load up the truck and get a system going. We fumbled a bit the first few minutes, each struggling to find our place....but then, something happened: We began to draw on what we knew of each over the last few days and created yet another assembly line - seamlessly operating in unison. We actually got so efficient that we chopped, and loaded, and entire truck full of wood in 20 minutes all with minimal communication!
Returning from the wood chopping experience, I was summoned to my interview. This was it, this was the moment to shine in front of the team, and give them every reason why I should be on the Expansion Team. I consider myself fortunate to have competed, and become friends, with the team before this day - yet it was still intimidating. I cannot imagine how some candidates, who'd never met any of them, felt at that table. The team was warm and welcoming though, and it felt far more like a discussion than an interview. Offering up direct questions and answers, I felt I represented myself well. I walked away with a smile thinking that good things were coming... and then it hit me, and it was like getting hit by a Mack truck. All these doubts entered my mind: "What if I get offered a slot, can I live up to the public expectation of a team member?"; "What if I just blew it?", etc. You see, in all my dreams of becoming a PDFT member, I'd actually never stopped to think what would happen if I actually got it. I know I wasn't the only one.
I didn't have too long to dwell on my insecurities since the night's activities were about to start after dinner. This time JC once again had an icebreaker game. This one was more a mind game, and boy did he mess with my mind :) The rules of the game were simple: You had to figure out the rules of the game, and when you did you had to guide (but not tell) players who hadn't figured it out yet. Much to my frustration I wasn't getting it and, as more and more around me figured it out, my frustration grew.
Fortunately, Ryan was the most frustrated and, in a fake temper tantrum, provided comic relief.
It was now time for our Rock Session. The team once again kicked it off, providing examples of how negative, but constructive, criticism to other teammates. Surprisingly, the candidates sessions remained largely positive. It was a very emotional experience for everyone involved. Drained and filled with self-doubt, I headed to bed.
Friday morning was the first morning all week, that no one was on time to breakfast. Mentally exhausted, and nervous, we gathered ourselves and headed out for the final day. The mood was definitely serious - we all knew what was happening today. We kicked off the day with a grueling exercise: We had to pick who we thought the new team should be, as well as a 'heart' team made up of 3 other people we'd love to fly with and then explain to everyone in a few short words, why we made the choices we did. It was here we got a tiny taste of what the PDFT was about to go through. It was incredibly tough to pick so few people from so many qualified people. In the end, after everyone's choices were vocalized, the choices were spread evenly among the group - this was definitely not going to be easy.
Deciding to jump, each group got paired with a PDFT member and did a formation jump. The exercise was in trust, and it was here I noticed that I needed to be more trusting of my teammates in the air. Time was now out though and the PDFT needed to go and deliberate, and while they deliberated gave us carte blanche to jump and do whatever we wanted to, to blow off steam...and blow off steam we did :) I took the opportunity to work on my trust issues by encouraging everyone there to swoop me while I sat in a kayak on the pond - after all, if I couldn't trust these people, who could I trust? It was one of the most enjoyable things I've ever done in my life. I had my own swoop show, with each person trying to outdo the other on the pond. It was total and utter carnage - and it was great! My favorite memory is of Travis Mills screaming by doing a ghost-rider with the biggest smile I think I've ever seen anyone have.
After a quick hike through Deepwood Ranch, it was time to return to hear the final announcement. The team arrived a few minutes later than expected, with a somber, yet relieved, look on their faces. It was clear they'd made a decision. Addressing the group the team announced that they'd almost not reached a decision that night, they had dropped the list to 6 people but had been unable to narrow it further. My heart jumped. With us all hanging on every word, the team announced that they'd made a change in plans and had decided to expand another 2 slots as "next on deck" or alternates. These candidates would be given first dibs at any future opportunities, or expansions, within the PDFT but would not be considered 'the final four'. First Jens Thorgenson's name was called. I was immediately thrilled; Jens and I had started building a strong friendship and respect, and I thought he was a wonderful choice. Next they announced me and my heart raced - it was unexpected, but ultimately perfect for me. I was ecstatic! In a weird way, I felt like the pressure was off, but felt no sadness at not making the final four. I knew, no matter who was picked, it was going to be a good choice and the PDFT was going be stronger than ever. Before announcing the final four, Ian Bobo emotionally reminded everyone that the blue jerseys weren't an indication of self-worth, and that each person there was a great candidate. The words were sincere, and they rang true. Once the final four were announced, through tears of joy, and sadness, everyone took the opportunity to congratulate them. Looking around I realized this is what the week was all about - cheering your team on, and we were ALL a team.
We all left the next day as better people, with a deeper respect for everyone there than any of us could have imagined. I often try to explain the experience to people, but realize that it falls short of doing the whole process justice. All I can say is that it changed me in a way I can't describe.
I've had many people asking me what happens from here? What does "next on deck" mean? Honestly, I don't know where this is going, but I know it's going to be a hell of a ride.
GetHypoxic HYPEYE D Pro
Get Hypoxic HYPEYE D PRO Remote Camcorder Indication and Control System
Settle back with a cup of good coffee as this is going to be lengthy; the product does a lot more than meets the eye!
I received my HYPEYE D PRO controller and expansion in the mail today; I was overjoyed. I knew it would be a good product, as I already owned two HYPEYE MINI camera indicators.
Just in case you ve been in the air too long, don't fly a camera, or simply haven't paid attention to technology, the camera control protocol known as LANC or (Local Area Network Control) is not a part of the crop of new camcorders being issued by Sony (or Canon). LANC is a tape-based protocol, and none of the new camcorders are tape-based, but rather are Hard Disk Drive (HDD), DVD, or Flash memory-based in design.
Tape is very much on its way out, and will not exist as a common format in the foreseeable future. Absent a LANC controller, camera flyers struggle to start/stop the camcorder, not to mention the lack of an indicator usually mounted on a ring sight to indicate the status of the camcorder. True, a small mirror might be mounted on an altimeter to view camera status, and of course, camera flyers can cut large holes in their camera boxes for access to on/off switches and record switches, so it s not as if all is lost with the disappearance of LANC. But it is terribly inconvenient for most of us.
Sporting a rubberized/weather proofed recessed button, this unit is solidly built. Early camera switches were fairly unreliable and affected by riser slap, high humidity, water, or the camera helmet being laid upon the ground and accidentally triggering the camera button. None of the above has any impact on the operation of the Get Hypoxic HYPEYE D PRO (damn, that s a long name) camera controller, due to the way it s built.
Designed to be mounted either inside or outside the helmet, the switch housing offers a threaded hole in the back of the unit allowing for an included nylon screw to mount it to the outside of a helmet or other mounting surface. Even though this may expose the switch to a riser slap, the nylon screw should break/release in an entanglement.
The switch housing is identical in size to the pre-formed port found in many camera helmets, allowing for a .65 to be drilled, allowing for a flush switch on the outside of the helmet with the bulk of the switch housing inside the helmet. Double stick tape or gaffers tape (not included) can be used to secure the switch to the helmet or mounting chassis. That s not all, nor is it the only way to be mounted - more on that later.
I used the Expansion kit to set up my own switch access that is smaller than that of the HypEye, but it is not weather resistant like the HypEye switch. The switch housing has two rubber inserts for accessories available for the HYPEYE D PRO. The first is a female 3.5mm jack that allows for a debrief cable to be plugged into the helmet/switch directly, thus eliminating the need to remove the camera from a camera box/housing, or from a mounting plate in order to view the video. The debrief cable will likely be essential for any team camera flyer or AFF instructor wanting to debrief a jump. Not only is removing the camera from the helmet a pain, but also wears hard on the camera and box, this allows additional wear on the camera and helmet to be avoided. Techno-geeks will probably install a female 3.5mm jack in their helmet so the debrief cable doesn't need to be plugged into the HYPEYE D PRO switch housing too. I've already seen one team using the debrief port on an LCD monitor in the aircraft as they climbed to altitude for another jump, again saving the hassle, time, and potential error involved with removing the camera from the housing or helmet. If your last camcorder came with a four-contact 3.5mm cable (has yellow, red, and white connectors on the end) you won't need to purchase the HYPEYE D PRO DEBRIEF CABLE.
The other rubber plug is an access port for the HYPEYE D PRO EXPANSION CABLE KIT. This is the kit that got me really excited about the unit because it adds so many features to the HYPEYE D PRO. In my opinion, this is what makes the HYPEYE so spectacular. The Expansion Cable Kit is optional at a cost of $29.00 USD.
So what does the Expansion kit add?
A plug that connects to an L&B; Optima audible altimeter. This allows a separate set of LED s on the HYPEYE indicator to flash when the Optima is triggered. The indicator will flash slow flashes at the first altitude set in the Optima, faster flashes as the second altitude is reached, and very fast flashes when the final altitude is reached by the Optima. This feature isn't only for the camera-flyer; deaf skydivers will find this feature very useful. Unlike the L&B indicator which is fragile and stiff, the HYPEYE indicator is on a flexible cable and can be mounted any number of ways to suit the users desire and need.
Bite Switch input. Yup, the Expansion Kit allows owners to plug their existing 2.5mm bite switch cable into the system, triggering stills from a video camera. Some cameras can only shoot 3 stills during a jump, but camcorders like the Sony CX7 or HC5 may be turned into a still-only camera, allowing for reasonable quality stills to be taken with these small HD camcorders.
External Switch/Remote Switch connection. This allows the rubberized nipple switch found in the HYPEYE housing to be bypassed and the system controlled by a third party switch. This is what I've done with my system. All electronics are mounted inside the recesses of my BoneHead Flat Top Pro helmet, and I've mounted my own softswitch on the side of the helmet. This is useful for custom buttons, but also would allow a pilot to trigger an exit camera or similar.
Zoom Memorization. Ever gone on a jump only to find that the zoom button had been moved, and everything was blurry, deeply zoomed, or both? This feature tells the camera to be zoomed in at a user-defined point. This will hopefully reduce the number of absolutely ugly vignettes found in so many skydiving videos, allowing users to slightly zoom in past the point of the lens adapter rings.
Remote on/off of camera functions. Imagine this; you re in the door of the aircraft ready to jump, and notice that you've forgotten to turn on the camcorder. The count begins as you yell WAIT! With the HYPEYE D PRO, pressing the switch will turn on the camera even if the on/off switch of the camera is in the off mode! (this is camera model dependent, and won't work with all cameras, but it s great with the CX and SR series cameras)
A audio/microphone input rounds out this system very nicely. If the camera is in a typical housing, the internal microphone is buried, often under Neoprene or other material designed to securely hold the camcorder. An external microphone isn't only helpful, but essentially necessary for tandem interviews in this situation. Or you can just connect your ipod and burn to DVD for your 4way team with no post production work at all.
Here is where users will find a weak point in the HYPEYE system; the installation instructions for the Expansion Kit recommend placing a dab of glue on top of the connector. After a quick call to Get Hypoxic I learned this was to prevent years of vibrations from inadvertently dislodging the cable. I needed to either use a hot glue gun or fingernail polish to create a bead on the cable once installed in the switch. It wasn t difficult, but I wondered why a swage or something similar wasn t molded to the otherwise well-designed cable. It would save users the headache of finding a glue gun or borrowing fingernail polish from someone. I used the hotglue, it was easier. See the GetHypoxic website for very detailed photos and instruction on how to achieve this.
What's to love
Weatherproof, recessed nipple button
Audio/ Line-Level Microphone input
Audible altimeter connection
Super-bright LEDs
Debrief port
Zoom memory
Bite Switch ready/input
Remote control of all camera modes
The camera connection side of the system is an AVRemote S cable system exclusive to Sony camcorders. What makes this unique is that these right angle cables will fit inside of most camera boxes where a straight connector absolutely will not. It s obvious that Get Hypoxic designed this connector and its slim profile, as the Get Hypoxic name is molded into the cable connector, as it is in the Expansion Kit fantail.
The indicator side of this unit has several micro LED s in it. These indicate a number of different functions depending on the mode in which the camera is operating. Ready/Standby is indicated by a blue LED, Record indicated by a red LED, and warnings for batteries, sleep, error, or tape end indicated with a yellow LED. However, double-clicking the switch will put the camera automatically into different modes. Want to switch from video mode to stills only mode? No problem, just double-tap the HYPEYE switch. Wanna go from stills to playback? Same action.
What's Not So Lovable:
Big round cables are space-killers in tight helmets
Zoom reset is slow
Requires tools and additional adhesives for certain setups like the Expansion Kit
Debrief port is part of switch, making it inconvenient for in-helmet setups
Pricey
WARNING: THESE LEDS ARE BRIGHT!
Users may find them too bright if they're mounted close to the eye such as in a ring sight configuration. Using a Morse code-like tap sequence, the LED s may be dimmed in five different levels. (Out of the package settings are at the most dim preset) Military users will appreciate the exceptionally dim light in those covert training ops, and night jumpers will appreciate not being blinded by the camera flyer s indicators as well. These same LED s will also indicate altitudes triggered by the Optima, if the Expansion Kit is part of the setup. Be aware that the batteries in the Optima will affect the brightness of the altitude indicators. Camera status indicators are not affected by the Optima battery level.
Speaking of military users, Get Hypoxic has said that they ll soon have an armored, aluminum billet version of the HYPEYE available at a higher cost. (comes stock set at a low brightness level, for your protection)
There are some things I wish were different. The HYPEYE uses a very high quality silicone-covered rounded cable. A flat cable would have been more appropriate given the very tight confines of most helmets, yet it should be mentioned that flat ribbon cable is very expensive and not terribly durable. The molded fantail/distribution point of the Expansion Cable kit is also somewhat larger than I would have liked. In my Tonfly CC1, it took significant effort to keep the cables from impacting how the helmet fits, but it is possible. As my TonFly helmet does not have a ring sight (used for wingsuit camera) I appreciated the very stiff plastic in the indicator side of the HYPEYE D PRO. The user-programmable zoom depth is slower to get to zoom point than it should be, yet this is camera-dependent, so not really GetHypoxic's fault.
Cable size aside, I feel this is one of the best-designed tools available to camera operators in any sport application where space and control are considerations whether they re using tape-based HDV camcorders, newer DV cams, or AVCHD camcorders. Congrats to Get Hypoxic for presenting a very well thought out, fully-featured product that skydivers can actually use, that seems to be very tough (I have only 22 jumps on my system). This tool is 110% real as far as I m concerned. It s hot, not hype.
Get the Hypoxic HYPEYE D PRO Remote Camcorder Indication and Control System at Get Hypoxic or most skydiving gear outlets.
HYPEYE D PRO-$99.00 MSRP
PRO Expansion Kit-$29.00
HYPEYE D PRO Debrief cable kit-$10.00
The Hypoxic Hypeye D Pro is also available on Amazon: Hypoxic HYPEYE D Pro Remote Camcorder Indication and Control System.
Canopy Formation Parachuting
By Peter Pfalzgraf
In the early days of CReW (as canopy formation skydiving used to be called) I wrote and published a little booklet for those who were interested in learning the new sport. Things have changed a lot since then. So, I found it necessary to publish something new to make general information on our sport available to everybody interested. This essay combines techniques and hints from Europe and America. The latest input came from the training camps for the new canopy formation world record attempts aiming for a 100-way formation.
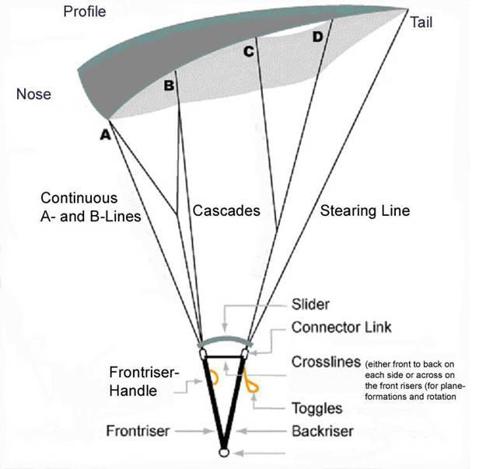
Canopy and Harness (Figure 1)
The times are gone where they had all-around canopies that could be used fairly well for any kind of skydive. Such canopies as the Cruisair, ¬U¬nit, Pegasus, Cruislite and Fury were once very common.
Today, the best parachutes for canopy formation parachuting (briefly known as “CF”, in the old days) are 7-cell canopies. These parachutes are the safest concerning deployment and stability in flight, especially in turbulent conditions. It is no coincidence that reserve parachutes and canopies for BASE jumping are mostly 7-cell canopies. Triathlons and Spectres with Dacron lines can be used for casual CF jumps, although Lightnings are the CF canopies of choice. If you intend to do a CF jump today you are well advised to use a canopy that has been designed for this kind of activity.
As a compromise for your first attempts, you may use a 7-cell canopy with a thick profile (for instance a student or accuracy canopy). Never attempt CF jumps with elliptical canopies, canopies with wide wing spans (in comparison with the depth of the profile/length in direction of flight) and/or a low profile.
Today’s CF canopies are available in different sizes for different weight classes. It is important that people intending to join a CF jump use the same type of canopy with the same line length and trim. Furthermore, the wing loading (weight under canopy per square foot) should be reasonably identical to guarantee similar flight characteristics.
The container of your harness should be big enough for the packing volume of the canopy to make sure it can be closed properly (safety!). There should be no handles, container flaps, pop-top pilot chutes or anything else sticking out that could get caught in another jumper’s lines. Those things could result in unintentional reserve openings or problems on separation. The bridle should be short or even better, self retracting to prevent your pilot chute from being caught in the other jumper’s lines while you are in a formation. You can imagine that separating a plane formation with one jumper’s pilot chute entangled in the other jumper’s lines will most certainly result in serious problems.
Additional Equipment
The altimeter should be worn in a way that makes sure it does not get snagged and can always be seen while you have your hands in the toggles.
The helmet should provide not only head protection but also allow good hearing. It should not cause wind noise that might affect your hearing.
Every CF jumper should carry a hook knife that can be used in case of an entanglement or wrap. Sometimes it only takes one line to be cut to get free and save a reserve ride.
The hook knife of course should also be worn in a way that prevents it from being caught or ripped away.
Your shoes must not have any hooks. They should fit loose enough that you can get rid of them if need be in order to get free.
It is very useful to wear long socks to protect your legs against bruises and line burns.
Aerodynamics of the Airfoil
Lift is the force that keeps a canopy in the air. Opposite to a round canopy that only creates a big air resistance to slow down your descent using a large area of fabric, the square parachute, or airfoil, really produces lift like the wing of a glider for instance. The square footage of an airfoil is approximately one-sixth to one-quarter of a round canopy, and yet has a far lower rate of descent.
The lift of the airfoil consists of 1/3 high pressure under the profile (similar to the round canopy) and 2/3 low pressure on the top surface created by the undisturbed airflow. This effect is the important matter for us.
The physical reasons for this effect aren’t pertinent to this particular discussion. What is most important is to know that the main part of the lift depends on the undisturbed airflow on the top surface of the square canopy, forward speed and the shape of the profile. The lift increases with forward speed and grows with the thickness of the profile. The air resistance of the canopy slows the forward speed down.
Due to the different pressure at the upper and lower surface of the profile air will flow around the sides of the canopy from the bottom to the top following the pressure difference. This effect reduces the lift and is called induced resistance. As a consequence of this, the maximum lift is in the centre of the airfoil. The stabilizers on either side of the profile are designed to reduce the loss of lift by hindering the airflow from the bottom to the top surface. Another way to reduce the loss of lift is to make the airfoil very wide so that the percentage of wing area being affected becomes comparably small. A good sample for this solution is the paraglider. This shape of airfoil is, of course, not good for CF activities.
Because of the airflow around the sides and also around the tail, a parachute gliding through the air leaves a track of turbulence. The side turbulence creates a zone of turbulent air on either side beginning at the trailing corners of the airfoil. The turbulence of the tail creates a turbulent zone rising from the trailing edge of the canopy.
It is clear that a parachute or canopy formation flying into such a turbulent zone will be affected by losing lift. Even aircraft flying through the turbulence of a canopy formation will lose considerable altitude.
Figures 2 and 3 show the shape and position of the zones of turbulence.
In a formation these phenomenon cause effects that can be noticed clearly. Just the top canopy in a formation gets only undisturbed airflow and has the maximum possible lift. All canopies having a body in front or on a front corner will lose lift due to the turbulence caused by the body out in front.
Aerodynamics of the basic Formation Types
Knowing the things mentioned above, we can predict that any type of formation cannot perform as well as a single canopy. That is useful for building formations as it gives the single canopy the potential to approach and dock on a formation due to its extra lift and forward speed.
In principle all formations consist of a few basic types. Let’s look at the conditions in these.
The Stack
The stack (Figure 4) is the most basic formation. To build a stack one jumper sits on top the other jumper’s center cell and hooks his feet behind the center A-lines of the lower canopy similar to sitting on a chair. There will be some tension on the lines because the lower canopy in this type of formation will have a little less lift. In a stack the body of the top jumper is in front of the center cell of the lower canopy. The turbulence of that body meets the airflow of the lower canopy exactly at the point where the main lift is created and leads to a considerable loss of lift. This means that a stack will sink far more than a single canopy.
The Plane
The plane (Figure 5) is created out of the stack. The top jumper climbs down the center A-lines and hooks his feet behind the front risers of the lower jumper underneath the slider. The lower jumper supports him by putting on some brakes to increase the lift of his canopy. For this formation type one or two cross connectors are required, which either connect the front connector links (one line) or two lines that connect the front and rear connector link on either side. Otherwise the top jumper might slide back up due to his plus of lift and pull up the slider, which would result in a collapsed lower canopy.
In a plane formation, the turbulence/loss of lift effect is not as strong. As the top jumper’s body is beneath the two canopies, one might think there is no loss of lift at all, yet the line contact causes deformation in the lower canopy and additionally forces both canopies into a new aspect ratio. This leads to a loss of performance. A single canopy will perform better than a biplane.
If a plane becomes bigger there will of course, be canopies with bodies in front of them. Planes with more than four canopies will sink faster as the plane formation grows larger.
The Stairstep
In a stairstep formation (Figure 6) the top jumper is positioned outside of the lower canopies end cell. He takes a foot grip on the outside A-line. Flying the stair step requires much more experience than flying a stack or plane formation because the link is not as stable. It is more of a pivot point than a stable connection. The lower jumper has to compensate for the influence of the upper jumper’s body to the flight of his canopy. To prevent the lower canopy from coming up and around you can put some tension on the outside front riser of the lower canopy or the lower jumper can stretch the outside leg while lifting the inside leg.
The stair-step is far less turbulent than the stack and plane. The body of the top jumper only causes turbulence on the outside corner of the lower canopy and that is a part of the airfoil that contributes only a minor amount of lift. That means that a stair step formation is only slightly less efficient than a single canopy.
Because only one side of the lower canopy is affected, the other side will perform better and cause the canopy to rise and drive forward. If the lower jumper does not compensate for this, his canopy might come up and around, leading to a wrap. To prevent that the lower jumper will start to compensate for the difference as soon as the top jumper has taken his grip. Possible ways to compensate include putting tension on the outside front riser and stretching the outside leg while lifting the inside leg. One might also apply some slight inside brake.
You can determine how much trim is needed by easing up on the risers or brakes after the canopy is set. Sometimes the formation will fly well with only slight trim or none at all. Nevertheless, the lower jumper should keep a watchful eye on his canopy to immediately compensate, if necessary.
That wraps up part one. Join Peter in a week or so for Part 2, when we'll dive deep into building and controlling these formations.

USPA & PIA Team to Revise FAA Repack Rule
Re-run with USPA permission.
After years of effort by USPA and the Parachute Industry Association, the FAA has approved a new final rule that will lengthen the parachute repack cycle from 120 days to 180 days. The final rule appeared in the Federal Register last month, and will take effect on December 19, 2008. The effort had more twists and turns than a funneled 20-way, but the change happened when PIA and USPA joined together and finally convinced the FAA to grant a 180-day repack cycle.
USPA initiated the first run at the change in 1998 when its board of directors approved a motion authorizing USPA to petition the FAA for the rule change. At the time, the FAA was preparing to revise Part 105. However, the FAA declined to include the lengthened repack cycle as part of its Part 105 revision in 2001, saying the initiative didn't have full industry support.
In early 2005, Allen Silver, a well-known rigger and PIA’s Rigging Committee chair, initiated discussion with the FAA about accepting a petition for an exemption that would allow a 180-day repack cycle. Getting FAA agreement, PIA and USPA formed a task group to develop the petition language. This resulted in an effort in which all aviation groups, whose pilots used emergency parachutes, including the Aircraft Owners and Pilots Association, the Experimental Aircraft Association and the Soaring Society, among others, to join PIA and USPA in jointly petitioning the FAA for an exemption to the regulations addressing those parachutes. The exemption requested a 180-day repack cycle for the emergency parachutes worn by pilots, as well as the sport parachutes used by skydivers. The joint PIA-USPA petition was submitted in July 2005. Ironically, while the FAA saw good cause for a lengthened repack cycle, the agency said its own rules prevented it from granting an exemption to so many beneficiaries; exemptions were intended for small groups. The FAA denied the petition for exemption.
However, acknowledging the support of so many pilots, riggers and skydivers, the FAA declared that it would publish its own Notice of Proposed Rulemaking to lengthen the repack cycle, which it did on May 22, 2007. At urging by USPA and PIA, nearly all of the hundreds of comments to the docket were in favor of the proposal. The end result is a final rule published this week granting the lengthened repack cycle.
"This result shows what can happen when two organizations like USPA and PIA decide to work together on common goals," said USPA Executive Director Ed Scott. "We look forward to doing even more together for the benefit of skydivers." PIA President Cliff Schmucker said, "The 180-day repack rule change is a fine example of what PIA and USPA can accomplish working as one. Together we will endeavor to continue improving safety for parachute users.”
For answers to frequently asked questions about the new Rule, please visit either the USPA or PIA (.pdf) online.

Can Yoga Improve Your Skydiving - You Might Be Surprised
ByNadene Beyerbach
Want to improve your skydiving skills, but don’t have thousands of dollars to blow in the wind tunnel? Try yoga! Yoga has been around for thousands of years. What is commonly considered yoga in Western society is actually Hatha Yoga, focusing mainly on physical yoga postures. However, yoga is not just a series of postures or poses. Yoga is meant to integrate the mind, body and spirit, and to achieve a state of enlightenment. For skydiving, this means developing your insight, awareness and focus, as well as balance, flexibility and stability.
Not just an effective exercise for improving skydiving skills, yoga is also extremely convenient to practice at the dropzone. The simplicity of yoga means that you can do it virtually anywhere and need very little to get started. The most important thing you can do is wear comfortable, loose fitting clothing that you’re able to move easily in. A yoga mat is ideal, since it will allow you to grip with your feet and go deeper into the poses. However, poses can be done on grass, a towel or a blanket, if necessary. You can experiment with different yoga postures, breathing, meditation and relaxation exercises to see how they affect your skydiving. Try the following to get started:
Complete Breath: A complete, “three part” breath consists of deep, continuous breathing through the nose. It is referred to as “three part” breath because you breathe first into the throat, expanding through the ribs, then deep into the belly. Slowly exhale, drawing the belly back in. Slow, deep breathing both energizes the body and calms the mind. Try using complete breathing when you’re concentrating on flying a body position that requires a lot of effort. For a relaxed and stable exit, you can also try exhaling completely as you leave the aircraft.
Meditation/Relaxation: Simply close your eyes and focus on your breathing. Let your mind go blank. As thoughts enter your mind, just return your attention to your breath and let the thoughts float away. Meditation reduces stress and tension and improves concentration. Try meditating for a few moments on the ride to altitude before you begin any mental rehearsal. This will allow you to visualize your intention for the jump from a calm and centered place.
Physical Postures: There are many different types of yoga postures to explore. Standing poses, seated poses, forward bends, back bends, twists, inversions (upside down poses), balance poses and relaxation poses are just some of the different types of postures. Let’s take a more in-depth look at sun salutations, twists, inversions and balance poses.
Sun Salutations are an ideal warm-up for skydiving. Sun salutations are made up of a series of poses, flowing continuously from one move to the next. As you move through the poses be sure to hold each one for a few deep breathes. Begin by standing with your shoulders back and body properly aligned (Mountain Pose). Taking a deep breath, stretch your arms overhead, then fold forward at the hips and let your head hang toward the ground (Forward Fold). Step back with your left foot into a lunge. Follow with your right foot, pushing into your hands and feet to create an inverted V shape (Downward Dog). Lower your body toward the ground (Plank), then straighten your arms, looking up and lifting your chest toward the sky (Upward Dog). Now return to your starting position: Push back into Downward Dog, lunge on the right leg, fold forward, and finish by inhaling deeply in Mountain Pose. Try this sun salutation before gearing up for your next jump. You’ll instantly increase circulation, mobility, and flexibility.
Twists offer back relief for skydivers who do a lot of bellyflying. If you spend a great deal of time arching, try a Half Spinal Twist to release tension in your back. Sitting down, bend your right leg to bring your foot toward you. Lift your left foot and place it on the outside of your right knee. Looking over your left shoulder, place your left arm behind you and your right arm around your knee. Breathe deeply and twist through your spine. Along with relieving tension, spinal twists will increase flexibility in your back and neck to help you further improve your RW skills.
Inversions are poses performed upside down (with your feet above your head). They improve circulation and increase the flow of oxygen throughout the body. Inversions allow you to become comfortable in an upside down position and to work on balance with your center of gravity above your head. To try the Half Shoulder Stand, lie on your back and pull your knees to your chest. Support your back with your hands and straighten your legs above your body. Your weight should be on your shoulders, not your neck. Breathe deeply and remain strong through your core to help you balance. The Half Shoulder Stand is an excellent inversion to work on if you’re learning to fly head down.
Balance Poses deserve special attention when it comes to skydiving. There is no better way to develop balance, strengthen stabilizer muscles, and increase mind-body awareness. Warrior 3 (also known as Airplane) is a good pose to begin working on your balance. Start by standing tall and lifting your arms to shoulder-height. Place your weight on one leg, lifting the opposite leg and leaning forward until you form a straight line. Hold for a few deep breathes, then repeat on the opposite side. Holding a balance pose will quickly make you aware of your alignment and body position. If you do any freeflying, adding balance work to your routine could give you the edge you’re looking for.
Enjoy your adventures in yoga! Test out the suggestions in this article and continue to experiment with different postures to find what works best for you. Always work at your own pace and stop if you experience any pain or discomfort. Remember, it’s about the journey, not the destination, so don’t worry if you’re not an expert right away. To learn more, consider attending a yoga class or inviting an instructor to teach at your dropzone. With practice you’ll start to notice improvement in your skydiving skills through increased mind-body awareness, balance, focus and control. Keeping your body strong and flexible will also help to protect you from hard openings and not-so-perfect landings.
Blue skies, or as we say in yoga, Namaste.
Nadene Beyerbach is a skydiver and yoga instructor. She is certified by Body Training Systems as a Group Centergy instructor and is a member of the Canadian Yoga Association. Learn more about skydiving specific yoga at Flex Fly.
Canopy Flight Simulation for Education
Skydiving requires an action to survive. Freeze, fight or flight are natural reactions to stress but they do not work for skydivers. There is very little time to think about what to do next when the ground is approaching fast. Hence, our response must be quick. We can separate a human reaction into three process: perception, assessment, and execution. These processes happen consecutively. The faster we complete them, the quicker our response is to the changing environment. Let's examine how education and training affects these processes.
Perception is the process during which we become aware of information: we look at the altimeter to know the altitude, we look around to see if no other canopies are moving to collide with us, etc. Education and past experiences play a major role in a person's perception. We are not necessarily aware of what we look at. Education trains us to look for the right information in the right places. For example, if we do not look around after our canopy opens to see where the drop zone is, we will not turn to fly toward it. On the other hand, even if we see where the landing area is, we may not know how to detect if we can reach it. As a result, we may not make a turn to fly toward the landing area in time.
Books and instructors tell students where to look and what to see, while videos show us examples. However, once students are in the air, they must make a conscious effort to look in the correct direction and focus on the right information: "It's landing time. The ground is moving very quickly. It should not move so quickly. Ohh... I must look at the horizon, I must not look directly underneath." The goal is to make proper perception a habit, because conscious effort is slow. Habits develop with practice, and practice takes time. A student has not yet developed habits and may forget to think about what to pay attention to, but help comes from the instructor over the radio: "Prepare for landing flare. Eyes on the horizon..." One does not develop a habit by taking a class, reading a book or watching a video. Instead, these sources supply knowledge that can be used during practice, which eventually leads to habit. Simulation of a situation, on the other hand, does help to develop a habit, in a safe environment.
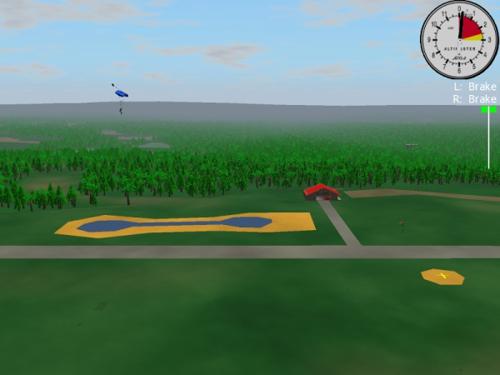
The emergency procedures that every jumper practices before every jump (you do, right?) is the example of a "simulation". In such "simulation" we create situations and responses ourselves. Another example of a "simulation" is hanging in a harness during a safety day. In this circumstance, an instructor creates an emergency situation for us. Dirt-dive is an example of a non-emergency "simulation". Airplane pilots take the concept of "simulation" further by using flight simulators (http://en.wikipedia.org/wiki/Flight_simulation). The military have used skydiving computer simulators (these are similar to flight simulators) for some time. Nowadays, computer parachute simulation software is available for everyone.
The second process in our reaction sequence is assessment - making a decision about what the acquired facts mean. We look at the altimeter and it's 2000 feet. Nothing to be done just yet, or maybe we still have a problem with the canopy, or maybe we see that we are not making it to the landing area, etc. Education has the largest impact on the process of assessment. We are taught what actions are required in different situations. At the very beginning, all we need to do is to pick the right action from the proffered set of actions.
Speed of the recall is important. Repetition is key for a quick recall. Taking a class, reading a book, or watching a video are good ways to refresh our memory (safety days help us do exactly that). The disadvantage of these methods is that they cover very limited number of situations and conditions. For example, we are told that to get back from a long spot we can use rear riser input, but that's only true for a certain ratio of your canopy forward speed and the speed of the wind. In some situations, we may have to use front risers or brakes. Now instead of a simple memory retrieval task, we have to do some reasoning. We may have all the knowledge to do the reasoning properly, but it's slow and error prone (time pressure and adrenalin rush do not help rational reasoning). Simulations offer an efficient way to condition memory by repetition. A computer simulation also allows for an infinite amount of situations with different conditions. It's easier to make a decision when we have already seen such a situation before.
Execution is the process of acting on the chosen response. Muscle memory allows us to speed up this process. Instructors, books, or videos can not help this process. Muscle memory is developed by repeating an action... but we already know that simulation is good for that! Pulling the cut away and reserve handles while hanging in a training harness or before your reserve is due for a repack are good examples of muscle memory training: we feel how hard we need to pull the handles, what the proper motion of the hands are, etc. Computer simulation can help as well, but it is most effective with a special hardware, which is not yet available at a reasonable price.
We have covered three processes that contribute to our reaction: perception, assessment, and execution. We repeat them over and over again. Every time we do something, a new set of conditions manifests itself. There is a dynamic and complex relationship between the situation and our responses to it. Instructors, books, and videos can only mention a very small set of examples. Traditional simulation methods (use of the imaginations or/and an instructor) are also quite limited. A computer simulation, however, provides real time feedback for all possible actions that we can exercise in the simulation. We can judge the correctness of our actions based on what happens next.
Simulation has always been an essential part of skydiving education and training. Computer simulation takes this concept further and allows for even better results. We have seen how it can help us when other means of education and training are less efficient or can not help at all. One may ask: "How good must a "computer simulation" be to be used for training?". A similar question would be "How good must a picture be in a text book?" The answer is "As long as it (simulation or picture) reasonably illustrates the required concepts." No educational tool can or should be used by itself. The purpose of the tools is to make a student think, ask the right questions, and develop the correct responses.
Given our limited attention span, it's always a compromise between focus on safety and focus on other things, especially for novice jumpers. The faster we get our habits and muscle memory developed, the safer our jumps become. This is why it's important to understand what tools are available to us, and what their limitations, advantages, and disadvantages are. In his book "The Parachute and its Pilot" Brian Germain phrased it this way "When we can acquire the right information, and access this data at the right time, we have a pretty good chance of walking away from sketchy situations." Our goal is "to acquire the right information." We can do this most efficiently when we understand what educational and training tools we have in our disposal: classes, book, videos, simulations, etc. The newest tool in the skydiver's toolbox is computer simulation software. This software greatly complements the other means of education and training. Which, in turn, will result in a safer and more enjoyable sport.
Author Information:
Alexander Shyrokov is the founder of Static Line Interactive, Inc.
Clean Up Your Turns
"Turn coordination" is a topic that, until recently, has been mostly unapplied to ram-air parachute aerodynamics. In simplest terms, this refers to the degree to which a flight vehicle is aligned to the relative wind during a turn. Another way to look at this is the degree to which a turning aircraft is pointed at the relative wind with regards to the yaw axis.
A "clean turn", from an aerodynamic perspective, is one that keeps the nose of the aircraft pointed at the relative wind throughout the turn. When flying airplanes, this prevents the passengers from spilling their drinks, as well as saving fuel and preserving airspeed. In parachutes however, this aspect of turning has mostly been ignored. As parachutes become faster and faster, the time has come to begin thinking about this aspect of our canopy flight for several very important reasons.
The first has to do with the ability of the pilot to level off at any point during the turn. Lets face it, sometimes the ground creeps up on us. Flying an aerodynamically sound turn increases the likelihood that you will be able to convert your airspeed into lift in a timely manner. If you are sliding sideways through the sky because you are simply jamming a toggle down, you are not prepared to interface with the planet. The relative wind is jumping across the bumps on your parachute, creating turbulent flow, while the suspension line load is getting shifted to one side of your canopy. When you attempt to stab out of an uncoordinated turn, there is a hesitation before the parachute begins to change direction and level off. If the ground gets to you before this happens you may find yourself watching Oprah in your hospital bed for a while (not that I have anything against Oprah).
The second reason for flying a coordinated turn has to do with overall parachute stability. In an uncoordinated turn, the nose of your parachute is not pointed at the oncoming relative wind. It is sliding sideways. This means that the pressure in your wing is being compromised, in addition to the wingtip on the outside of the turn being presented to the relative wind. If you hit turbulence during this kind of "sloppy" turn, you are much more likely to experience a collapse of this side of the parachute. In other words, if you are turning right, your left wing more likely to fold under. Interestingly, when an aggressive, uncoordinated toggle turn is released, the opposite tends to happen. When the right toggle is released, the right wing surges forward as the drag is released and it is presented to the relative wind, opening the door for a collapse on right side of the parachute. Either way, this can result in way too much daytime TV.
A fundamental problem...
There is a fundamental problem with the way in which most of us were taught how to turn our parachutes. They said: "if you want to turn right, pull down the right toggle." Simply pulling on a toggle increases the drag on the right side of the parachute, retreating that wing tip. At the beginning of the turn, it is purely "yaw" energy. It is like the pilot of an airplane stepping on the rudder pedal. As a discrete action, steering toggles are an incomplete input. We need some "roll" energy.
The harness is more than a way to attach the jumper to the parachute. It is also a way to manipulate the canopy itself. If the right leg reaches for the earth as the left hip reaches for the sky, the parachute will turn to the right. It is true that smaller parachutes will respond quicker to such inputs than larger ones, with elliptical canopies responding the quickest, but harness input will have an affect all parachutes. Most importantly, when used at the initiation of a turn, harness steering converts a toggle turn into a coordinated maneuver. This is true if you are under a Lotus 190 or a Samurai 95.
When flying an airplane, all turns begin by initiating roll energy with the ailerons, (rotating the yolk), followed by an application of the rudder to coordinate the turn. The old airplanes had a string on the cowling (hood) to show the direction of the wind-flow, while newer ones have slip indicators on the instrument panel. If only we had such information while we were flying our canopies. Ah, but we do…
Trailing behind your wing is all the yaw axis coordination data you will ever need. It is called your pilot-chute. If you are flying a coordinated turn, your bridle will remain parallel to the ribs of your canopy throughout the turn. If at any point it goes slack, whips around like a snake or drifts off to one side, you are not flying a clean turn. You are not carving your wing through the sky; you are skidding out of control. The relative wind is not following the valleys of your ribs; it is hopping over the bumps, tumbling into chaos.
Try this on your next jump. Look up at your canopy while you are flying straight and simply yank a steering toggle down to the ½ brake position. You will immediately see what I am talking about as your pilot-chute swings off to one side. Next, lean in your harness, lifting one leg-strap to yield direct roll axis input. It may turn and it may not, depending on the wing. This is not important. Then, while holding the harness input, pull the steering toggle to turn toward the direction of your harness input. You will notice that the pilot-chute is trailing straight back, even in a sharp turn.
Once you have experienced your first real coordinated parachute turn, it is time to develop new habits. This takes time. I find that when learning a new skill like this, it is best to have a simple way to remember the process. In this case, try using the following sequence for every turn you make: 1) LOOK, 2) LEAN and 3) TURN. This is mnemonic was taught to me by a great paragliding instructor and skydiver, J.C. Brown. Rather than thoughtlessly jamming a toggle down, look where you are about to go, lean in the harness to establish the roll, and finally, pull the toggle down to flow deeper into the maneuver.
When you play with this kind of turn, you will find that the parachute simply feels better; that you feel more in control over the wing. You will also find that you can better bump both brakes down during the turn in order to reduce your decent rate, or even level off completely. While practice is necessary to perfect the technique, all parachute have the ability to transition from a descending turn into a level flight turn, into a soft beautiful landing. If you know how to carve your way out of a low turn, there will never be a reason to hook into the ground, ever.
Although many skydivers still think of their parachute simply as a means to get back down to the ground after a skydive, learning how to use the system the way it was meant to be used will increase the chances that you will get back down to the ground safely. Gravity pulls equally on those who love canopy flight as those who abhor it. From twenty years of teaching parachute flight I have learned this: you can only become great at something that you love. The more you understand, the more you will explore. The more you explore, the more you will feel control. The more in control you feel, the more you will love it. And that, ladies and gentlemen, is what it is all about.
BSG
Brian Germain is a parachute designer, test pilot, advanced canopy flight instructor and author. Brian's book The Parachute and its Pilot has become the worldwide source for canopy flight information and is available at a gear store near you, or through Brian's website: www.BigAirSportZ.com
NeoXS from Parasport - Review
Powerful, small, and flexible, the new NeoXS from Parasport is the newest product in audible altimeters available to skydivers. If you’re a freeflyer, wingsuiter, speedskydiver, or a relative work skydiver, you’ve probably already recognized the need and value of a trustworthy audible.
Slightly smaller than other audible devices, it is also slightly thicker. The casing is a combination of heavy-duty cast aluminum and plastic. The NeoXS fits inside of any skydiving helmet set up for an internal audible, and with a little work can be made to fit on the outside of any helmet set up for external mounting. Although there is no cradle currently available for the NeoXS, it should be easy to mount on goggles if jumping without a fraphat or helmet.
The Right Stuff-
Heavy and tough, this is one tool you won’t have to worry about dropping on the floor. The test unit sent to me survived several drops from an 8’ height onto carpet, linoleum, and concrete without missing a beat. The aluminum case is available in multiple colors, making it easy to spot in a gear box or bag, or on the ground at the DZ. It also makes it easy to engrave your name and license number for quick identification and loss prevention.
With three alarms for freefall and three alarms for swooping modes, the NeoXS may be set up for any skydiving discipline. Alarms may be set to various volume levels, and you’ll want to be exceptionally careful with the highest levels of volume. This small package is LOUD when set to the high-volume setting. On one jump, I used standard foam earplugs to see if I could hear the device at full volume, and the cutting pitch and squeals easily penetrated the foam ear plugs. This can be of significant benefit to hard-of-hearing skydivers or for those that like to wear earplugs in the aircraft, and would prefer to leave them in during freefall.
The NeoXS is slightly smaller than most audibles, but not significantly so. It'll fit the audible pocket in any skydiving helmet.
Skydivers that enjoy multiple disciplines will appreciate the various profile modes the NeoXS offers. Going from a tandem to an AFF to a wingsuit jump? No problem. This unit stores up to four profiles, allowing very rapid switching from one profile to another. Simply push the joystick three times to enter "edit" mode, move the joystick to the left to change the profile, and put the NeoXS back in the audible pocket. The audible always resets automatically but can be manually reset.
Another benefit is the always-locked modes of the unit, making it impossible to accidentally change profiles when the unit is left in a gear bag.
The unit may easily be reset for new MSL altitudes, simply by entering the configuration mode and using the joystick, reset the zero point of the device.
What You'll Love (in a nutshell)
3 freefall signals
3 canopy warnings
countdown timer
real time altitude display while climbing to altitude
simplified programming of warning altitudes
4 user programmable profiles
Can be set EXTREMELY LOUD (user selectable volume)
May be programmed during climb to altitude
It's heavy (durable aluminum). It won't crush in your gearbag
The Not-So-Right Stuff-
The owners manual could use some improvement. It’s not immediately clear how to program the profiles, or which profile is being used. Actually programming the unit makes the profile modes perfectly clear, however. The same may be said for swoop modes. Better diagramming might alleviate this small concern, or perhaps some on-line help. Once the programming dialog is accessed, the procedures for setting altitudes become readily self-evident.
The only major concern with the unit is that the small joystick sits slightly higher than the recessed area in which the joystick is mounted. The recessed area makes it obvious that the manufacturer wanted to prevent the joystick from being accidentally knocked about, but the joystick does slightly protrude above the recess.
The joystick is marginally elevated. Initially, this suggested a problem, but in working with the unit in real-world situations, it is not an issue due to the unit always being locked. Three button pushes are required just to unlock the unit, and then the joystick is used to enter programming modes.
The unit also offers no backlight, making it difficult to set up for night jumps or in those wee hours of the morning. The LCD is clear and textually driven, however.
What You Might Not Love
Owners manual is weakly written
Joystick button is slightly higher than body/recessed space
No backlight for night-time programming
It's heavy, weighs nearly double compared to other audibles (I personally like the heavier weight.)
General Comments:
Although the owners manual could use some improvement, the only real challenge encountered was figuring out how to unlock the unit. (This is achieved by repeatedly pressing the joystick until the lock icon first flashes and then turns off.) A quick glance at the owners manual was required to determine how to unlock the unit after a few minutes of trying to do it by instinct.
Once I’d unlocked the unit, I put the manual down to see if I could self-start the programming procedure based. I could, and it was very instinctive once I’d reached the unlocked stage.
The four main menu options are Profile, Swoop, Alarm, and Configure. Programming for Meters or Feet display is offered in the Profiles menu, with three altitudes available. Additionally, unique volumes may be programmed for swoop alarms vs freefall alarms.
Alarm altitudes cannot be programmed lower than a subsequent altitude, thus preventing accidental programming errors.
The NeoXS is easily opened with a normal screwdriver. No special tools or jewelers-sized screwdrivers are required. The unit does not need to be opened to change batteries (you can see the battery door in the housing), I simply like disassembling things to see what they're made of. The reason for the weight is obvious; this is not thin, easily crushed aluminum.
*(Opening the NeoXS will void your warranty, do not try this at home, kids!)
The alarms are varied, allowing for each alarm to play a distinct tone and pattern, thus eliminating confusion about what alarm is for what altitude.
As a side note, I wouldn't mind seeing a manufacturer develop personally-created alarms such as one recorded by a user. Wouldn't it be cool to hear your own voice at the third warning saying "Hey buddy, it's time to pull?" All that would be involved is either a USB connection to a computer, or a microphone built into the audible. It would be difficult to output audio frequencies that cut through the noice properly, yet wouldn't a voice be more fun than a screech? But I digress...
In evaluating the unit, the joystick could not be accidentally moved in “real-world” scenarios, but in putting it in the helmet and using fingers to move the unit around, I was able to “accidentally” hit and move the joystick but could not affect the programming modes, as the unit is virtually always locked. It is impossible to leave the unit unlocked, as it returns to a locked mode 30 seconds after programming input is ceased. Therefore, it’s impossible to accidentally change the modes by moving the unit around inside a helmet pocket or other location.
The unit uses one CR2430 battery and offers a very long life. These batteries are easy to find at most any grocery or large retail store.
All in all, I like this little audible. After having used it for a little over a month, I feel pretty good about the quality, durability, design, and how it functions. I’d first seen it when it was announced at Reno PIA 2007 when Paulo from Parasport overheard me complaining about a particular audible I had (A Cool n' Groovy Fridge Company audible) and its lack of adjustable features. When he set the NeoXS to screaming, it had everyone anywhere near covering their ears, it was so loud. The fact that it can be taken down to a nominal level is great for those that still have fully intact hearing. Levels may be checked on the ground, so it's not an exercise in aerial experimentation to determine which volume levels are best for you.
At $170.00 USD, the price is right too, and makes it an accessible cost point for most any skydiver.
Overall, this is a very tough, well designed and manufactured tool for skydivers and from my perspective, should be part of any consideration in purchasing an audible altimeter.
~douglas