Submit Article

Skydiving News and Articles

Select A Category

Pick a Category

An Introduction to Piece Flying on Formation Skydives

(This article was first published in the August 2004 issue of Parachutist as “One Good Turn Deserves Another”. Since then, the article has been updated and improved.)
Turning a piece on a formation skydive is not as simple as yanking it around and hoping it will stop where it is supposed to. Jumpers in the piece must help it stay close and level throughout the turn, and they must help their piece partners start and stop the turn without rotating it too far or slamming it into the other piece.
A piece that is yanked around too fast can rotate too far or even injure somebody. A piece that is not completely turned or turned incorrectly can drift away and actually become harder to control. This article shows the correct (and safe) techniques for turning pieces on recreational RW loads.
Meet the minimum skill level
Before jumpers participate in a skydive that involves piece turning, they should meet the requirements for a USPA A license, which means that they can do individual 360-degree turns, dock on another skydiver, maintain eye contact, track, wave off, and pull. In addition, jumpers should be able to dock on small formations such as a 4-way Star.
Start with partial turns
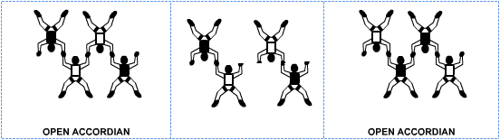
Newer jumpers should start with partial turns (180 degrees or less) on small formations. Here is a fun drill. Build a 4-way Open Accordion, break it in the middle, turn the two pieces 180 degrees and re-dock. This puts the jumpers who were on the inside on the outside, and vice versa.
In this drill, think more about “trading places” with your piece partner than about turning the piece. The piece will automatically rotate if you move to the slot vacated by your piece partner. As you move, try to help place your piece partner in the spot you just vacated, keeping your piece level with the other piece as you do. Repeat the process to place yourselves back in your original slots then repeat the drill until breakoff.

Move on to 360-degree turns
Once you can do drills like the one described above, you are ready to move on to 360-degree turns on small formations. A good drill for this is the Zig Zag – Marquis 4-way block.
A “block” is a two-formation set in which jumpers build the first formation, split into pieces, rotate the pieces then reconnect them to form the second formation. In competition, experienced teams speed up their turns by rotating the end of one piece over the end of the other piece – in essence, reducing a 360-degree turn to 270 degrees or even less. But in this article, we only discuss flat turns because they normally work best on recreational loads where the objective is not speed but smooth level turns.

In the Zig Zag – Marquis block shown above:
To start the turn, Jumpers A and B break grips and turn approximately 90 degrees to the right and stop, keeping each other in view over their left shoulder (helps them stay close and level). While this is happening, Jumpers C and D stay put except to extend their arms to let Jumpers A and B move.
Once Jumpers A and B have moved, Jumpers C and D “trade places”, keeping each other in sight over their left shoulder as they move. When their legs almost touch, they stop, look over the other shoulder (called a “head switch”) and place Jumpers A and B together in the Marquis.
While Jumpers C and D are finishing their turns, A and B also do a “head switch” and keep each other in view and on level while they are placed together.
All jumpers should help keep the pieces level throughout the turn.
Notes:
To be safe while they trade places, Jumpers C and D do not move directly at each other, but slightly offset so that their legs do not collide.
Also if they focus on “trading places” rather than spinning their partners around, the pieces are more likely to stay close. The same concepts used for the Zig Zag – Marquis example above can be applied to turning pieces in larger formations. Consider the following example.

In the 9-way example above:
Jumper A turns approximately 90 degrees to the right and stops, keeping the other pieces in view over his left shoulder (helps him stay level and close).
Jumper B moves into the space cleared by Jumper A. At the same time, Jumper C moves into the space vacated by Jumper B.
As soon as Jumper A feels the piece rotating, he looks over his right shoulder for the other pieces and stays level with them as the turn finishes.
As the turn finishes, Jumpers B and C place Jumper A back into his original slot.
All jumpers should help keep the pieces level throughout the turn. Note: Everybody’s initial moves should create enough momentum to keep the piece rotating. If it starts rotating too fast, Jumpers B and C can lower their right knee temporarily to put on the brakes. Similarly, if the piece stops rotating too soon, they can lower their left knee until it starts moving again.
Rotate pieces on their center points
To keep the pieces close throughout the turn, each jumper must help the piece rotate on its center point. Jumpers in each piece should watch the other piece over one shoulder as the turn starts, then “head switch” and watch it come back into view over the other shoulder as the turn completes. This helps keep the pieces close and on level and emphasizes the following point: If you keep your target in sight, you will be more likely to fly to it.
Get the right grips
In the dirt dive, jumpers should practice the grips they will be taking in the air. This way they won’t be fumbling around for grips when the piece starts turning.
Also a grip should not hinder a piece partner’s ability to fly. This is especially true of leg grips. Do not grip at or below the knee because this hinders your piece partner’s ability to move his leg. Instead, grip as high as you can on the outside of his thigh so that when he moves his leg your grip doesn’t move much at all.
Tip! High, outside leg grips also help people with short arm spans to fly when they have Sidebody grips. Sidebody grips consist of an arm and a leg grip on the side of your piece partner. It is much easier to fly if your arms aren’t all stretched out.
Slow is Fast
If the pieces drift apart and get on different levels during a turn, jumpers should not try to make up the distance too quickly. They should get the pieces level first then slowly make up the horizontal distance. Slamming the pieces together in a rush can possibly injure somebody or even cause a funnel. At the very least, it creates a wave throughout the formation that must be dealt with before jumpers break for the next point. If jumpers break before the formation settles down, they will more than likely end up on different levels again. It actually takes less time to get the pieces level and fly them smoothly back together than it does to slam them together then have to deal with an unstable formation. As often is the case, slow is fast.
Give it time
Like any skydiving technique, learning to turn pieces effectively takes time. Don’t expect to run straight from your A license exam to jumping on the hot RW loads. Practice on small formations first. Do some 4-way; there is no better training tool for learning how to turn pieces.
With practice, you’ll learn to anticipate your moves and to work with other jumpers in the piece. Piece turning is definitely a group effort and when everybody is working together, it feels like the piece has eyes and a mind of its own as it does a smooth, quick and controlled 360-degree rotation then stops on a dime and makes a perfect re-dock on the other pieces!

By elightle, in Disciplines,

The Great Book of BASE - Review

Base jumping is something that I’ve not had a desire to do, so it was understandable that when I was presented with the opportunity to read and review "The Great Book of Base" that I did so with some level of skepticism. You see, I've always had preconceived ideas about BASE jumpers, their discipline, and the personality types involved - ironic when you consider the very notion, a pet peeve of mine, general skydivers have regarding canopy piloting/swooping. "The Great Book of BASE" helped turn that thinking on its head.
The Author, along with oftentimes anecdotal experiences with other BASE jumpers, paints a vivid yet methodical view of the world of BASE jumping. The book itself begins with a rather heavy handed push warning readers of the dangers of BASE jumping. Something, that while necessary, wears a little bit on the reader at times. It was the only part of the book I found a little difficult to get through - not because the warnings were invalid, or not to be heeded, but rather it felt like the Author was attempting to offset any potential future litigation.
There is something about this book that should be clearly stated: This book will NOT teach you how to BASE jump, nor is it the intention of the Author for it to do so. What the book does do, and in my opinion does very well, is give the reader a solid sense of a path to follow in the BASE world. It's a guide and a reference book, something you read multiple times in your BASE career and refresh the things you need to. For newer (and perhaps even some seasoned jumpers) the book discusses the myriad of things a BASE jumper should consider from etiquette (site burning, etc), mentorship (something the Author is a avid believer in), various types of BASE jumps and locations, detailed explanations on various weather phenomena that can affect the outcome of the BASE jump, and even the types of skydives a future, or current, BASE jumper should spend time working on to give them the greatest chance of having a positive BASE experience. Also noteworthy is how the Author takes some time to dispel myths, largely prevalent in the regular skydiving community, about altitude BASE jumps. All the subjects mentioned above are discussed in depth, but not so much so that they become a chore to read. Quite the opposite in fact, and the Author does a spectacular job of keeping the reader engaged in the topic being discussed - not always an easy task when discussing technical topics.
The book is well edited and written. The only real complaint I had about the layout, and it's a minor quibble, is that the Author refers to DBS (Deep Brake Setting) at one point, but doesn’t actually explain the acronym until a later chapter. As a non-BASE jumper, this term had me scratching my head until it was later explained.
So what does this mean for you, the reader? Well while I still have the opinion that BASE jumping is not for me I have a newfound respect for participants in the sport. Additionally I can say that if I ever were to reconsider my BASE jumping career, I would certainly have this book on my bookshelf and use it for guidance on the next steps to take. I definitely will be recommending to some of the local BASE jumpers I know.
Safe BASE jumps.
Overall: Highly recommended

By admin, in News,

Operation Toy Drop: Airborne Tradition Set to Explode in 13th Year

Thousands of toys and paratroopers, hundreds of volunteers, and more than a dozen aircraft come together December 10th and 11th at Fort Bragg in order to give back to the surrounding community.
WHEN: Friday, December 10, 2010 for Toy Collection and Lottery [ 9:00am – 10:30am ]
Saturday, December 11, 2010 for the Airborne Operation [ 7:00am – 3:00pm ]
WHERE: Green Ramp, Pope Air Force Base (Friday)
Sicily Drop Zone, Fort Bragg (Saturday)
What makes this year’s Toy Drop different?
The addition of the 437th Air Wing out of Charleston Air Force Base and their unofficial challenge to “out-toy” Fort Bragg and Pope Air Force Base by collecting more toys for underprivileged families throughout the region. This year’s operation will also include double the amount of jump masters from allied militaries – greatly expanding the number of foreign jump wings awarded to U.S. paratroopers who participate.
Operation Toy Drop’s goal is to collect more than 6,000 new toys for children and families throughout the region who may not otherwise receive gifts this holiday season. America’s paratroopers don’t hold back – donations last year included numerous high-end game consoles, countless bicycles, and more otherwise unattainable toys for children of underprivileged families.
Media opportunities include: hundreds of Paratroopers lined up to donate toys for their chance to join the jump; the jump itself; paratroopers delivering toys, and more. Live interviews via satellite uplink will be available Friday during toy collection and airborne refresher training and Saturday morning from the drop zone during the jump.
Dozens of parachute silhouettes raining down against the North Carolina sky are nothing out of the ordinary around Fort Bragg, but each December since 1998, Airborne operations have taken on a different meaning to America's men and women in uniform with the Randy Oler Memorial Operation Toy Drop. An annual opportunity for Fort Bragg's military community to help families in need over the holidays, Operation Toy Drop combines the efforts of Army, Air Force and civilian service organizations in a truly unique event.
Operation Toy Drop is a week-long, philanthropic project where Fort Bragg's paratroopers (or visiting paratroopers from across the nation) individually contribute new, unwrapped toys to be distributed to local children's homes and social service agencies. Despite the project's name, these toys are not "dropped" anywhere except into the arms of deserving children throughout Cumberland County and North Carolina. The drop is actually a daytime, non-tactical airborne operation supervised by foreign military jumpmasters – a rare treat for participating Soldiers who relish the opportunity to earn a foreign nation's "jump wings".
Masterminded by then-Staff Sgt. Randy Oler in 1998, Operation Toy Drop started as a relatively small-time success backed by some big-time coordination. Oler's dream of incorporating Airborne operations, foreign military jumpmasters and local charities was a tall order, but Oler was never one to shy away from a challenge. He approached his commanding general within the U.S. Army Civil Affairs and Psychological Operations Command with the idea and was given the green light to spearhead the project.
That December, after eight months of planning, USACAPOC(A)'s first annual Operation Toy Drop had been completed on a wing, a prayer, and Oler's handshakes across several organizations. It was small, and very few toys had actually been raised - but it was a start, and from that point on Oler had a foundation to build on.
Over the following years, Operation Toy Drop expanded to include aircraft support from Pope Air Force Base's 43rd Airlift Wing, and welcomed the participation of Soldiers from Fort Bragg's XVIII Airborne Corps and 82nd Airborne Division. These Soldiers’ enthusiasm to participate in the budding holiday tradition greatly outweighed the number of jump slots available. With limited space on the planes, the project's organizers arranged to draw names of participating Soldiers at random to fill the slots. The name drawing has become one of the main spectacles of Operation Toy Drop, where hundreds of Soldiers crowd together for the chance to hear their ticket number called, no matter how long the wait.
Each iteration of Operation Toy Drop has brought in more toys for children in need. Even as USACAPOC(A) Soldiers mobilized with the rest of the military community in support of the Global War on Terrorism, those who remained stateside continued the tradition. In 2001, each child who lost a family member in the Sept. 11 attacks received a toy raised in the following December's Operation Toy Drop.
As the war broke out, Oler remained at the helm of the operation. By April of 2004, he'd been promoted to Sgt. 1st Class and was finishing up an assignment at the U.S. Army John F. Kennedy Special Warfare Center and School. Even as the USACAPOC(A) commanding general was fighting Oler's relocation orders, which would take him away from Fort Bragg, Oler was starting to get the ball rolling for Operation Toy Drop, 2004, which was less than eight months away.
Oler had warned his colleagues that he might not be around for what would have been his seventh year running Operation Toy Drop. Sadly, he was right, but not due to any relocation orders. On April 20th, 2004, Sgt. 1st Class Randall R. Oler suffered a heart attack while performing jumpmaster duties aboard a C-130 aircraft. At 43 years old, Oler was pronounced dead at Womack Army Medical Center. The Tennessee native had joined the Army in 1979 as an Infantryman, spending time in Ranger and Special Forces battalions throughout his career, and had deployed in support of Operations Desert Storm, Provide Comfort and Joint Endeavor. In 1995, he joined USACAPOC(A) to become a Civil Affairs specialist.
Oler's humanitarian spirit built Operation Toy Drop from the ground up, and it's only appropriate that the following December, his dream-turned-reality was dubbed the Randy Oler Memorial Operation Toy Drop by those who had worked so closely with him over the years. The void left by Oler's death was a difficult one to fill – Oler had run the operation from memory for six years. With no written notes to work from, key players scrambled to make the connections that Oler had worked from his head over the previous years.
To this date, Operation Toy Drop has collected and distributed over 35,000 toys – from bikes, to dolls, to video game systems – for local families and children in need. In 2007, Operation Toy Drop's 10-year anniversary, over 3,000 participants brought in approximately $55,000 worth of toys.
USACAPOC(A), a subordinate of the Army Reserve Command, has had control over Operation Toy Drop since Oler, a USACAPOC(A) Soldier, initiated the event in 1998. Oler's passion for helping those in need is echoed again and again among USACAPOC(A)'s nearly 10,000 Army Reservists, whose civilian experiences play important roles in their units' missions overseas. By conducting civil-military projects and humanitarian assistance efforts, USACAPOC(A) Soldiers are making non-lethal contributions to global peace and stability across the world. Located at Fort Bragg, USACAPOC(A) is headquarters to the 69 Army Reserve Civil Affairs and Psychological Operations units across the nation.
Civil Affairs and PSYOP Soldiers account for only five percent of the U.S. Army Reserve force, but comprise 20 percent of Army Reserve deployments.

By admin, in News,

GoWear comes to the UK

Preston, UK – Sep 15, 2010 – Beginning in September, GoWear skydiving t-shirts from the USA will be available in the UK through Go-Wear (Europe) Ltd, a new company formed by UK skydiver Adrian Bond. “This will be good news for skydivers in the UK and Europe,” says Kris Ruff, the American skydiver and designer who started GoWear back in 2000. “There’s always been a lot of interest in our products in Europe, but the high cost of shipping overseas has made it difficult for our customers to get them. Now, t-shirts like our classic Jumps from Perfectly Good Airplanes t-shirt can be ordered from a UK-based website instead of having to come all the way from the U.S.”
A Good Partnership
Kris is excited to be working with Adrian, who will be the sole distributor of GoWear’s products in Europe. “Adrian brings great business expertise to this new partnership and has lots of great ideas for new products to add to the GoWear brand.”
Go-Wear (Europe) will start with 12 of the most popular GoWear t-shirts and widen the range in the coming months. In addition to t-shirts, other products, including personalized products that will be completely new to the market, are in the works.
All the Details
GoWear skydiving t-shirts and other products will be available in Europe at www.Go-Wear.co.uk during August. Unisex tees will sell for £17.99 and the luxury women’s fitted tees will be £21.99. In addition, some DZ shops will be carrying the range. Go-Wear (Europe) Ltd is also looking for agents in Europe. If you’re interested, contact Adrian Bond at theboss@go-wear.co.uk or t: 0843 289 1655 or m: 07786 980 984.
Author:
Adrian Bond has been a skydiver for 7 years and jumps camera for a four way FS team, he is also on the BPA council and has been for 6 years. As well as launching Go Wear is also a management consultant.

By admin, in News,

Phoenix-Fly Revamps Wingsuit Instructional Programs

Phoenix-fly announces a new Coaching program to replace the Phoenix-fly Instructor Program.
Rising up from out of the ashes is the Phoenix and the latest re-start at Phoenix-fly is the dismantling of their “Instructor” program and the birth of a new Coaching program, making room for a gradual move towards a more official training standard.
“With the recent rise in wingsuit-related incidents and the tremendous growth in the wingsuit discipline, we felt it was time to re-examine our roster of manufacturer-endorsed instructors and determine a path for instruction that not only provides the best methodologies for training, but also provides an accessible, consistent system that Phoenix-fly can firmly stand behind,” says Jarno Cordia, Global Marketing Manager for Phoenix-Fly.
Phoenix-Fly’s history is well known; president and founder Robi Pecnik was one of the first and easily the most innovative wingsuit designer in the early days of wingsuiting. Paired up with Jari Kuosima, they formed Birdman. Pecnik kept the company on the leading edge of suit design while Kuosima sold suits. Together they built a powerhouse product line, and over time they instituted a training program to help skydivers get their wings into the air. The program was primarily authored by Chuck Blue and Henny Wiggers.This was known as the “Birdman Instructor” program.
In 2004, Pecnik grew dissatisfied with the direction Birdman was taking, and so left to form Phoenix-fly.
Many Birdman Instructors (BMI) automatically received Phoenix-fly instructor ratings when the competitive company was formed, and the Phoenix-fly program moved forward and grew from that base of early instructors. It was later discovered that some of the BMI’s had received their ratings via email. In short, some of the new PFI’s had never received formal training of any kind.
“We’ve found over the course of years that instructors were going uncurrent or teaching First Flight Courses to skydivers that didn’t meet the industry-recognized recommendation of 200 skydives in the last 18 months,” said Jarno, “We needed to address this, and with the spate of recent fatalities, we wanted to address it before someone was killed or injured during one of our training jumps. A high percentage of the recent fatalities fall well below the 200 jump minimum required by Phoenix-Fly and now by the new USPA BSR.”
With this in mind, the old PFI or “Phoenix-fly Instructor” program has been dismantled and the replacement program being steadily brought online. “We made four Phoenix-Fly Coaches (PFC’S) this past June, with others lined up to obtain their rating in the fall months,” says Douglas Spotted Eagle (DSE) Director of US training. “With the new additions to the SIM that myself and a team of wingsuiters authored, the recent changes in the program Robi and Jarno wanted to make, and the USPA adding a Basic Safety Requirement related to wingsuiting demonstrated that now is the right time to change up the program.”
Holders of the Phoenix-fly Instructor’s patch now hold a souvenir of the time they taught beginning wingsuiters. The Phoenix-Fly Instructional rating does not automatically translate to the newly founded Coach rating, and requires some re-training to merge into the new methodology of the PFC program, as well as a USPA Coach rating (USA-only).
“The new program parallels the USPA Coaching program and in fact we now require, rather than recommend, that Phoenix-fly Coaches in the USA hold a current USPA Coach instructional rating,” says DSE (who also holds a USPA Coach Examiner rating). According to Cordia, “We’re looking at requiring something similar for our non-USA Coaches. We’re already in the process of training up a Coach/Examiner for South America and he’s a USPA AFFI, TI, and just finishing his Senior Rigging rating. These are the kinds of people we want teaching and evaluating potential coaches.”
The newly developed program fundamentals came from the coaching techniques initially developed by Skydive University, discussions with other wingsuit coaches, and weaknesses observed over hundreds of student jumps.
Kinesthetics, isometrics, visual imagery, and student repetition are all part of the revamped PF First Flight program. First Flight Courses take slightly more time and provide improved and up-to-date information regarding navigation, deployments, and emergency procedures. Scotty Burns of Z-flock points out, “We’ve been teaching wingsuiting based on methods developed in the early days of wingsuits but the suits of today are much bigger, faster, and potentially more dangerous than they were ten years ago. This new program arms students with the knowledge they’ll need as they undergo the wingsuit journey. I’m really excited about it. I’ve taught dozens of wingsuit students over the years and know what to expect in an average First Flight. Since I’ve started training with this new program, my students somehow have been flying better. This thing works!”
“Having watched numerous wingsuit first flight courses, I can say with confidence that the PF coach program takes instruction to a completely new level, using various well thought-out techniques that deliver the best training I could think of,” commented recent PFC graduate Andreea Olea. “It's amazing how well it works with all kinds of students, from the most distracted to the most clumsy to the most cocky ones. Quality wingsuit training at its best - major kudos to Phoenix-Fly for setting such an excellent standard!”
Phoenix-fly coach candidates that have obtained their USPA Coach rating should plan on attending a Phoenix-Fly Coach training session at Skydive Elsinore, Skydive Utah, Skydive City/Zephyr Hills, or at Raeford Parachuting School with Douglas Spotted Eagle, Scotty Burns, or Chuck Blue. There is one half day of classwork, some of which will recall training received during the USPA Coach rating process. The second half day is a jump day, in which students must receive two satisfactory scores in three possible jumps. The jumps are scored using criteria very similar to the USPA Coach evaluation form. Candidates are also required to pass a written test before receiving their Phoenix-Fly Coach patches.
“Phoenix-fly Coaches must teach a minimum of six First Flight Courses per year and 15 coach jumps in order to remain current,” says DSE. Phoenix-fly Coaches receive special discounts on PF wingsuits, access to the PF training fleet for special events, and other unique discounts and opportunities via PFpartners.
“Truly, we’ve changed up our program so it meets a standard consistent with the USPA methodology of training and coaching, and so that the new program is consistent with the new wingsuiting additions to the USPA SIM. We’re looking to insert additional Coach/Examiners so that there are more geographical points in the USA where potential Phoenix-fly Coach candidates can more readily receive training and pass the course,” says Cordia. “We believe we’ve built a new training program worthy of even the most challenging students.”
“From the USPA perspective, we’re thrilled to see Phoenix-fly step up their training to prepare skydivers for bigger suits, low-tail aircraft, and overall safety. The fact that the program is consistent with existing USPA standards and training programs is a bonus for all, ‘ says Jay Stokes, President of the USPA.
Former Phoenix-Fly instructors wanting to update their Phoenix-Fly rating, or anyone qualified to challenge the PFC course may contact one of the PF Coach Examiners to arrange for a training class.
Phoenix-fly Coach Courses are currently available at:
~Skydive Elsinore (Douglas Spotted Eagle)
~Skydive Utah (Douglas Spotted Eagle)
~Raeford Parachuting Center (Chuck Blue)
~Skydive City/Z-Hills (Scotty Burns)
-The Parachute Center, Lodi, CA (Ed Pawlowski)
Contact Jarno Cordia for other countries/regions
Dropzones are encouraged to check Phoenix-fly.com for information regarding the active status of Phoenix-Fly Coaches.

By Deleted, in Gear,

Launching 2, 3 and 4-Way Stars for Recreational RW

Funneled exits are bound to happen once in a while on recreational RW loads, but they do not have to be the norm. With the leadership of a good load organizer and thorough dirt dives, jumpers with relatively little experience can soon be pulling off stable exits.
In recreational RW, the most common type of exit is a Star (or “round” as it often called). In a Star exit, it is easier to control the exit chunk and maintain levels because all jumpers are looking into the center. The number of jumpers in the Star exit depends on factors such as jumper experience and the complexity of the skydive. For recreational loads with mixed experience levels, a 2, 3 or 4-way Star is probably large enough. Any bigger and the chance of a funnel increases.
This article focuses on Star exits from left side-door aircraft such as Otters, Cessna Caravans and PAC750s because they are commonly used for formations larger than a 4-way. Also, because many recreational skydivers don’t do a lot of 4-way, terms such as Middle Floater and Rear Floater are used instead of 4-way terminology such as Outside Center and Tail.
Deciding Who Will Be In The Base
The simple solution is to put only experienced jumpers in the base, but that often doesn’t leave enough experienced jumpers further back in the lineup. An alternate solution is to put experienced jumpers outside the plane and lesser-experienced jumpers inside. This mix of experience levels can work quite well if everybody leaves on ‘GO’ and presents to the relative wind. Then, if the exit is less than perfect, the experienced jumpers are in a better position to control the exit chunk. For example, if one of the inside jumpers starts to flip over, it is sometimes possible for one of the outside jumpers to push against his back pack and help him settle back down into his slot.
The Importance Of Dirt Diving The Exit
The exit is just as important as remembering the points of the skydive. If the base is not there, no points will be turned anyway. So during the dirt dive, jumpers should pack it up and take grips exactly the way they expect to do it on jump run. This can prevent a lot of fumbling around for grips when they are lining up for real. If a mockup of the aircraft door is available, jumpers should use it. If not, they can make marks on the ground to represent the door.
Typically, the organizer is positioned in the middle of the door and facing in so that he can see when everybody is in position before giving the count. Since full face helmets make it very difficult to hear the count, many organizers move their head or leg in time with the count. Some organizers swing their left leg out-in-out to indicate the Ready-Set-Go. (The second swing out represents the ‘Go’).
Launching A 2-Way Star
This exit uses a Middle Floater and 1 jumper inside the plane. As mentioned earlier, the most experienced jumper should be outside the plane because he is in a better position to control the inside jumper as the 2-way leaves the plane.
Getting Into position
1. With both hands holding onto the bar (or the top inside of the door if there is no bar), the Middle Floater rotates his body to the left so that his back pack goes out the middle of the door (so he doesn’t snag anything). His head follows until he is standing outside the plane with his right foot on the edge of the door and his left knee presented to the prop blast. His hands should be approximately shoulder-width apart.
2. As soon as the Middle Floater turns around in the door, the Inside Jumper reaches between the Middle Floater’s arms then right and left for his arm grippers. This leaves both the Middle Floater’s arms free to fly and control the exit.
3. As he takes grips, the Inside Jumper steps forward with his left foot, placing it on the edge of the door and crouching down (not on his knees) while keeping his chest cheated toward the prop blast and his back straight up and down. His right foot should naturally be a foot or two back inside the plane (helps ensure his body is cheated toward the prop blast).

The Launch

When the Inside Jumper is ready, he looks up at the Middle Floater.
The Middle Floater gives the count and launches out, leading with his left knee and presenting his chest and hips to the prop blast. With his free hands he can help control the Inside Jumper if he starts to twist or turn off heading. He can also double grip the Inside Jumper for added stability.
The Inside Jumper DOES NOT push but goes with the exit, keeping his head up and rotating his chest and hips toward the prop blast as he helps fly the 2-way on the relative wind.
Both jumpers are responsible for keeping the 2-way on heading relative to the aircraft’s line of flight so that other jumpers on the skydive can go directly to their slots for a faster build. The 2-way is also responsible for maintaining a good fall rate.
Launching A 3-Way Star
This exit uses 2 floaters (a Rear and a Middle) and 1 jumper inside the plane. Again, the most experienced jumpers should be outside the plane.
Getting Into Psition
1. The Rear Floater climbs out first (see the photo of the Middle Floater climbing out for the 2-way).
2. On the heels of the Rear Floater, the Middle Floater climbs out the same way, except he rotates his body to the right and stands pretty much in the middle of the door.


3. As the Middle Floater climbs out, the Rear Floater grips the Middle Floater’s right arm gripper with his left hand.
4. Both floaters are now standing outside the door and should be turned slightly toward the front of the aircraft with the inside of their left knees presented to the prop blast.


5. The Inside Jumper gets in position the same way as described for the 2-way Star except he takes a left-hand grip on the Rear Floater’s right arm gripper and a right-hand grip on the Middle Floater’s left arm gripper. (Again, he steps toward the door with his left foot and places it near the edge of the door to ensure he is cheated toward the prop blast.)


Launch

When the Inside Jumper is ready, he looks up at the Middle Floater.
The Middle Floater gives the count and launches out, leading with his left knee and presenting his chest and hips to the prop blast.
The Rear Floater should anticipate the count and leave a split second early, hardly noticeable but just enough to place him on the lower end of the 3-way and looking up at it. (In 4-way, the Rear Floater, called the ‘Tail’, is always on the lower end of the formation to help anchor it on the relative wind.)
The Inside Jumper DOES NOT push. He simply steps off, keeping his head up and rotating his chest and hips toward the prop blast as he helps fly the 3-way on the relative wind.
All jumpers are responsible for keeping the 3-way on heading relative to the aircraft’s line of flight so that other jumpers on the skydive can go directly to their slots for a faster build. The 3-way is also responsible for maintaining a good fall rate.
Launching A 4-Way Star
This exit uses 2 floaters (a Rear and a Middle) and 2 jumpers inside the plane. As with the 2 and 3-way Star exits, the most experienced jumpers should be outside the plane.
Getting Into Position
1. The Rear and Middle floaters climb out the same way as described for the 3-way Star exit. (Note: The Rear Floater should stand a few inches forward of the rear door jamb so that the Inside Rear jumper does not hit his arm on exit.)
2. While the two floaters are climbing out, the 2 inside jumpers (let’s call them Inside Rear and Inside Front to indicate their relative positions in the door) should step forward with their left foot and place it on the edge of the door, keeping their back pack backs straight up and down and their chests cheated toward the prop blast. They should crouch but not be on their knees. Their right foot should naturally be a foot or two back inside the plane.
3. The Inside Rear jumper takes a left-hand grip on the Rear Floater’s right arm gripper and a right-hand grip on the Inside Front jumper’s left arm gripper.
4. The Inside Front jumper takes a right-hand grip on the Middle Floater’s left arm gripper and can either leave his left hand free or reach back and double grip the Inside Rear jumper’s right arm.


The Launch

When the inside jumpers are ready, they look up at the Middle Floater.
The Middle Floater gives the count and launches out, leading with his left knee and presenting his chest and hips to the prop blast.
The Rear Floater should anticipate the count and leave a split second early (the same way as described for the 3-way exit).
The inside jumpers DO NOT push. They basically step off and go with the Middle Floater, keeping their heads up and rotating their chests and hips toward the prop blast. The Inside Front jumper should also think about launching toward the front of the plane, and the Rear Inside jumper should think about helping to place the Inside Front jumper up and forward.
No grip switching is necessary. If the 4-way is the base for a big-way, jumpers can take double grips for added stability.
All jumpers are responsible for keeping the 4-way on heading relative to the aircraft’s line of flight so that other jumpers on the skydive can go directly to their slots for a faster build. The 4-way is also responsible for maintaining a good fall rate.
Safety Tips

Before boarding the plane and before jump run, jumpers should give each other pin checks.
During the lineup and the exit, jumpers should always protect their handles.
Before planning to launch larger exit chunks, jumpers should know how many jumpers are allowed in the door and at the back of the aircraft (so that the aircraft’s stall point is not jeopardized). If they don’t know, they should ask the pilot! As with other types of exits, methods for launching a Star can vary from one organizer to the next, from one 4-way team to the next, or even from one DZ to the next. The methods described in this article are ones that have worked successfully for this author on both 4-way and recreational loads. But no matter what method is used, success is much more likely if jumpers present as much as possible to the relative wind when lining up in the door and continue this through the launch.
Finally, bigger is not always better. Most skydivers would rather swoop on a solid 2-way than chase a funneled 6 or 8-way base. A solid base allows everybody on the load to turn more points and get the most bang for their buck.

By elightle, in Safety,

The Abort Zone

Landing your canopy in a specific place is a skill that we all must master. If you cannot land where you want to, eventually you will land someplace you don’t want to. Honing this skill is something that we all must pursue, and how we approach this will determine whether or not we survive the learning process.
We must first learn how to land on a runway before striving to land on a specific point. When pilots try to skip this step, they often run into significant stumbling blocks, some of them requiring surgery. Once you are proficient at hitting the centerline of a runway with consistency, then you can move on to more specific targets such as entry gates and landing points.
One of the most important aspects of any approach is the “entry angle”. Although we can often repair a flawed approach, there are limits to our course corrections. The parachute can only do so much. If you set up too close to the target or entry gate of the swoop course, you may be in for a painful lesson. Too tight is a very dangerous place to be.
Even if you are flying a conservative approach, making gentle turns to final, this can still bite you. When a pilot strives to land on a target that is mostly underneath them, they are on what I call “the path of crazy shit”. You can almost hear the banjo music starting like in a chase scene in an old western. There is no graceful way to land on a target that is directly below you. The parachute wants to glide, and turning or diving to get there will always put your life at risk.
If you are a swooper, the consequences of being too close to your entry gate are dire. You may have the potential to extend the dive of your canopy to make the entry gate, but all you will do is make a divot between the flags that mark the location of your final act of egoistic stupidity. Let it go, and live to swoop another day.
If we are too far away from our entry gate, real or imaginary, our solutions are simple, and generally quite safe. “Shallowing” of the approach can easily be accomplished by letting off the dive early and/or holding a bit of brakes or rear risers. We do not often read incident reports about canopy pilots who died a horrible death as a result of holding two inches of rears to stretch their glide back to the target. Set up deep, and tighten up over several jumps.
The hard part comes when you have set yourself up, started your dive, and are not sure if you can make the gate or not. You are tight and steep, and you think that if you make it you are going to be a hero. Hero or zero that is; only time will tell. If you hold your swoop in your hand like a butterfly, hoping it will not fly off, you will live far longer than if you squeeze it tightly and try to force a square peg into a round hole. Either it is there or it is not.

You need to train yourself to know when you are too tight by knowing what it looks like when it is just right. Visualize the perfect entry, not too shallow, not too tight, with the target or entry gate out in front of you. Walk through the sequence, setting up tiny gates on the ground, and practice making aborts by lifting your eyes from the entry gate and landing long. If you are looking down at it, just let her fly, land safely, and go up and do it again. There is always the next jump.
They key to a good abort procedure is training. Without physical rehearsal for physical activities, our cognitive understanding is useless. We have to practice arresting the dive over and over, and find new ways of putting our parachutes into level flight quickly.
The first concept is: “Pitch Before Roll”. This means that the turn itself is less important than the pitch attitude of the canopy. When you are striving to pull up from a diving turn, increase the canopy’s pitch angle before striving to recover the roll. Bank angle does not kill people, descent rate does that. If you nose your parachute up, you will increase the angle of attack of the wing, which will give you the added lift that will reduce the decent rate. This will afford you the time to reduce your roll angle prior to touchdown. You literally create time.
The second concept that supports healthy recovery technique is: “Sharp Inputs Create Sharp Results”. Slowly applying the brakes, regardless of the depth of the input, will never create the high rate of pitch change that shorter, sharp inputs can. This is the same reason why slow flares, when started at a very high altitude, will not cause an adequate change of direction of flight so as to create a level-off for a soft landing. Practice giving sharp stabs on the brakes while in a turn, and see what it does for you. If your weight increases dramatically, you know you are creating a change of direction, since inertia is resisting your change of motion.

Another relevant concept with regards to saving yourself from a low turn is: “Give Up Some Heading”. If you strive to arrest your dive and stop the yaw too quickly, you are likely to wobble on the roll axis. This is because the increased lift on the low wing is bringing that wing up, beginning an oscillation about the roll axis. This can easily be prevented by allowing the turn to continue a bit following the increase in the angle of attack. Look into the turn, and let the wing follow through with its natural over-steer tendency, perhaps as much as 90 degrees when recovering from a fast turn. This overshoot can be as little as 20 degrees in a slower, carving turn. When you strike the toggles, do it with a short, strong burst-and-hold of 12-18 inches, but do it in an asymmetric manner that continues the current momentum of the turn. This will allow you to smoothly and slowly exit the turn and enter your final landing procedures gracefully.

The last idea that seems to make a difference in how quickly you are able to pull up from a low turn is where you are looking: “Look Where You Want To Go”. If you are like most people, you will stare at your impending impact point on the ground, right until landing. By focusing your attention on what you don’t want, you inevitably make it happen. Somehow we are drawn toward whatever is in the center of our focus, so it is a far better plan to look toward where you intend to go, rather than where you are currently going. If you have turned too low, your current destination point is somewhere below you, while your intended flight path is in the general direction of the horizon. Lift your eyes, and make your parachute fly toward where you want to go. Focus is more than the object of attention, it is the shape of things to come.
Aborting is a part of life. Humans are not perfect, and sometimes we are incapable of fixing our errors. Targets and entry gates are fun to shoot for, but not at the expense of our bodies. Aim to fly a clean approach every time, and let your gut tell you what to do. If it feels bad, it usually is. Do not let your desire to make the swoop course or the peas keep you from seeing what is right in front of you. Ego distorts our vision, as does passionate desire.
The only way to see clearly is to remain calm, breathing slowly and completely throughout the approach, and maintain a positive mood as you set yourself up. If you start to feel scared, it is your cue to breathe more and try less. The perfect approach always feels easy. It flows like water. It is the result of good planning combined with good execution, made possible by positive emotion. Joy is thrust, fear is drag, ego is weight, and knowledge is lift. Maximize lift and thrust, and you will go far.
Go Big
Live Long

BSG
Brian Germain is the author or several popular skydiving books including: The Parachute and its Pilot, Transcending Fear, Vertical Journey and Greenlight Your Life. He also has a spot on Skydive Radio called “Safety First with Brian Germain. Brian runs canopy flight courses throughout the world, and does motivational keynote speaking on the topic of transcending fear. His website is: www.BrianGermain.com

By Deleted, in Safety,

10 Things to ask your potential Tandem or AFF student

This is a lot of info I have learned over the years about interviewing potential tandem customers and AFF students who are either elderly, or have some disability or medical condition.
I always try to relate the physical aspects of the skydive to that person and what might the consequences be. In particular, the airplane ride, the opening shock and the landing. All of these events have specific physiological effects on people and each person have different risks and will react differently to these effects.
1. What is your height and weight? Obvious question. Do not exceed the weight limits of the gear. For tandems, weigh yourself with gear and everything on to know what your exit weight is going to be.
Most tandem manufacturers have a 500lb (227kg) limit for their gear, so easy math will help you know what YOUR personal maximum tandem student weight is.
Do not exceed the TSO for the AFF students rig. If you do and they get hurt, then that is simply defined as ‘gross negligence’ on your part and the waiver will mean virtually nothing in the case of a lawsuit.
2. Do you have any metal in your body? Most people will know a great deal about accidents or surgeries that they have had and can tell you in great detail about it. A spinal fusion with plates/screws or a rod in a femur does not mean that someone cannot jump – but it might raise other questions about the stability of those joints and the consequences of a hard opening or a bad landing.
But a rod in the lower spine could break several vertebrae if a hard landing occurs with the student landing on their butt, causing serious and/or more permanent injuries.
3. Do you have any artificial joints? The question needs to be asked of everyone. A hip replacement is a dangerous thing for a 70 year-old or 80 year-old candidate. Opening shock alone could dislocate the joint. Knees as well. What is the range of that knee? Can you raise your legs for landing?
4. Do you have any plumbing (catheters, colostomy bags, etc)? (Yes that’s right – I said COLOSTOMY BAG) While this may be awkward for you to talk about, it probably is not awkward for the student or person that might have one. If someone has one of these or similar devices installed, then it is probably as ‘normal’ to them as walking or breathing.
But on a skydive, a catheter or bag can come loose or detach, and at the very least, would be a nasty mess to deal with. A lot of catheters are attached to a bag strapped to their leg. Many can be removed, relocated, drained or emptied prior to a jump.
5. Do you have any other medical apparatus (Pacemaker, insulin pump, etc)? Again, they could have internal or external devices on their body. A pacemaker is often not a big deal. A external defibrillator might be a problem if it became detached during the skydive. Same for an insulin pump or a catheter used to feed medications into their body? Where is it? Will the harness rub against it? Can it be removed, relocated? What are the consequences of something happening to it?
6. Are you taking a medication or something that can be administered by me in an emergency? Something like an asthma inhaler or a diabetic medication. If there is a chance of an asthma attack, then the tandem instructor can take the inhaler with them and administer it if needed.
7. Do you have issues with heart or breathing? Someone with a weak or other heart condition, or congenital breathing problems may not even be able to breath properly at 10,000’ in an airplane. Combine that with the stress of a skydive, and you may end up with a medical emergency. Have they flown recently? What precautions do they take if any? And no, I do not recommend bringing their oxygen system on board the plane.
Can they deal with an accelerated heart rate for an extended period of time? We all know that heart rates can rise to some 140+ just prior to and during the exit out of the airplane. Not everyone is able to handle that if they have some condition related to heart or blood pressure.
8. What if my doctor says it’s OK for me to jump? While that may be good information to know, most doctors know little or nothing about skydiving. If you get the chance, talk to their doctor directly and explain the physical things that happen during a skydive.
The airplane ride (hot, sweaty, cramped space and altitude issues). The adrenaline rush during exit and freefall (heart rate), the opening shock of the parachute, (several G’s of force and the potential for a very hard opening), the parachute ride (vertigo, motion sickness, tight and uncomfortable harness, reduced circulation) and the landing especially (forward motion instead of vertical, and how we can slide in (or not) and what is expected of the student during that phase and what can happen if it does not go well)
9. What will an injury do to your quality of life? I have learned that this is probably one of the most important questions you can ask. An 80 year old with Osteoporosis may be able to skydive, but if they break an ankle, they may never walk again.
Bones may not heal and they could spend the rest of their life in a wheelchair or worse. It is much the same for disabled folks. I always try to get a feel for what would happen to their life if they break something, because it CAN and it DOES happen.
10. Do you have any sort of medical condition that can kill you in a 10-15 minute window? I ask this question as a catch-all. Basically there is a possible 10-15 minute window in the case of a tandem jump, (a high or early activation on a parachute resulting in a long ride down). During that time, the instructor cannot perform CPR, a tracheotomy, or rescue breathing. So if the student has any medical condition that would need to be attended to by emergency means, the tandem instructor is pretty much helpless to intervene during the skydive. If the student has any such condition, then perhaps a skydive is not a good idea.
When in doubt, consult a doctor who IS a skydiver. There are plenty of them out there and most can advise you on the effects of a disease, surgery or medication on the process of skydiving.
Just because the customer is standing in front of you right now and wants to jump right now, is not a reason to take them up. Offer to do some homework on their condition(s) and arrange for a future date to see if they can jump.
I have taken up dozens of elderly, disabled, and paraplegic/quadriplegic students in my life. I have also REFUSED to take up dozens of them. Not everyone is capable of making a skydive. Not everyone should be making a skydive.
David TK Hayes

USPA D-18764

CSPA D-486

AFF, Tandem, IAD, S&TA;, Coach, PRO

By admin, in Safety,

Gear Database Updates

You have probably seen the previous article on the bonehead composites gear update. Well that was the first of what was almost a complete gear section update. It became evident that much of what is listed in the gear database wasn't entirely fresh and that there were some discontinued items which were still listed and some new gear out there which also hadn't found it's way into the database.
Action has been taken in correcting this issue and making sure the gear section is as up to date as possible. I have both sent out e-mails to all involved manufacturers as well as manually gone through the list and updated what I could. The result is over 100 new gear items added to the database including a new category, "Cameras and Camera Equipment". Granted much of what is new on the site isn't new in production, but this now gives you a chance to review gear that was previously not listed.
New gear items can be found under the following categories:


Altimeters, Audibles and AADS


- Alti-2 Inc

- Free Fall Accessories

- Larsen & Brusgaard

- Parasport Italia


Cameras and Video Cameras


- GoPro

- Sony

- VholdR

- Conceptus

- Hypoxic

- Ultimate Switch

- Sky Tools

- Skydance Headwear


Harness and Container Systems


- Altico

- Basik Air Concept

- Jump Shack

- Para Avis

- Para-Phernalia

- Rigging Innovations Inc

- Sunrise Manufacturing International

- Thomas Sports Equipment


Helmets, Head Gear and Goggles


- 2K Composites

- Bonehead Composites

- Cookie Composites

- Gath Head Gear

- Headfirst Headwear

- Parasport Italia

- RAWA

- Sky Systems

- TonFly


Jumpsuits and Clothing


- Bird-Man Suits

- Body Sport USA

- Firefly Jumpsuits

- GoCrazy

- Kurupee

- Matter Clothing

- Phoenix-Fly

- Sonic Flywear

- Tonfly


Main and Reserve Parachutes


- Atair

- Basik Air Concept

- Flight Concepts

- Icarus Canopies

- ParaAvis

- Parachute Systems

- Performance Designs


A complete list of the new gear items can be found - On the New Listing page.
Though even with these updates I am sure there are still manufacturers which have slipped through and aren't listed in the database. And I will be trying my best to fill in these holes and hopefully create a comprehensive up to date gear section.
Your assistance would be greatly appreciated too! Anyone who notices a manufacturer or gear item missing in the database can post information in the following thread - Gear Section - and I will add them. If you are also aware of products which have been discontinued, but aren't listed as such you can also alert me to this and I will go ahead and correct the issue.

By admin, in Gear,

Bonehead Composite Gear Update

We're happy to announce that we've updated the Bonehead Composite gear page with plenty of new items. We've been somewhat out of date regarding some of the new helmets put out by Bonehead Composite, so there is lots to check out- some of which you may already be aware of or own. Though this gives you the chance to head over to some of the new items and rate them, should you already have experience with them.
Here's some of the new items we have added:


The ZEUS Helmet
"Take a walk on the wildside... Zeus is a new way to look at video helmets. The ZEUS from BoneHead Composites Is designed to be a versatile camera helmet with its flat side and a space provided for a Cam EYE II. One of the first things you'll notice about the ZEUS is the Retro-Roman styling. ZEUS provides more frontal facial coverage and a brim to keep the sun out of your eyes without being aerodynamically obtrusive. The ZEUS comes standard with BH's ingenious Thermal-Fit liner, our new buckle chin-strap closure and the great finish quality that you have come to expect from BoneHead. This helmet does not require a chin-cup and there is not a cutaway system currently available"


The FLAT-TOP NARROW Camera Helmet
"The other choice of professional camera fliers from around the world… The FLAT-TOP NARROW from Bonehead composites is the trimmed version of our almost famous FLAT-TOP PRO. The FLAT-TOP NARROW is a great all-around camera helmet for any discipline in skydiving. RW, freefly, tandem video or competition freestyle can be captured with your FLAT-TOP NARROW. This camera helmet is a rear-entry system to give the user better camera stability without sacrificing comfort. This NARROW version of the FLAT-TOP PRO has been made to allow the camera flyer less surface mounting availability and air drag but keeps the stability of the rear-entry configuration. The FLAT-TOP NARROW has plenty of space inside to run wiring, camera buttons, etc. to keep as much of the snagable surfaces to a minimum. You have the choice of where you would like a ring sight post placed. The FLAT-TOP NARROW comes standard with BH's ingenious Thermal-Fit liner, still camera adjustable platform, NEW cutaway system, and "Riser Slap" release button protector."


Hells Halo Camera Helmet
"Hell's Halo is Boneheads latest and greatest camera helmet. There are 3 mounting surfaces for all your camera mounting needs. What makes this helmet stand out is an internal "halo" band that is adjustable using the ratchet clip on the back for last minute size adjustment. The helmet comes in two shell sizes along with our thermo-fit foam and an adjustable chin strap. If you still feel you need a chin cup, that accessory is also available. You can choose from our regular chin cup or our new concealed chin cup which hides the ladder straps!"


The MAMBA Helmet
"Welcome to BoneHead's latest addition to Full-Face Flip-Up Helmets. The MAMBA from Bonehead Composites is a great choice for RW jumpers with its full face security and the ability to flip open the lens quickly and easily without sacrificing keeping closed in freefall. The new lens closing mechanism requires the jumper to squeeze the lens together to allow the closing pin to be released from it's locking position at the forehead area in order not to make a push-in button on the chin susceptible to knock and unwanted lens openings during the most intense skydives. The MAMBA features dual internal audible pockets on the inside of the helmet, great peripheral vision, a heavy neoprene neck liner to help with fogging lenses and noise, a FASTEX chin strap closure with padded strap, front Chin-Dam wind deflector to keep unwanted wind flow out of the inside of the helmet and a shape that allows full head movement and the ability to see and locate emergency handles. The MAMBA comes standard with BH's ingenious Thermal-Fit liner, chin-strap closure and also comes with the lens coated with anti-fog direct from the factory."


The ALL-SPORT Helmet
"Refined Sleek Shape For All Types of Skydiving. The ALL-SPORT helmet from Bonehead Composites is now available from your favorite retailer! Customers all over the world wanted a helmet that was simple, sleek and of course had the quality and design that has made BoneHead Composites famous in the skydiving world.. and we delivered! The ALL-SPORT features a very simple shell design that is flatter on the left and the right so that camera mounts can be added easier. We took all the best attributes of the Guner and Mindwarp and combined them to make the ALL-SPORT. Internal audible pockets have been integrated into the helmet so that there is no need to build out the sides of the shell to accommodate audibles and still keep the interior comfortable. The ALL-SPORT comes standard with BH's ingenious Thermal-Fit liner, neoprene padded leather FASTEX chin-strap closure. "


These are just 5 of the new 10 helmet and helmet items added today. Head over to the Bonehead Composite gear page to see the rest.

By admin, in Gear,