Submit Article

Skydiving News and Articles

Select A Category

Pick a Category

Sunpath - SPS B009 (23 May 2013)

DATE: May 23, 2013 SERVICE BULLETIN# SPSB009
SUBJECT: SUPPLIER/VENDOR RECALL OF PS70104 HOUSINGS (METAL FLEX HOSING INC)
STATUS: MANDATORY INSPECTION AND REPLACEMENT OF RECALLED HOUSINGS
SERVICE BULLETIN: MANDATORY INSPECTION (COMPLIANCE WITH METAL FLEX HOSING MATERIAL RECALL)
IDENTIFICATION: ALL JA101 XX HARNESS CONTAINER ASSEMBLIES (JAVELIN ODYSSEY) WITH METAL FLEX HOUSING BATCH #33234 A AND 33227, .375ID PS70104 HOUSINGS.
SEE SERIAL NUMBER LIST BELOW.


38159
38891
38901
38912
38959
38973
38987
38997
39027
39037
39047


39061
39165
38231
38892
38902
38913
38960
38975
38988
38999
39028


39038
39048
39063
39419
38453
38893
38903
38923
38961
38976
38989


39013
39029
39039
39049
39064
39499
38523
38894
38904
38924
38963


38978
38990
39014
39030
39040
39050
39066
39527
38589
38895
38905


38925
38964
38979
38991
39021
39031
39041
39051
39070
38753
38896


38906
38943
38967
38980
38992
39022
39032
39042
39054
39076
38799


38897
38907
38945
38968
38982
38993
39023
39033
39043
39055
39083


38800
38898
38908
38946
38970
38984
38994
39024
39034
39044
39056


39087
38860
38899
38909
38947
38971
38985
38995
39025
39035
39045


39058
39089
38890
38900
38910
38953
38972
38986
38996
39026
39036


39046
39060
39118

BACKGROUND: Metal Flex Hosing (supplier of flexible metal housings) has recalled 195 total PS70104 .375” ID SS housings due to the ability of the coil to separate. 155 of these housings were received by Sun Path Products, Inc., 124 of which were installed in harness container assemblies, 27 pulled from inventory prior to use and 4 damaged/discarded. (Note: this is not a failure mode. Separating of the coil does not impede normal operation or function of the system)

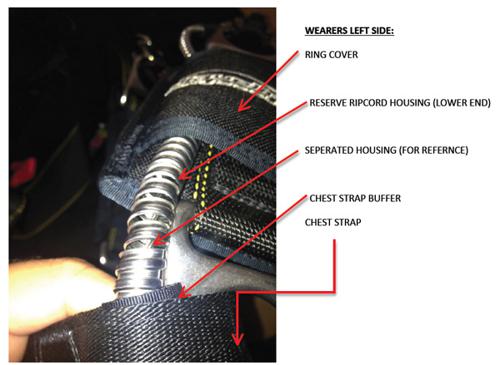
Who can inspect: Anyone can inspect this area. See photos below.
What to inspect: All JA101 XX harness container systems listed in table above. Inspect Reserve Ripcord housing.
PROCEDURE: If the serial number is listed in the above table, inspect the available exposed reserve ripcord housing. Locate the lower end of the housing, which is clamped to the Main Lift Web, just above the reserve ripcord pocket. Inspect the exposed length of housing from the clamp upwards; ensure that the coil has not separated/unraveled. Be sure to inspect the section that is routed through the chest strap.
Inspection Results:
A. HOUSING FOUND TO BE INTACT (GOOD): The rig may continue to be jumped with periodic monitoring until the next repack cycle or earlier elective replacement. However this housing must be replaced at the next repack cycle. See http://www.sunpath.com/support/HousingReplacement.pdf for instructions for your rigger to complete the replacement of the housing.
B. HOUSING FOUND TO BE SEPERATED/UNRAVELLED (BAD): The housing must be replaced before the next jump by a certificated senior or master parachute rigger (or foreign equal) or the manufacturer. See http://www.sunpath.com/support/HousingReplacement.pdf for instructions for your rigger to complete the replacement of the housing or instructions to send your system back to the manufacturer.
Resolution:
A: Housing is intact and will be monitored and replaced at the inspection/repack cycle.

1. NOTE ON PACKING DATA CARD, SPSB009 COMPLETED

2. AT TIME OF REPLACEMENT, FILL OUT WEB FORM AND SUBMIT at http://www.sunpath.com/MetalFlexRecall.html and add “–Replaced“ after SPSB009 COMPLETED from step 1 above.

3. NO FURTHER ACTION REQUIRED
B. HOUSINGS ARE SEPERATED/UNRAVELLED:

1. GO TO http://www.sunpath.com/support/HousingReplacement.pdf FOR FURTHER INSTRUCTIONS ON REPLACEMENT OF THE SUBJECT HOUSINGS.

2. AT TIME OF REPLACEMENT, FILL OUT WEB FORM AND SUBMIT at http://www.sunpath.com/MetalFlexRecall.html ;NOTE ON PACKING DATA CARD AND RIGGER LOG BOOK, SPSB009 COMPLETED REPLACED.

3. NO FURTHER ACTION REQUIRED.
COMPLIANCE DATE: INSPECTION BEFORE NEXT JUMP (BY ANYONE) AND MANDITORY HOUSING REPLACEMENT AT NEXT REPACK CYCLE BY FAA SENIOR OR MASTER PARACHUTE RIGGER OR FOREIGN EQUAL.
AUTHORITY:

DAVID L. SINGER

Sun Path Products, Inc.

Director of Engineering

404

West Edinborough Ave

Raeford NC 28376 USA

Telephone: 910 875 9002

FAX: 910 875 9272
DISTRIBUTION:

1. All Sun Path Products Dealers

2. PIA Technical Committee

3. PIA Rigging Committee

4. National Aero Clubs, Parachuting Section

5. All Parachuting publications

6. Military Parachute Organizations

7. FAA MIDO SAVANNA

8. FAA FISDO, GREENSBORO, NC

9. FAA ACO, ATLANTA, GA

10. DGAC, FRANCE


By admin, in News,

Peripheral Vision

Measuring “Spotlight Effect” Interference On a Peripheral Vision Matching Task.
ChrisD
Abstract
In historical peripheral studies, peripheral stimuli are presented and measures are taken on known central task behaviors and the effect on the main task is measured. In this experiment a dual task peripheral stimulus is presented and a central task is presented using Eriksen & Eriksen’s (1974) “Attentional Spotlight” paradigm. What makes this study interesting is that the central field is completely flooded with stimulus thus making parallel processing aka Treisman’s “features and objects” paradigm compared with very fast and multiple serial searches, independent of the search/ experimental paradigm used. Thus regardless of the serial or parallel search debate, effects of a central stimulus presented in a varying attentional spotlight area can be measured reliably regardless of the attention demands of a task. Early results suggest stimuli presented within the attention spotlight have a pronounced and unavoidable linear negative effect on varying levels of peripheral task performance. Discussions on subject age and behavior/ occupation requiring a high degree of attentive awareness/ vigilance such as driving or piloting are discussed also.
Introduction
Current perceptual/ cognitive research may be limited by methodological hindrances. Computer screens by their very nature limit current visual field measurements, which generally cover 1 degree to 20 degrees of the visual field depending upon the subjects distance from the computer screen. Further complicating visual research paradigms is the fact that perception is mainly a binocular phenomenon. This complicates visual search paradigms considering pre-attentive features that may or not, “pop-out” (Treisman, 1986), primarily a parallel search process, as compared with more attention driven, serial search paradigms. Further complicating this is the switch from a wide processing area to a relatively small and restricted area for intense serial processing during periods of intense concentration or high stress (Murata 2004). Understanding these two paradigms has great implications for any subject that depends upon these visual perceptual systems for their particular task, such as pilots or motor vehicle operators. Many researchers have suggested two distinct visual attentional systems. One wide area resource gathering system that quickly switches to a serial search with a very narrow, less than 2 degrees of visual field angle, field of view which is also called the “spotlight effect.” (Spotlight effect known about since the 1950s, generally attributed to Eriksen & Eriksen, 1974, and Posner, various.) This switching effect which Rufin VanRullen (2004) points out is highly dependent on attentional load or how many tasks an individual is involved in. He refers to dual task activities as the: “…two distinct attentional resources paradigm.”
However with small computer screens this visual spotlight effect, parallel, serial search processing paradigm suffers as subjects can readily switch search areas or due to the narrow visual field, they can readily conduct a quick search of relevant features with their attentional spotlights. As an example Crundall, et al., (1998, 2002) research supports this as when experienced drivers visual information acquisition is different than compared with inexperienced drivers that use different and limited visual field areas as an example (Ruff 2004, et al.). This highlights the parallel/ serial confound by studies using limited visual areas as the subjects can utilize fast serial searches due the restricted viewing area and or utilize parallel searches due the same reason. Other research paradigms present realistic driving simulators and or real driving studies and label the driving task as the primary or spotlight effect and vary and measure the effects of various peripheral stimuli and the effects of these peripheral stimuli upon the central (spotlight) task performance (Ruff 2004). Frequently the perceptual tasks whether dual or single, complicated or simple place extraneous demands upon the simulation (Recarte et al. 2003, Ivanoff et al. 2003). Additional studies have subjects attend to varying visual tasks to measure the area of this attentional visual field narrowing by varying central task loads (Horrey et al. 2004). This amounts to a perspective switching in a sense as too exactly which is the spotlighted effect or the peripheral task becoming the spotlighted area. Perspective switching between central tasks being affected by varying peripheral loads or intrusions, compared with peripheral tasks becoming the central task. In other words the subject can move the spotlight; the subject determines which is the spotlighted area merely by directing attention to the stimulus, whether in the central area or the peripheral area!
A corollary to this idea is the general dearth of research on central field of view influence on peripheral tasks. Whereas there is much research and a generally accepted view that certain peripheral stimulus can attract attention even in high attentional demanding environments, this experiment tries to study the effect of a central stimulus while performing a dual peripheral vision task, independent of the constraints imposed upon the subject by narrowed visual fields popular in computer research and imposed by the dominance of task experienced in real or driving studies. I.e. in real driving or acquisition type studies the subject by the very nature of the task is pre-occupied with that same task! In this experiment the peripheral area is flooded with stimulus and the effects of a central intrusive distractor flood the area of this spotlight regardless of any search paradigm or eye position. Thus the effects of this spotlight can be discerned from a peripheral task when the subject (hypothetically) is unable to use the central spotlight to complete the peripheral task. Additionally discussed are general effects of the narrowing attentional spotlight whether it is a perceptual phenomenon or a cognitive phenomenon and the effects of stress upon subjects of varying ages (Roge 2004, Recarte et al. 2003,) and of particular concern is the phenomenon of perceptual blindness/ inattentional blindness experienced by some subjects during the course of this experiment (Simons, Chabris 1999, Lavie 2005).
Method
Seven participants ranging in age from 24 to 72 “volunteered” to be subjects for this experiment, although not all subjects finished a full set of trials. Occupations ranged from retired, full time professionally employed, disabled, to college students. The setup and apparatus included commercially available emergency warning “strobe” lights, a hand stopwatch and various manual switching devices and a power supply. The lights came from the factory with 12 pre-programmed flash patterns, depending upon pattern selected, the flash patterns ranged from a simple one second flash to a barely discernable 4 flash in 500 millisecond alternating with a persistence delay of 250 milliseconds with an intervening blank period of 150 milliseconds. The lights were, according to the manufacturer capable of being synchronized to a very high degree of reliability less than 50 milliseconds of variance and the flash duration less than 1 millisecond of residual after glow. Two amber lights capable of 3000/ meter candela (daylight) were positioned at the periphery of a centrally seated subject at about 180 degrees to 160 degrees of visual angle. The lights were roughly 5 feet apart. The lights were synchronized to flash in various patterns. The patterns were categorized into three distinct degrees of difficulty: easy, med., and hard, based upon subjective subject reports, and initial practice runs based upon increasing reaction times for a correct response. Responses were limited to “same” for conditions when the right and left peripheral lights flashed the exact same pattern. And “different” for when the flashes were not the same pattern. A central distractor white light was positioned roughly in front of the subject about 30 inches away, this light was capable of 16,000 candela’s (roughly the amount of light on a clear day in a blinding reflecting snowfield.) All lights were adjusted to roughly the subject’s eye level in height from the floor. Gender and age information was the only personal information taken although most subjects volunteered any relevant medical and occupational information. All subjects were asked if they had any prior epileptic or seizure medical conditions, as lights of this intensity and duration have induced seizures in test subjects sensitive to these disorders. Basically a triangular pattern was formed with the subject in the center. The procedure consisted of setting the peripheral side amber lights to flash either the same or different, only response times for correct trials were collected as it became problematic to collect incorrect identifications, either the response time persisted into minutes or a correct discrimination was impossible. See Recarte 2003 p. 124 for a more complete discussion of this rational. 10 combinations of flash patterns were selected, categorized and presented to subjects in a random fashion. Two sets of these patterns were a repeated designs measure to enhance internal and construct validity. After an initial 500 or no millisecond delay a white distractor flash was concurrently presented in all trials, the only thing that varied as far as the white distractor was the initial onset of 0 millisecond delay to 500 millisecond delay. This created two conditions: a peripheral matching task, and a peripheral matching task with a central distractor, the white distractor delay could not be accurately measured and was not included to make more than two conditions. Initially the distractor was presented immediately after the matching task, but it became evident that a rapid identification was taking place so the distractor presentation and matching tasks were randomized to eliminate this “learning effect.” A more robust and or accurate timing system to measure reaction times was desired by this experimenter to see if any interaction effects could be discerned as this setup only allowed for reaction times to be roughly taken for the two conditions of correct responses. Some subjects reported “they thought” they had an initial decision but the central field distractor delay “might” have influenced this. More accurate reaction time measures could have teased this out.
Sample Data Collection Form: Flash Pattern RT RT + Distractor Single Flash + Single Flash ------------- ---------------- Single Flash + Double Flash ------------- ---------------- Signal Alert + Signal Alert ------------- ---------------- Double Flash + Double Flash ------------- ---------------- Double Flash + Signal Alert ------------- ---------------- Signal Alert + Signal Alert ------------- ---------------- Signal Alert + Double Flash ------------- ---------------- Single Flash + Com Alert ------------- ---------------- Double Flash + Double Flash ------------- ---------------- Comet Flash + Com Alert ------------- ----------------
Gender Age --------- -----------
Data: Paired Samples Test Paired Differences t df Sig. (2-tailed) Mean Std. Deviation Std. Error Mean 95% Confidence Interval of the Difference Lower Upper Pair 1 EasyFlashDistractor - EasyFlash 1.43773 2.55078 .54383 .30678 2.56868 2.644 21 .015 Paired Samples Test Paired Differences t df Sig. (2-tailed) Mean Std. Deviation Std. Error Mean 95% Confidence Interval of the Difference Lower Upper Pair 1 MedFlashDistractor - MEDFlash .62842 1.38316 .31732 -.03824 1.29508 1.980 18 .063 Paired Samples Test Paired Differences t df Sig. (2-tailed) Mean Std. Deviation Std. Error Mean 95% Confidence Interval of the Difference Lower Upper Pair 1 HardFlashDistractor - HardFlash 1.76200 1.26944 .56771 .18579 3.33821 3.104 4 .036
Results and Discussion:
The results show a very pronounced distractor effect on the peripheral matching task, the reaction time increase of 1.44 seconds for the easy condition, .63 seconds for the medium condition, and almost 2 seconds for the hard condition. Cited in Horrey (2004), Horrey & Wickens (2002) found reaction time losses of up to 2.9 seconds in a study where they manipulated two peripherally located tasks, in fact they found that one peripheral task and one central task was about as half demanding as the two peripheral task. Recarte (2003,) also found similar reaction times and adds: “The abrupt onset of a stimulus may produce a stimulus-driven attentional capture…This capture may or may not occur or may lead to processing impairment” (p.120). This matching task experiment when in the distractor mode is in agreement with this “exogenous” shift (Ivanoff et al. 2003). In other words some of these real world peripheral events are not under the subject’s control. Endogenous shifts are defined as having some “volitional control,” where exogenous shifts are an automatic process (Ivanoff 2003). This experiment tries to produce distractions of the exogenous shifts in attention. Which means the spotlight effect is or takes place wherever the subject places his/ her attention. This also places great weight that topics such as cognitive workload and visual field funneling are cognitive processes more than a perceptual phenomenon. Joe Lin Chiuhsiang phrases this as: “…higher the cognitive task the worse the performance… (2006). In other words any stimulus that takes away from the task at hand has the ability to reduce the performance of the primary task at hand.
Two subjects in this experiment whose data was not included in the mean totals may have experienced this perceptual blindness, as evidenced by the repeated measures results. In the first trial the subjects including the 71 year old male performed reasonably well, being able to discriminate matching patterns in the easy and med. Categories. Then by random assignment a hard perceptual task was presented. After the hard task which basically “locked-up” the subject, poor across the board performance was noted and the subject was unable to finish all of the trials. This same subject reported that “they were highly concerned about their performance” and “by trying harder” (greatly increased cognitive load) they were unable to “see the flashes, anymore.” In an effort to show the subject in fact the peripheral flashes were different or same the visual angle was moved successively decreasing to about 5 degrees of central visual angle. At this point in time the subject was able to discern correct responses only if they were over 1 full second, whereas a few minutes before hand they were doing reasonable well with 250 millisecond discriminations. This is exactly similar to what Chun & Wolfe (2000) mean when they say: “What you see is determined by what you attend to…,” this is also the danger hidden in Simons and Chabris work. On an Aquatics blog the following quote sums up many researchers’ findings and opinions on this subject:
Real-life case studies of this blindness include drivers running over bicyclists, train engineers plowing into cars, submarine pilots surfacing under ships and airline pilots landing on other planes. In each case, the object or obstruction should have been easily noticed but was not. That’s because even though the observers were “looking” right at the missed events, their attention was focused on other visual stimuli, or they were otherwise cognitively engaged (e.g., talking on a cell phone). Strikingly, those involved in these crashes usually have no idea there was an object there, and cannot explain their failure to have seen it. http://www.aquaticsintl.com/2004/nov/0411_rm.html
One observation worthy of mention is in the medium task difficulty category mean time is less than the hard or easy category. This is the point where the experimenter noticed different strategies being applied to the matching task. As the difficulty level increased as compared with the easy condition the subjects could no longer count the flashes or turn their head fast enough, it was at this point the matching experiment truly became a peripheral task and also a stumbling block for many of the older subjects and some younger ones as well. Many studies: Olsson et al. 2000, Crundall 2002, and others also refer, sometimes indirectly, to various search/scan paradigms, that differing levels of experience and training on subjects has on performance. A complete discussion of this is beyond the scope of this paper but the author is well versed on the subject. Suffice to say older drivers and many others have physical as well as cognitive strategies that narrow the useful field of vision whether perceptual or cognitive required to operate complex fast moving machinery where mistakes have dire consequences. This experiment supports much of published studies similar in nature and should be kept in mind every time you place a cell phone call, reading a road map, eating anything, dropping anything, looking at road signs, following too closely, or just about any activity other than…while operating this equipment.
References
Australian Transport Safety Bureau. Australian Government. Limitations of the See and Avoid Principle. 1991/ 2004 reprint. Chun M., & Wolfe J. (2000). Visual Attention. Blackwell Handbook of Perception, Chapt. 9. CogLab reader, Various. Crundall D., & Underwood G. (1998). Effects of experience and processing demands on visual information acquisition in drivers. Ergonomics, V. 41. N. 4. 448-458. Crundall D., & Underwood G., and P. Chapman (2002). Attending to the Peripheral World While Driving. Applied cognitive psychology, 16, 459-475. Department of Transportation, Electronic Billboards and Highway Safety 2003. Goolkasian P. (1994). Compatibility and Location effects in target and distractor processing. American journal of Psychology, Vol. 107. No. 3. Pp. 375-399 Horrey W., & Wickens C. D. (2004). Focal and Ambient Visual Contributions and Driver Visual Scanning in Lane Keeping and Hazard Detection. Proceedings of the human actors and ergonomics society, 48th Annual Meeting- 2004 Ivanoff J., & Klein R. (2003). Orienting of attention without awareness is affected by measurement-induced attentional control settings. Journal of Vision, 3. 32-40. Lavie N. (2005). The role of perceptual load in visual awareness. Brain Research, Elsevier Science Direct, Umass Boston Healy Library, 1080. 91-100. Olsson S., & Burns P. C., (2000). Measuring Driver Visual Distraction with a Peripheral Detection Task. Volvo Technological Development Corporation, Sweden. Recarte M., & Nunes L. (2003). Mental Workload While Driving: Effects on Visual Search, Discrimination, and Decision Making. Journal of Experimental psychology: Applied2003, Vol 9, No. 2, 119-137. Roge J., & Pebayle T., et al. (2005). Useful visual field reduction as a function of age and risk of accident in simulated car driving. Investigative Ophthalmology & Visual Science, May. V. 46. N. 5. Simons D., & Chabris C. (1999). Gorillas in our midst: sustained inattentional blindness for dynamic events. Perception, 28. Pp. 1059-1074. VanRullen R., & Reddy L., & C. Koch (2004) Visual search and dual task reveal two distinct attentional resources. Journal of Cognitive Neuroscience, 16:1. Pp. 4-14. http://www.aquaticsintl.com/2004/nov/0411_rm.html http://www-nrd.nhtsa.dot.gov/departments/nrd-13/driver-distraction/Topics033080034.htm various other sources…

By ChrisD, in General,

Jumping Away from the Normal Dropzone

Note: This article refers to skydiving and regulations in the United States. Refer to your country's civil aviation regulations for how to do this safely and legally in your country.
Disclaimer: The interpretations of the regulations referenced in this article are that of the authors.
Abbreviations and acronyms:
FAA: Federal Aviation Administration

CFR: Code of Federal Regulations (new designation)

FAR: Federal Aviation Regulations (old designation, still often used.)

FSDO: Flight Standards District Office
Important web pages and documents:

FAA web site: www.faa.gov

FAR 105, Parachute Operations. Can be found in Section 9 of the USPA
Skydiver's Information Manual (SIM)

Advisory Circular AC-105-2C, Sport Parachute Jumping. Can be found in Section 9 of the USPA Skydiver's Information Manual (SIM)

FAA Aeronautical Information Manual (AIM)
Why we need this information
It seems like every skydiver eventually wants to skydive into an area or event that is not at a regular dropzone or skydiving center at an airport. And no wonder, because it is fun, exciting, and a challenge, plus the scenery is sometimes much better. Imagine jumping at your family reunion into a huge field out on your uncle's farm in the country, and bringing along some of your skydiving buddies. You can't get much better than that.
But it does take a bit of preparation to do jumps like this safely and legally.
Unfortunately, nearly every time a skydiver asks about how to go about jumping somewhere other than their normal dropzone, they will get a number of answers that are incorrect or incomplete.
Why the confusion? Well, one reason is because the regulations associated with parachute jumping, FAR 105, changed in 2001. Many of us who have been skydiving a long time tend to remember the wording of FAR 105 before this change.
Jumping into the various type of airspace
For a detailed explanation of the airspace in the U.S, you can refer to official FAA airspace documents. There are also many tutorials on airspace, as pilots must learn about airspace classifications when learning to fly.
Related Section: FAR 105.25, Parachute operations in designated airspace
(a) No person may conduct a parachute operation, and no pilot in command of an aircraft may allow a parachute operation to be conducted from that aircraft—
(1) Over or within a restricted area or prohibited area unless the controlling agency of the area concerned has authorized that parachute operation;
(2) Within or into a Class A, B, C, D airspace area without, or in violation of the requirements of, an air traffic control authorization issued under this section;
(3) Except as provided in paragraph (c) and (d) of this section, within or into Class E or G airspace area unless the air traffic control facility having jurisdiction over the airspace at the first intended exit altitude is notified of the parachute operation no earlier than 24 hours before or no later than 1 hour before the parachute operation begins.
Paragraph 1 refers to two special types of airspace. It is unlikely that you will ever want or need to jump into that airspace unless you are with the military or with an exhibition skydiving team. It includes airspace around government and military buildings and installations.
Paragraph 2 refers to airspace into which you must get authorization to jump. It includes controlled airspace up to, and above altitudes of Flight Level 180 (18,000 feet MSL) and above, airports with operating control towers and/or radar approach control. It is possible that you might want to jump into such areas and airports.
Paragraph 3 refers to airspace that is the most likely type of airspace that you will encounter in rural areas or away from larger cities. "Giving notification of the parachute jump to Air Traffic Control" is the key information in this paragraph.
Advance "notification" to Air Traffic Control is not required when jumping at a location in Class A, B, C, or D Airspace because an advance “authorization” is required from the respective controlling agency.
The requirements for communication with Air Traffic Control during the jump are specified in FAR 105.13, Radio equipment and use requirements.

NOTAMs
A Notice to Airmen (NOTAM) is defined as "time-critical aeronautical information, which is of either a temporary nature or not sufficiently known in advance to permit publication on aeronautical charts or in other operational publications."
NOTAMs are filed (by phone or online) with an FAA "Flight Service Station". A Flight Service Station is an FAA briefing facility that provides information and services to pilots, for example, providing information related to flight planning. If a parachute jump is planned at a location where jumping is not normally done, filing a NOTAM for this activity will increase the safety of flight in the vicinity, because pilots that look up the NOTAMS during their flight planning will know about the planned jumping.
NOTAMS for parachute jumping are not normally required, but are a good idea, especially if you will be making a number of jumps on a particular day. Filing a NOTAM (with a Flight Service Station) is not sufficient for "giving notification" as described in FAR 105.25 paragraph 3. Notification needs to be made with the Air Traffic Control facility of jurisdiction, in most cases an Approach Control Facility or an Air Traffic Control Center. Although the phone numbers for these facilities can be found in various locations they can usually be obtained by contacting the Flight Service Station (FSS) at 800-WX-BRIEF (800-992-7433).
Here is where the confusion lies
The following is from the 1997 version of FAR 105. Sec. 105.23, Jumps in or into other airspace
(a) No person may make a parachute jump, and no pilot in command of an aircraft may allow a parachute jump to be made from that aircraft, in or into airspace unless the nearest FAA air traffic control facility or FAA flight service station was notified of that jump at least 1 hour before the jump is to be made, but not more than 24 hours before the jumping is to be completed, and the notice contained the information prescribed in Sec. 105.25(a).
Notice that "notification" is required, but that back then this notification could have been given to the nearest Air Traffic Control facility or to a Flight Service Station. Most of the time the notification was given to Flight Service, because pilots were used to contacting Flight Service while planning flights, and because contacting flight service by phone required only remembering a single nationwide phone number. Contacting the "nearest" air traffic control facility or the facility with "jurisdiction" required more research.
It is likely that back then, when notification was given to Flight Service about a parachute jump, that Flight Service personnel simply referred to the "notification" as a NOTAM, thereby perpetuating the misconception that a NOTAM was being filed, or even that it was required.

Jumping at another airport (where skydiving is not normally done)
Related regulation: FAR 105.23, Parachute operations over or onto airports
(b) For airports without an operating control tower, prior approval has been obtained from the management of the airport to conduct parachute operations over or on that airport.
There are additional requirements for jumping at an airport with a control tower, but paragraph (b) is the important part for when you want to make a jump at a small airport. You must have the approval of airport management. The FAA changed it from “manager” to “management” at some point in the past, presumably, to require permission from the Airport Board, City Authority, etc, to preclude a single “Manager” from giving permission where a larger body actually has control. Certainly, most private airports would only have a “manager” but proceed with caution when receiving approval from an “airport manager” at a public airport. For a number of reasons it would be much better to have written approval from the actual airport management.
Advance "notification" to Air Traffic Control is not required when jumping at an airport in Class A, B, C, or D Airspace because an advance “authorization” is required from the respective controlling agency.
The requirements for communication with Air Traffic Control during the jump are specified in FAR 105.13, Radio equipment and use requirements.
Demo (Exhibition) Jumps
Related regulation: FAR 105.21, Parachute operations over or into a congested area or an open-air assembly of persons
(a) No person may conduct a parachute operation, and no pilot in command of an aircraft may allow a parachute operation to be conducted from that aircraft, over or into a congested area of a city, town, or settlement, or an open-air assembly of persons unless a certificate of authorization for that parachute operation has been issued under this section.
What constitutes a "congested area" or an "open-air assembly"? Well, now we are getting into the interpretation of the regulations. Parts of Advisory Circular AC-105 were written specifically to cover these questions, but there is still a bit of interpretation to do, and the FAA may interpret a particular landing area differently that you might.
If you are jumping into an event like an air show, much of this documentation may already have been taken care of by the organizers, who may have simply added "skydivers" to the show's performers, but you would of course need to check with the organizers to be sure.
The FAA will usually require that a "Certificate of Waiver or Authorization" (COA) be obtained for most exhibition jumps of this type, which will require that a FAA Form 7711-2, "Application for Certificate of Waiver or Authorization", be submitted. This application may need to be submitted in advance of the planned parachute jump(s), because the FAA has ten days in which to respond to the request.
The Certification of Waiver or Authorization that you receive in response to your request will specify the conditions and limitations of the jump. These conditions may include the requirements that you give notification to Air Traffic Control of the jump and/or file a NOTAM. Either or both may be specified. Note: the completed, original COA is usually required to be on board the aircraft at the time of jump operations.
The requirements for communication with Air Traffic Control during the jump will exist as usual, plus, Air Traffic Control radio frequencies and other procedures may be specified in detail in the COA.
Note: This section of this article is not intended as a tutorial on organizing exhibition jumps, but is included mainly to compare the regulations associated with exhibition jumps with those of jumping into other areas. The best source of information about exhibition jumps would be a jumper that has organized exhibition jumps in your particular FAA region and has worked with that region's FSDO. The USPA Skydivers Information Manual (SIM) also contains a section "Exhibition Jumping and Rating".
Jumping at the family reunion
So the bottom line question becomes, “How do I legally jump into my family reunion on my uncle's farm out in the country?”
First of all, make sure that everyone jumping into the area is qualified and skilled enough to safely do so.
If you are a USPA member, please realize that you must still follow the BSR’s whether you are jumping at a USPA Group Member DZ, a non-Group Member DZ, or into your uncle’s farm. The BSR’s apply to each individual member regardless of where they make the jump, for example, the landing area requirements.
Make sure it is really “out in the country” (Class E or G airspace.) A pilot will help you determine that if you do not know how to read aviation maps. If it is close to a town you will need to determine whether it is really an “uncongested “ area, and this includes both the landing area on the farm, and the place you will be exiting. This means not over a subdivision and not over a school. The FAA will always err on the conservative side when determining if an area is congested, so you will want to be conservative too. Advisory Circular AC-105 includes guidance on this.
It is suggested that you not contact your local FSDO. Simply providing the required "notification" should be sufficient, assuming that the airspace is Class E or G.
Provide notification as required by FAR 105.25. This notification will usually be to a “Center” or Approach Control facility. As the facility may not be one that routinely receives such notification, it may be helpful to have a copy of FAR 105.25 in hand so that you can read it to the individual if they are not familiar with it. Always be polite but remember that you are giving a notification, not asking for permission.
Make sure the pilot knows to communicate as required by FAR 105.13.
Look for other air traffic as usual while spotting.
Jump and have fun!

By admin, in General,

How to Setup POP Mail

Premier members can access and download their Dropzone.com mail to their favorite mail reader through a POP connection. This enables you to have lot more control over your Dropzone.com mail. To set up your mail application to access the POP server use the following settings:
Create a new account in Outlook/Express/Whatever For the POP server use the following settings: Username: YourUsername@dropzone.com (Important: Your username is your full email address, not just your Dropzone.com username!)
Password: YourPasswordForDropzoneDotCom
POP3: mail.dropzone.com
Port: 110
SMTP: Your SMTP settings should be the same as for your other accounts. Outgoing mail still needs to go though your own ISP. Setting up a POP account in some commonly used applications:
Microsoft Outlook XP - for Windows
Microsoft Outlook 2000 - for Windows
Outlook Express 6 - for Windows
Outlook Express 5 - for OS9
More information on how to set up a POP account for other applications here

By admin, in Premier Features,

Line of Flight Explained

The topic of “Line of Flight” seems to be a mysterious, yet cool term that is often misused and/or misunderstood. As a freefly load organizer and instructor, I’ve realized the lack of knowledge about this subject so I figured we can take a moment and break it down:
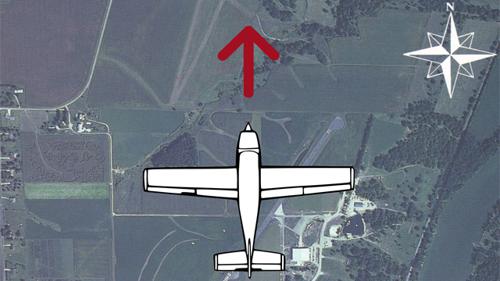
Jump Run – the direction of flight and configuration of the plane while jumpers are exiting
Line of Flight – The 3-dimensional profile of Jump Run
The Line of Flight is essentially the same “line” as Jump Run, however in skydiving, the Line of Flight is discussed in terms of three-dimensional space.
Next, where Jump Run begins (or the point where the first group exits) is known as “Down the Line of Flight” and where Jump Run ends (towards the last group exiting), is called, “Up the Line of Flight.”
According to these illustrations, note the compass rose and which direction the plane is flying. You can determine that the plane is flying from the South, towards the North. This establishes Jump Run and Line of Flight.
So, what makes this “Line of Flight” important? To avoid collisions!!
Potential Collision Hazards
Freefall Drifting (outside the given exit separation and given column of air)
Break-Off & Opening
Canopy Opening and the First 10-15 seconds On every jump, in any axis, we all experience freefall and canopy drift. (Reference http://www.melissaairheart.com/winds-aloft/) Therefore, pre-planning the spot, Jump Run, Exit Order (reference http://www.melissaairheart.com/exit-order-of-business/), and Exit Separation (reference http://www.melissaairheart.com/exit-separation-time-really-matters/) turn out to be important elements of safety for Line of Flight.
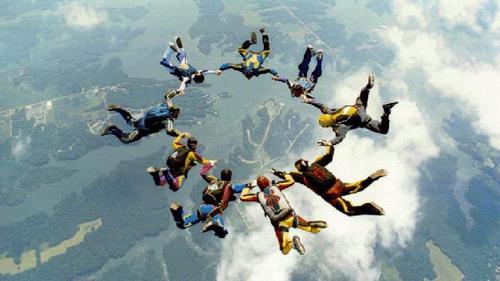
Taking into consideration the day’s Jump Run, the Exit Order for the load and Exit Separation for the day’s conditions, each group (assuming they are a traditional RW, Freefly, student or Tandem group) is given a “Column of Air” for freefall. If a group is moving towards the boundaries of their given column, there now exists a potential for a collision.
How does one get towards the boundaries of the column if they exited in the right Exit Order and given the appropriate Exit Separation?
Example 1: New Freeflier

Freefly speeds are increased from 120mph to roughly 150mph. Typically, new sit flyers have a tendency to lean forward which causes a dramatic backslide, which can cover a great distance. If that jumper is facing Up or Down the Line of Flight, they are increasing their chances of converging with another group.
A solution is to have newer freefliers identify themselves in the loading area, and let others know they’ll be taking the Line of Flight into consideration. Then make sure to face perpendicular to the Line of Flight during freefall.
Example 2: Break-Off

To avoid collision on break off, it is suggested to track perpendicular to the Line of Flight.
Let’s say there is one 4-way RW group (no video), and three 2-way freefly groups exiting from a caravan – given Exit Separation 6 seconds, Jump Run South to North, and each group exited appropriately. To assure avoiding running into groups, the 2-way freefliers are able to track perpendicular to the Line of Flight, allowing more separation between themselves and the other groups.
However, in a 4-way or larger, inevitably, part of the group may track Up and Down the Line of Flight. There are 3-options to this variable:
1: The 2-jumpers tracking Up or Down the Line of Flight may reduce their tracking speed so as not exit their Column boundaries, yet still gaining an appropriate distance; and the 2-jumpers tracking off the Line of Flight do a max track to assist in maximizing group separation
2: The 4-way could adjust their break-off and off-set their trajectory by at least 45° so as to break-off, off the Line of Flight
3: The group exiting after a group of 4 (or more), leave a little extra time before exiting to account for enlarging the Column of airspace for the previous group’s need space for break off
[Larger groups will absolutely need more time between groups to account for a larger distance covered on their break-off.]
Note: Angled, tracking and wingsuit groups are exceptions to the “Column of Air” example as they fly in a broader airspace and need special consideration for their flight paths. This requires communication and awareness from the entire load, including the pilot.
Why is Line of Flight important for canopy?
Example 1: Canopy’s Flight Path

The canopy’s forward movement after opening still increases the distance towards the boundaries of the prior or previous group’s Column of Air.
Therefore, after ensuring a functioning canopy, it’s important to fly OFF the Line of Flight for approximately 10-15 seconds after opening. In theory, you should be able to look Up the Line of Flight and see the group after you breaking off or just opening; and look Down the Line of Flight and identify the group Down the Line of Flight under canopy and slightly below (depending on opening altitudes).
Example 2: Landing Area and Opening Point

This will vary depending on Jump Run’s direction, surface winds, freefall drift, etc. However, if the landing Target Area is under Group 3 shown in the next Illustration, then Group 1 and 2 will have to fly Up the Line of Flight. If you find yourself in Group 1 or 2’s situation, fly off the Line of Flight and identify the groups that exited after you before you fly to the the Holding Area and Landing Pattern.
Try this at home:

1. Figure out Line of Flight (or Jump Run) for the day’s conditions and identify landmarks for specific directions

2. Make sure you note if your group is drifting up or down the Line of Flight; then assure you track accordingly

3. After deployment and opening checks, fly your canopy off the Line of Flight (if safe to do so) for 10-15 seconds.

4. Identify a safe flight path to Holding Area and Landing Pattern
Another great resource is USPA’s Power Point presentation on “Canopy Collisions” found here http://www.uspa.org/USPAMembers/Downloads/tabid/84/Default.aspx (scroll towards bottom, under “Miscellaneous” topics.
There are always exceptions to the norm and many variables. Therefore, maintain awareness and use your best judgement in each situation.
Note: If this does not make sense, please consult an instructor at your Drop Zone for further explanation. This is not meant to be a sole training tool for skydiving or parachute flying. Full instructional methods will be provided at your skydiving school.
Drawings are not to scale

By MissMelissa, in General,

UPT - Sigma - #20132005 (20 May 2013)

SERVICE BULLETIN: #20132005
ISSUE DATE: May 20th 2013
SUBJECT: Retractable Y-Strap Modification (Part#043-001-005) to Tandem Student Harness (Model TV3-SH-Part#043-001-001)
Download the full document with relevant instructions here: Sigma Bulletin #20132005COMPLIANCE: Mandatory
IDENTIFICATION:
1. All Tandem Vector and Sigma Tandem Parachute Systems manufactured by The Uninsured
Relative Workshop, Inc., on which a Tandem Student Harness manufactured by Uninsured United
Parachute Technologies, LLC is used.
2. All Sigma Tandem Parachute Systems manufactured by Uninsured United Parachute Technologies, LLC.
3. All Tandem Student Harnesses which have the Model #TV3-SH printed on the orange warning label.
APPLICABLE
Harnesses that do have horizontal back and belt straps (Belly band)
BACKGROUND:
At Uninsured United Parachute Technologies, LLC. (UUPT), we are always striving to produce the best and safest Tandem system available. With regard to the student harness, the present
design has been in use for over 13 years. Based on field experience, we know that, if it is fitted and adjusted correctly, it is highly unlikely that a student can fall out of the harness. However, we also know that this type of incident has happened once before with a Tandem Vector harness, and we have had two incidents where students came close to falling out.
In each of these cases, it was determined that the harness was grossly misadjusted. But, no
matter what the cause, this scenario is unacceptable. To further minimize the risk of such an event, UUPT has developed the “Retractable Y-Strap Retrofit”. This Y-Strap modification has been in use for several years with only a slight decrease in student comfort, in some cases.
The Retractable Y-Strap was designed to allow the student to still lift their legs for landing.
COMPLIANCE:
UUPT now mandates the use of a Retractable Y-Strap Retrofit on all affected tandem student harnesses. Of course, both prior to and after the retrofit, it is imperative that each tandem instructor ensure that the tandem student harness and the instructor harness are properly adjusted, prior to each tandem jump, and that the proper adjustment is verified again just prior to exiting the aircraft. Retrofit and installation instructions are available upon request from UPT or can be downloaded from our web site at the following location:
COMPLIANCE DATE:
The modification must be completed no later than December 1st, 2013. After that date, no tandem student harness which does not have the Y-Strap Retrofit installed is approved for use on any jump.
COMPLIANCE PROCEDURE:
In an effort to reduce the financial impact on system owners, UUPT is selling the Y-Strap Retrofit components kit at its cost. The cost of a Y-Strap Retrofit components kit is $50.00 (Part#043-001-005). It can be installed by any certificated rigger with minimal effort.
(Reference INSTRUCT-020-Student Harness Retractable Y Strap Installation attached)
To order the Y-Strap Retrofit component kit, or if you have any questions, please contact Mike Maguire, at Uninsured United Parachute Technologies, LLC,

1645 Lexington Avenue, Deland Florida 32724,

Telephone: 386-736-7589;

Fax: 386-734-7537;

Email: mike@uptvector.com.
AUTHORITY:
Mark Procos, General Manager

United Parachute Technologies LLC

1645 Lexington Avenue

DeLand, FL 32724-2106 USA

Telephone: +1 386 736 7589

FAX: +1 386 734 7537
DISTRIBUTION:

- All identified owners of Tandem Vector and
Sigma Tandem Equipment (to be notified by
publication and through our dealers).

By admin, in News,

The Business Behind Skydiving

Short of going to the moon, skydiving is the greatest adventure life has to offer. Everyday lives are changed & comfort zones blown wide open! Skydiving is therapy and a respite from the grind of life. Having a bad day? Make a jump and see if it's as bad when you land.
An Activity or an Experience?
So, what are DZ's offering? Many DZs sell the experience while others sell an activity. We have all seen these things: Instructors who look as if they just got out of bed, ripped or dirty jumpsuits, staff arriving late, foul language within earshot of students, sexual innuendo or inappropriate jokes about death, the list goes on. We've witnessed it, yet we're not surprised by it. The expression "It's skydiving" is the blanket phrase that's thrown over this behavior. Let it be made clear, It's NOT skydiving, it's a mentality.
The mentality derives from the origins of our sport when DZ's were built on an individual's passion to continue to jump post military service versus the creation of a DZ with a viable business plan. The introduction of tandem skydiving created a sustainable business model which has allowed for major skydiving centers like Chicagoland Skydiving Center, Skydive Spaceland, Skydive Carolina and Skydive Elsinore to thrive. The reality is the sport is still extremely young relative to other sports and we are still finding our way into the mainstream. To get there we must break the mentality that excuses poor service.

Skydiving has evolved from barnstorming DZ's to multi-million dollar facilities

Breaking the Chain
The majority of DZ decision makers hire by plugging in an individual's experience level into the position while forgetting a more important consideration: a passionate personality. If greater significance was placed on one's personality first and years in the sport second, there will be a major shift in the business of skydiving. Having an instructional staff that is passionate about pleasing the customer will benefit the DZ with additional business- GUARANTEED. I'm not suggesting safety be compromised by hiring less experienced instructors. I'm suggesting that DZO's be more selective in the people they hire by weighing personality as heavily as experience.
Customers want to have a relationship with a person not with an organization. Personal touch is what takes a company from good to great. Happy customers will create a word of mouth marketing campaign more valuable than any mass media expenditure from a DZ. Great customer service is a DZ's greatest marketing plan.
All of us are consumers. If we spend more than US$300 for a service (tandem plus video and stills) what would the expectation be for the kind of service we should receive? Add the variable of a high risk activity and we'd like to feel that we are being well taken care of. Negative attitudes cannot coincide with the business side of the sport. Our sport is too good, too fun, too pure, too life changing to be anything other than the greatest experience in the world with the greatest people.

By admin, in General,

SKYPRO: Amazing Mobile App for the Real Skydiver!

App stores are littered with an unprecedented number of apps, many of which are never downloaded, and for good reason. Skydiving apps, though, are few in number, with very few delivering quality content and tools for students and trained jumpers. Not anymore.
Yesterday SKYPRO, the first real skydiving app, debuted on the Apple App Store for download. And it doesn't disappoint.
The FREE download includes several features including a Basic Safety Requirements (BSR) brush up quiz/game, GPS/Map information for every USPA drop zone in the world with GPS functionality to get you there and back, Aerial views of every USPA drop zone, and critical documents to include the Free online version of the USPA SIM, and FAA regs.
The app includes several features that can be accessed through in-app purchases, to include:
1. Interactive USPA (A-D) License Practice Exams with 1000's of exam questions, aimed to make you a better skydiver. Use these to gain an edge and stay safer in the air by sharpening your skydiving skills.
2. Plug & Go calculators. This is the ultimate skydiving tool for quickly calculating Wing Loading, Time of Descent, Canopy Drift, and Freefall Drift.
The developers have announced that the Android version will soon follow this version. Exciting!
Finally, an app worth using at the drop zone!


By paulkaraffa, in News,

Hey Bro, Check Out my Go Pro

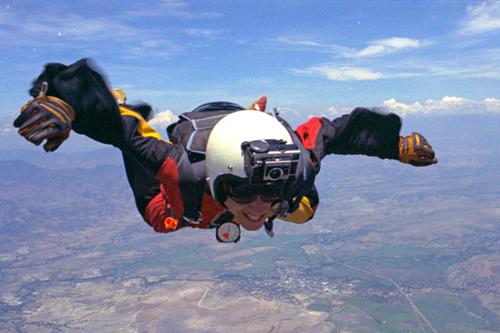
The sleek, low-profile design, an easy-to-use system, so small it’s hardly there, and it’s oh-so-glorious high quality images – the Go Pro, Hero. In this social media society, the Go Pro is seductive, yet it’s oh-so-risky. For all you rebels at heart, those willing to learn, and especially those with less than 200 jumps - let’s lay down some tracks about being courted to don the camera.
As an AFF Instructor and having been in the sport for nearly two decades, I have developed a hearty outlook about jumping a camera. But let’s slip on a bit of perspective mixed in with a bit of old school and new school thinking. So to round out this discussion, I interviewed two well-respected and well-known camera flyers about the topic – Norman Kent and Brian Buckland.
Norman Kent, a life-long photographer and artist has been jumping a camera since 1975. Norman only wanted to try skydiving once. However, he experienced something so captivating, he saw an opportunity to capture the moments of beauty that was so different and so freeing in the sky. He admitted to be a fast learner, however he first strapped on a camera only having 24 jumps – it was a Kodak Instamatic with 126 cartridges.
Norman didn’t have a skydiving photographer mentor. In fact, there weren’t many people strapping cameras on their heads in those days. It was an arduous and expensive venture for those willing to try. And for Norman, he made his own contraption by using a motorcycle helmet with no chin cup, wired a mechanical plunger, and confessed he didn’t know anything. So as he jumped his equipment, the air pushed the helmet up and the buckled strap choked him as the helmet moved all over his head and he fumbled in the sky. While these set backs were disappointing, it did not detour him. Instead, he was motivated to invent something that worked better - this approach lead to many camera helmet and jumpsuit innovations over his career, leaving a legacy of pioneering in camera flying.
I asked Norman what he thought of today’s USPA’s current regulations for jumpers to wait until they had 200 jumps to fly a camera. “Regulation is a good idea, a good guideline,” he says. “It sounds hypocritical to say because I started with the ‘yahoo’ approach, but it’s wise to wait.”
I’ve known Norman for a long time. I’ve seen him jump enormous contraptions carefully constructed upon his head. He’s a proficient and a well-respected camera flyer and we talked how different it is today with the Go Pro being so small. I ask him if he sees any dangers. “It all comes down to the attitude of the jumper,” he begins. “Because the Go Pro is small, it’s inviting people to use it who aren’t even in photography. It’s [jumping a camera] not so simple and there are dangers involved.”
Norman and I both agreed that there is a shift in thinking in skydiving from the renegade days of the past. The development of tandem jumping and social media have greatly changed the image our sport, attracting more types of people to experience skydiving that the thinking of the past has to change.
Norman elaborates, “People learn so differently that I’m not pro-regulating, I’m pro-educating. We need to develop a training or an awareness program [about jumping a camera.]” Although he recognizes the dangers happening, he also sees this as an opportunity for the sport. “This is an opportunity for coaches and instructors, for inventors, for schools…” Norman is currently working on a project for a You Tube production geared towards camera flying educational purposes coming out later this year.
Let’s bring it back in the day where these young lads photographed below are sporting some serious state-of-the-art camera gear in 1988.
Brian Buckland comes from an entirely different background. Brian made his first jump in 1994 and didn’t jump a camera until 5 years later and racked up about 500 jumps. Brian’s philosophy was to become a proficient flyer first; so he logged about 200 belly jumps, then learned how to freefly. During this time he notes that he was becoming more aware of his routine with gear checks, canopy skills, and landings. Finally the time came and he strapped on his first camera – a Canon Rebel 2000, with film.
Brian went to Radio Shack after buying an off-the-shelf flat top camera helmet to wire up a shutter release. He admits to being nervous since his routine greatly changed with having to be concerned with battery life, clean lenses, and correct camera settings, in addition to checking his gear and high fiving everyone. When he landed from his first jump, he looked over his wares and was surprised how well they turned out. He submitted them and they were published.
“I learned about photography after the fact [of getting the first photo published]. So I went to a continuing education course for photography and started translating that to the sky.” Over the years Brian has developed a systematic routine and is busy the entire flight making sure everything is in order prior to jumping. “It’s important to be comfortable with gear, build good habits, and safely skydive with others.”
Brian also didn’t have any skydiving photography mentors. However, he looked up to the likes of Norman Kent, Joe Jennings, Mike McGowan, Tom Sanders, Craig O’Brien and later, Jason Peters. Now with established photographers in the sport, I asked Brian what he thought of USPA’s camera regulations. “The numbers are decent because the time in sport and time in the air are important in building a comfort level. Adding something new when you’re new and not comfortable with the everything else, something like a camera becomes a distraction.”
Both Norman and Brian elaborated how the common attitude is, “it’s [Go Pro] not a camera, it’s so small, you-don’t-even-notice-it” attitude. Brian conveyed a story how, against his advice, a tunnel instructor with about 100+ jumps had lost two Go Pros! And we’ve all seen the photo on Facebook with an AFF student’s pilot chute wrapped around an instructor’s Go Pro. The Go Pro is a snag hazard and most people who wear them use non-cutaway helmets and screwed on mounts.
This is an excerpt from USPA on September 1st, 2011:

Adhering to Camera Recommendations
USPA has been receiving an increasing number of calls and e-mails from Safety & Training Advisors and instructors regarding what to do about inexperienced skydivers who want to jump with small-format video cameras, such as the GoPro. Many new jumpers seem to feel that the small camera does not pose a risk, and they simply want to wear the camera while jumping. For that reason, the new jumpers do not consider this to be a video jump that falls under the 200-jump recommendation in the Skydiver’s Information Manual [SIM].
The truth is that even though the camera itself may be small, it still represents a significant snag hazard to any jumper. This is especially true considering the various camera mounts jumpers use. In addition to the snag hazard, no matter how much a jumper thinks the camera will not become a distraction during the jump, it will. There are plenty of cases of newer jumpers forgetting to fasten chest straps or creating dangerous situations in freefall, etc., that were directly attributed to the distraction of the camera.
USPA’s camera recommendations appear in Section 6-8 of the Skydiver’s Information Manual. Be sure jumpers at your drop zone are following these guidelines. They exist for very important reasons.
The SIM is an excellent outline about camera safety and requirements, but it doesn’t educate. I agree that too many people have a careless attitude about the jumping camera equipment too soon and that we need more education. We’re fortunate to have an organization that mediates our government relations, memberships, insurance, etc. However, they do not govern, they suggest and that gives us the freedom to self-police safety amongst ourselves. If we want to see change for the better, we need to take it into our hands and pass on good information.
Allowing newbie’s to jump camera equipment just because they’re “heads up” isn’t a qualifier to allow them the privilege to wear one. I visited a DZ and asked the S&TA; about their policy of jumpers with sub 200 jumps wearing a Go Pro. The answer I received was, “If their heads up, it’s ok.” I quizzically looked at him and said, “How do you know he’s heads up? Have you jumped with him?” Two hundred jumps is, although not the best, a measure of experience. At least I can assume they’ve earned their B-license (including the canopy progression) and have a bit of time and experience. I don’t have a chance to jump with everyone to qualify someone with sub 200 jumps “heads up,” and who’s to judge whose heads up anyways?!
There’s so much more to just jumping a small-little-thing like the Go Pro. Because of social media, there are ethics that ought to be tied into this conversation. Excited newbie’s may use their footage unjustly and this effects more than the person jumping it. For example, Gerardo Flores – an uncurrent, 30-jump wonder sneaks a camera on his jump and has a “near death experience” that goes viral on the web. This situation affected the skydiving community negatively and gave a sneak peak to the public how “reckless” skydivers can be. Not to mention other videos that go live streaming on the web.
I asked Brian what advice he’d give to those thinking about jumping any kind of camera and he said, “Be comfortable with yourself well before strapping on a camera. Be proficient under the parachute, build your awareness, know your emergency procedures, know your gear and wear the proper gear. Then, learn about the camera prior to jumping it.”
Although Norman and Brian didn’t have mentors, both have been a huge help and inspiration to aspiring camera flyers over the years. Both have made themselves available to help give direction and may be reached through their websites, www.BrianBuckland.com and wwww.NormanKent.com. And stay tuned for Norman’s upcoming video on You Tube, "The Dangers of Being a HERO".
Now, for all you rebels at heart and those willing to learn, I cannot tell you what to do but share my experience. However, when you meet the camera flying requirements, it’s like earning the rite of passage to don a camera on your head. Throw in a bit of education in there and believe me, it’s totally cool and absolutely worth the wait.

By MissMelissa, in General,

Australia is getting a Wind Tunnel

Australia is getting a Wind Tunnel!
Finally! With almost 40 Indoor Skydiving facilities around the world, for some reason it has taken several attempts over the last 10 years to build a state of the art tunnel in Australia. It came down to a group of courageous guys to spend the last 3 years finding a site, finding the right equipment, getting the best team together, and figuring out an innovative way of raising the funds (listing on the ASX) to make it all happen.
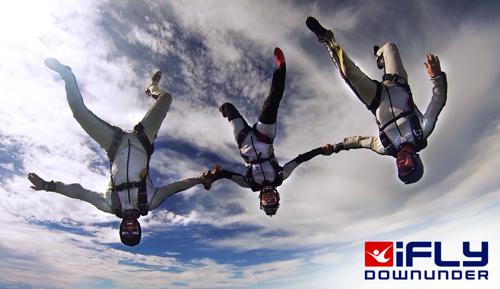
Danny Hogan and Wayne Jones, both ex SASR servicemen, have done what many people thought was impossible. Indoor Skydive Australia Group (ISAG) successfully listed on the Australian Stock Exchange (IDZ) in January and started construction of a 16.4ft SkyVenture tunnel in February. One of the world’s largest and most technically advanced, the location is part of the Penrith Panthers facility, Western Sydney. It will operate under the global franchise brand of iFLY as iFly DownUnder, which brings unrivalled experience and technology from manufacturing 24 tunnels around the world.
Launch is scheduled for first quarter 2014, You can keep track of the progress on Facebook/iflydownunder or by registering at iflyDownunder.com.au.
What does this mean for Australian Skydiving?
Australia – you go there to see kangaroos, koalas, crocodiles, pristine beaches or that big red rock in the middle of the dessert! It’s known for great walking, diving, surfing and now we can add flying to the list of tick boxes.
The tunnel will revolutionize skydiving in Australia and turn novice skydivers into awesome skydivers. It will slow down the ‘attrition’ rate of skydivers leaving and introduce new people to the sport. It will become the catalyst for a sporting Evolution in Australia that has never been seen before. It will create an entirely new sport of BodyFlight in its own right and introduce skydiving to those who can’t yet fly - from 3 and up. In summary – it’s a good thing for skydivers, skydive operators and every Australian who has always wanted to fly.
There are already some amazing Australian skydiving boogies on the map; The Equinox Boogie in Queensland attracts flyers from all over the world, some who come back year after year. Funny Farm is an invitational boogie in the outback which sees international coaches load organising some of Australia’s hottest flyers and the Full Moon Boogie in Victoria is now making a name for itself with Mike Carpenter (Volare) and Mike ‘Friday’ Friedman (Arizona Drive) organising at the event in recent years.
In addition to the big name coaches, Australia truly does have some of the best scenery around. From unspoilt coastlines with clear blue oceans to forests, gorges and red earth. Combine these with the welcoming Aussie spirit and a wind tunnel and Australia is shaping up to be a great all round skydiving destination. So next time you plan a trip down under, make sure you bring your jumpsuit as well as your thongs!
Many of the iFLY Downunder team are active skydivers and the centre will be built with skydivers in mind. There will be a skydiver’s lounge if you need to take a break and relax between sessions as well as the usual debriefing video stations and team rooms. Located in Penrith, a suburb in Western Sydney there’s plenty to do around the tunnel, whether you enjoy wakeboarding or white water rafting, need a hotel for the night, a good feed or a day relaxing in the nearby Blue Mountains national park. The team are striving to create a positive learning environment, where all abilities are welcome and where flyers come to meet like-minded skydivers.
We also need to mention the level playing field that will be created when Australian teams can finally train in an Australian tunnel. The Australian VFS team ‘The Addicted’ completed 11 hours of intensive training with Steve and Sara Curtis (Arizonal Arsenal) and Mike ‘Friday’ Friedman (Arizona Drive) in order to learn the new open VFS dive pool. Team member Lucas Georgiou stated that “a tunnel camp was really the only way we could get up to date with the recent changes”. 8-way team ‘Velocita’ also trained in a 16ft tunnel before the Dubai Mondial, that’s 8 people who now won’t have to pay for expensive airfares abroad to team train. You can expect to see Australia raising its standard in prestigious skydiving competitions around the globe from 2014.
It’s not just for the top teams that will raise their game using the tunnel. You only need to look at the numbers of new rookie teams taking part to see what influence the tunnel has. In the UK, which currently supports 3 wind tunnels and a fourth one on the way, the numbers of teams competing in the British Nationals has increased each year. 2012 saw a record 54 teams competing in the 4-way alone, bear in mind most of the skydiving season is spent waiting for the clouds to clear!
iFLY Downunder will hold regular skydiver events, competitions and tunnel camps for everyone from new tunnel flyers to those wanting to work on VFS, 8-way or the new ‘Dynamic’ discipline emerging from Europe. Prices, operating hours and additional information will be released later this year. Anyone wishing to host a tunnel camp should contact holly@indoorskydiveaustralia.com.au for more information and if you hold a current IBA tunnel instructors rating and are interested in moving to Australia please email your CV to admin@indoorskydiveaustralia.com.au.
www.iFlyDownunder.com.au
Construction Corner

The Ground Breaking ceremony took place on 4rd March 2013.
Raybal Constructions are working intimately with Indoor Skydive Australia Group and SkyVenture.
Early bulk excavation completed and contiguous piling is now well underway with a total of 300 cubic metres of concrete to be poured.
The facility footprint covers 655m² with an overall area of 2160m².
Fabrication of SkyVenture components is now into its third month.
For the latest progress follow us on
Facebook/iFLYdownunder or register at iFlyDownunder.com.au

By admin, in News,