Submit Article

Skydiving News and Articles

Select A Category

Pick a Category

Fly Gear: The New School of Tracking Suits

The first tracking suit was a humble thing indeed.
Invented by pioneers of the tracking discipline in the unforgiving terrain atop Norway’s bigwall exits, the first suits were resourceful repurposings of the stuff they already had on-hand – the rain gear required by Norway’s reliably inclement weather, and the cigarettes they used to while away the time as they waited for it to pass.
The “big idea” was simple: increase a tracker’s surface area, and he/she can use it to fly longer, flatter, faster and farther from the danger posed by the solid object behind him. With this in mind, someone -- no one quite remembers who -- burned cigarette holes in their waterproofs, positing that enough air would enter the holes to afford meaningful inflation. Somewhat miraculously, it worked. The rest, as they say, is history.
The first purpose-built version, the original Phoenix Fly tracking suit, was introduced in 2004. Until recently, it has seen little serious competition: suit tracking was born by and for the BASE environment, and non-BASE-jumpers had little interest in it outside of its contested, folk-wisdomy usefulness as a stepping stone to wingsuiting.
The past year has changed everything. Skydiving and BASE have both seen an unprecedented boom in participating athletes -- as well as a notable rise in tracking as a specialization. Whether the boom owes to a sharp increase in wingsuit-related incidents or to a renewed interest in tracking subdisciplines such as angle flying is unclear, but the empirical evidence speaks for itself. In any case, suit manufacturers have responded with an explosion of new technologies and designs. The new range aims for lighting-fast inflation, foolproof pressurization, optimized lift-drag ratios and multi-orientational usability. In a couple of cases, the designs even introduce wingsuitesque one-piece construction into the mix.
I five brand-new suits through their paces in both the BASE and skydiving environments to find out which provide an optimum performance in different circumstances. Here’s the rundown on my findings.*
*You will note that I am one human, and that, while I have quite a lot of time in tracking suits, I am not any kind of god, savant or superwoman. Your experience may vary from mine. Heck, it’s likely to.
By Joel Strickland
The Suits
Phoenix-Fly Power Tracking Suit
Currently the most popular tracking suit on the market, Phoenix Fly’s Power Tracking Suit is the more powerful baby brother of Phoenix Fly’s venerable and much-beloved Original Tracking Suit. Along with a bigger general profile, the new suit integrates thicker stiffening fabric, additional gear pockets on the jacket, tougher construction, mesh lining and inlets redesigned to deliver quicker pressurization. Aerialists love its forgiving transitions, and the power zone is relatively easy for lower-experience trackers to find (though Phoenix-Fly suggests a minimum of 120 jumps on the Original Tracking Suit before putting on the Power).
I found the Power Tracking Suit to be instantly comfortable, and its construction to be thoughtful and solid. While the suit doesn’t have the raw power of some of the other new offerings, it’s accessible, predictable and confidence-inspiring – which is probably why so many personal-best tracks have been performed in it.
Pressurized Tube 4
The Tube 4’s predecessor, the Tube 3, was a polarizing piece of gear. Trackers either loved or hated it, citing distinct roll-and-yaw wiggliness and unpredictability during the transition. In response, Pressurized redesigned the Tube 4 from the ground up. Features include inflation-staging leg inlets, zipper safeties and a thicker arm profile. Long, strong stiffeners at the front of the calf effectively smooth the leg profile. Backfly inlets are available (though not standard), and zippers aside the leg open up a sizeable extension to the leg volume.
Given my previous experience with the Tube 3, I was expecting a rodeo when I tested the new suit in the BASE environment. I was shocked by the new suit’s ease of use: it was a baby-smooth ride from the get-go. Though it took a bit of trial-and-error to find the power zone, the Tube 4’s transition was among the smoothest I’d ever experienced.
I had a couple of nagging issues with the Tube 4’s construction. For one, I found the vent-stiffening material easily malforms – and quickly “learns” the new shape – when the suit is folded for packing. (Overnight storage on a wide-shouldered hanger reduces the problem, but doesn’t solve it; after all, the suit has to go into a stash bag sometime.) Beyond that, I was constantly fighting my suit’s sticky zippers.
Tony Suits Masai
There’s no denying that the Tony Masai, wingsuit manufacturer TonySuits’ first tracking offering, is a head-turner. I was the subject of several baffled stares as I marched across Skydive Empuriabrava in it – probably, because the one-piece Masai looks neither like a tracking suit nor a wingsuit but an idiosyncratic combination of both. Where other tracking suits are distinctly baggy, aiming to inflate across the entire body, the central body of the Masai is unusually trim. This decidedly anomalous design inflates via both front and back inlets on a set of tubular fabric “rails” that run from armpit to ankle and down the inseams. The jumper’s rig zips in just like a wingsuit. The Masai comes standard with Cordura booties, stealth-rubber soles, backfly inlets and a humorously roomy zippered pocket positioned right on the seat.
When I first geared up in the Masai, I was worried about inflation. In other, far looser suits, a slight bend in the limbs doesn’t noticeably deform the inflating portion of the suit; on the Masai, however, slight changes in the articulation of legs and arms pulled the fabric unnervingly taut to the body. When I jumped it, however, my worries were instantly dispelled. While the Masai tended to misbehave in a steep dive, the suit kept its inflation admirably through the rest of the test maneuvers, achieved solid marks for distance and delivered the crispest transition to and from backfly of any tested suit.
S-Fly Cruise
Fly Your Body’s first addition to the field, the Cruise, is getting a lot of attention, and not just because it’s the suit that Fred Fugen and Vince Reffet used for their record-breaking freefly-tracking jump from the Burj Dubai. The Cruise is massive, it’s intelligently designed, and it’s delivering eyebrow-raising results from trackers with low jump numbers.
The suit features several industry-first advancements. Internal airlocks maintain pressurization. Thumbloops on both sides (so they remain available whether you track with palms up or down) keep the arm stable. An integrated deflector improves airflow around the jumper’s rig. The Cruise comes standard with both front and back inlets and removable booties (as well as the option to order rubber with a BASE tread).
The wide, one-piece design inflates centrally -- very differently from a two-piece design, which is necessary cinched around the waist. (Jumpers can expect this to result in yaw instability during the first few jumps.) The Cruise’s optimal flying technique moves closer to that of a wingsuit than a born-and-bred tracking suit, and it’s a lot for a newer jumper to handle. However, an athlete with some experience -- and the time and willingness to put a few skydives on the suit -- will likely have the same take-away I did: something akin to jaw-on-the-floor disbelief.
Squirrel Sumo
The Squirrel Sumo is aptly named: it’s a very burly suit. It’s so voluminous, in fact, that it’s likely to be mistaken for a small wingsuit in a stash bag. The Sumo comes standard with a bevy of thoughtful details: loads of oversized, difficult-to-deform Mylar inlets, a close-fitting collar and cuffs to prevent air escape, three Mylar-reinforced toe tension settings, Cordura reinforcements and brawny industrial-grade zippers. Uniquely, Squirrel’s suit also includes Velcro-fastened stabilizers on the inner leg to prevent its abundance of fabric from jostling out of position on exit.
All that fabric, flown correctly, delivers rocketship power. My first skydives on the Sumo were gainers from the back of a military Casa over the open ocean off the coast of Panama, and the suit ferried me back to the island landing area with room to spare. I was pleased to see that it was racking up similar distances to smaller flocking wingsuits without much dialing-in.
In full flight, the Sumo felt rock-solid. As with any other large suit – especially one that inflates as quickly and sizeably as the Sumo – BASE exits proved a trickier proposition, though the field-leading start speed is well worth the effort to workshop. Note: Squirrel purpose-built the Sumo to maintain solid internal pressure in order to outfly aggressive exits in the BASE environment. Because of that laser focus, you won’t find backfly inlets on the Squirrel.
[Originally published in Skydive Dubai’s now-defunct Dropzone Magazine, Fall 2014]

By admin, in Gear,

How to Buy New Skydiving Gear

(With The Minimum Hit To Your Credit Rating)
You want it. Bad.
And you want it your way.
In your colors.
And nothing’s gonna stop you.
If you’ve already done your time at the rental counter (and put some more mileage on a set of used gear, as you must), you’re well within your rights to be ogling the hot new nylon. Custom fit, hotshot technology and all the look-at-me embroidery a jumper could want? Just take my money.
You’re no doubt aware that this purchase is going to rival car-buying in the cash outlay -- there’s really no way around it. That said, there are some steps you can take to get the best possible deal on your new skyrig.
1. Use the best brains you know (including yours).
Start by asking your mentor’s opinion. Then ask your rigger’s opinion. Then ask your hero’s opinion. Ask the very smartest people you know to make their recommendations before you start the conversation with dealers and factory reps (who are, naturally, highly persuasive folk). There’s a labyrinth of pricey options to consider. Expert advice will help you navigate it without losing your shirt on poshity-posh back pads and tie-dye.
You’ll have to be very honest with yourself about your skill level, your height and weight, the discipline you’ll spend the most time practicing, your annual jump numbers and your (realistic) total budget.

Spoiler: this is not the fun part.
2. Be a brand snob.
Y’know those skydiving gear brands that buy front-fold real estate in all the parachuting association magazines? The ones that always seem to have a pop-up and a smiling face at the major boogies? The ones that place their logos like the tap of a knighting sword on the fine shoulders of the world-champion teams?
Those are the brands you want.
This might feel a little like selling out to snazzy marketing. It’s not. If you play your cards right, you’ll have plenty of time in your career to experiment with fringe gear; for now, you need what a top-of-the-food-chain manufacturer brings to the table, namely:
1. Well-tested components, created in a well-established factory, and the attendant safety track record.
2. Equipment that’s familiar to any given rigger, thus easier to fix -- with parts that aren’t hard to replace
Later on, you’ll have the requisite knowledge and experience to branch into buying specialty equipment, experimenting with less-tested technology and trying out the offerings of lesser-known manufacturers. At this point, however, you don’t know what you don’t know – and that can be dangerous. It can also be very, very expensive.
3. Try before you cry.
Another benefit of buying from a major manufacturer: the ubiquitous demo.
The cardinal rule in airsports gear-buying is a simple one: never buy it until you’ve tried it.
Another note: you’ll certainly see demos on-hand at any major skydiving boogie, but do yourself a favor and evaluate gear outside the frantic context of crowded airspace. (When you’re not constantly chasing a hangover. Yes. You. I know this.)
4. Blend it.
*Everything* doesn’t have to be new, you know. In fact, it’s a really good idea to save money by blending new components with old, if you do it intelligently.
If -- after weighing the value benefits -- you decide to go all-in, try to buy everything together for a package discount. Shop the large gear shops to compare their (often attractive) package offerings. Since they’re all assembling their deals from the same major-manufacturer components, you can feel perfectly confident purchasing the one with the lowest price.
5. Repeat after me: dolla dolla bill, y’awl.
Cash, if you can scrounge it together, is going to net you the best price. It’ll give you the best position to negotiate around taxes and shipping fees, and might just let you wiggle out from under the credit card charge that most dealers fold into to their baseline pricing.
6. Slow your roll.
Take your time as a buyer on the market -- it pays off. After a couple of seasons, you’ll start to pick up the rhythm of yearly and seasonal sales. Go to as many boogies as you can, browsing the gear and sniffing out event discounts. (Don’t forget to stay for the raffle! Major gear giveaways land in lucky laps.) Get to know your local dealers, who might cotton to you and let you know when there’s a price shift on the horizon.
Soon enough, all that waiting will pay off -- and you’ll be swaggering to the plane in a shiny new kit that just screams “I will cry like a tiny child if I don’t stand up this landing.”
7. Buy a stiff-bristled Brush of Shame.
Just do it.
 

By admin, in Gear,

Top 10 Marketing Musts

Image by Andrey VeselovDo you wish to increase profitability and grow your DZ? If so, read each of these 10 points closely.
As a DZO, you are no doubt constantly bombarded by marketing companies trying to get you to spend your precious money. These marketing efforts generally result in little to no ROI. Focus on the objectives below, do them well and you will see growth.
1. CUSTOMER EXPERIENCE
No matter where your DZ shows up in a Google search, if the customer experience is not great, then no amount of marketing will matter. With platforms like Yelp, TripAdvisor and Google Reviews, the power of word of mouth has never been stronger. Delivering a great experience is not the same as executing a safe skydive. Identifying each individual customer point of interaction and making it a five star experience is the total package. Master this and watch your business grow. If you spend no money on marketing, get this right because many of your competitors are not.
Tip: Survey your customers 24 hours* after their experience. The questions should revolve around each individual customer touch point. This is eye-opening as it will reveal the weak points of your business.
* Do not survey immediately after the experience. Everyone is on a high and will give feedback that is skewed.
2. SEO
If you’re not on page one of a Google Search, then you’re invisible. The majority of your guests will search for your business via Google and few of them will be leaving the first results page. Educate yourself on what you need to do to ensure that you show up on page one, preferably near the top, in organic (unpaid) Google search. Be sure to find out the most commonly used search terms for skydiving in your region to identify what search words to focus on. This is hugely important to get right.
Tip: Do not be fooled by SEO companies that promise to bring your page to number one. If an SEO company reaches out to you with this kind of guarantee, it should be a red flag.
Tip: When seeing where you show up on a Google Search, don’t search for the exact name of your business. Search using terms like ‘skydiving’ ‘in’ (enter nearest big city).
3. WEBSITE
Your number one marketing tool will be your website. Don’t do a barter trade for jumps with someone that knows web design unless they are a) great at design and b) understand how to optimize the back end of the website for search. There are many functional websites in the skydiving industry that are not strategically optimized for search engine performance on the back end. Having a great looking website means absolutely nothing if the back end of the site is not correctly optimized for search. Many web design companies will simply create a site for you and then leave you to employ an SEO company to fill in the gaps. Utilize a design company that will create both a great design and optimize it for search.
4. WOMM
Word of Mouth Marketing (WOMM) is the most powerful form of marketing because we all trust recommendations from our friends and family along with review sites. IF you’ve identified all customer touch points and are receiving great scores in your customer surveys, then it’s time to implement a WOMM campaign. A WOMM campaign transforms customers into the marketing team for your business and best of all it’s free. Use lagniappe, leverage social media and implement a strategy that makes it very easy for your customers to write a review for your business.
Tip: When implementing a WOMM strategy, it’s important you’re focused on the overall customer experience. If not, it’s highly possible you’ll receive negative reviews.
5. E-MAIL MARKETING
E-mail marketing is FAR FROM DEAD. However, effective email marketing requires much more than just sending an e-mail out every once in a while – there is a technique to creating a great e-mail marketing campaign. The growth of DropZone Marketing is due, in large part, to our e-mail newsletter campaign. Providing free marketing information (quality content) that is graphically pleasing and suited for mobile devices is a great marketing tool for any business as it keeps you in front of your customers and should help drive traffic to your website which helps with SEO.
6. SOCIAL MEDIA
Everyone knows that social media is a powerful medium, but few in the skydiving industry are leveraging it correctly. First, don’t try to be on all social channels. Select up to three channels and do well on each of the three. My recommendation is to focus on Google+, Facebook and Instagram for the skydiving industry. Focus on engagement rather than number of followers. If you’re not increasing your engagement with your followers, than your efforts may be a waste. Be consistent, be authentic, and really make an effort to engage with your audience.
Tip 1: Google+ is relevant for SEO. Google will index its own networks when executing a search, so it’s worthy being there.
Tip 2: Learn Tips for Mastering Facebook to better utilize this platform.
Tip 3: Understand Instagram.
7. GOOGLE ADWORDS
One of the most powerful advertising tools is Google Adwords and is something I would recommend for every DZ. Do not waste money on billboards, TV or print advertising, you will not get a return on this investment. AdWords can be implemented by anyone, but if not managed correctly can become a waste of money. Presently, I’m seeing many DZ’s ads showing in markets hundreds and even thousands of miles away from a DZ’s region. AdWords should be monitored closely and keyword research should be done in order to create the correct marketing campaigns.
8. CONTENT MARKETING
Why does anyone create content on their websites? The answer is to drive traffic into their site, which increases the chance of a conversion (a booking for a skydive). Furthermore, increased site traffic can help your SEO efforts by increasing click rates into your site and hopefully, if your content is valuable, expanding your external link profile. Content marketing is a strategy that must be implemented by every business offering a product or service.
Tip: Learn about River Pools and Spas and how they implemented content marketing to save their business during financial crisis.
9. FACEBOOK ADVERTISING
Being on Facebook is one thing, but if you want to see real results, you have to pay to play. Facebook is the gold standard of all the social media platforms that offer advertising because of focused targeting. Facebook ads can allow a DZ to focus pay per click ads (only pay if the ad is clicked) targeted towards a specific age demographic with specific interests. This is very powerful. Combine great Facebook content with an ad campaign and you will see your Facebook marketing campaign go to a higher level.
10. EVENT PRESENCE
Participate in highly attended, local events. Paying for a 10ft x 10ft booth is worth it. You won’t sell tandem skydives onsite, but it provides a great opportunity to capture e-mails to add to your valuable e-mail database for your e-mail marketing campaign. I encourage my clients to have a plan to expand their e-mail database continuously. Giving away a tandem skydive in order to collect hundreds of e-mail addresses is very valuable because it creates an opportunity to directly message people who are interested in your service. Go to lots of events!
Tip: Look professional with your booths and have your pop-up tent branded. Spend the money to have a presentation that you would see at a trade show. If the approach is done half-ass by pulling things together, it’s not helping your brand. Do it right or don’t do it at all.

By admin, in General,

Advice For Your First Hop and Pop

It’s sitting there, waiting for you in Category F of your USPA skydiver training: the hop ‘n’ pop.
Eek.
It’s no wonder that you’re biting your nails. (We’ve all been there.) It’ll be your first time deploying in soft, subterminal air. It’ll be your first time really trusting your stability out the door. And it’s probably going to be your first time opening that daunting clear plastic thingy. And you’ll be doing all this under the ungoggled gazes of everyone else in the plane -- who, you probably imagine, will have nothing better to do than inspect your technique.
The USPA officially calls it the “clear-and-pull requirement,” in case you’ve been fruitlessly searching for “hop and pop” in the SIM. Your mission, should you choose to accept it (and, y’know, get that solo license) will be to exit from 5,500’ AGL, get stable and deploy within five seconds.
Five seconds?!
Don’t worry so much. Five seconds is much longer than you think it is. Ask any BASE jumper (or television commercial editor, or rodeo competitor): five seconds is kinda forever. Remember, too: you’re not reinventing the wheel. Your hop ‘n’ pop exit is no different from any other solo exit you’ve ever done, except that you’ll need to be stable and deploying within that aforementioned time constraint. If your licensed instructor didn’t think you ready and reliable, he/she wouldn’t be lining you up for it. So own it. And breathe.
1. Start on the ground. Check out the winds aloft before you start the march to the plane, and review the spot with your instructor while you can both hear each other clearly.
2. Don’t worry too much about the door. Other jumpers are paying less attention to you than you think they are. (Anyway, your instructor is going to be right there to help.)
3. Don’t lose sight of the goal. From your window seat, you’ll be in a prime position to keep an eye on the landing area. Watch it as you climb, picking out the landmarks you usually use to find your way home. Once you have a lock on it, don’t let your nerves jiggle it out of your consciousness.
4. Don’t forget your magical backpack. Get a pin check before that door opens. Check your handles and pilot chute, too.
5. Take a moment to hang out. While the door is open and you’re waiting for that green light, put your goggles on and lean your head out a bit to check out the situation. You’re looking for the airport, of course; since you’ve been keeping an eye on the dropzone from your lofty perch, you’ll know just where to look. You’re also looking for positioning relative to the spot you discussed earlier with your instructor (winds aloft, remember?), and for other air traffic crowding “your” sky.
6. Get ready for different feels. Your instructor will prep you on the ground for the correct hop-n-pop exit to leave this particular plane. When that green light comes on, take a deep, cleansing breath and do your relaxed best to nail it. The air will feel different -- “softer” -- than it usually does, which might catch you off-guard. You can expect to turn a little as you exit. Point your hips levelly at the ground and deploy that nylon within those five weirdly-long seconds.
7. Bollocked it up? Pull anyway. If you don’t get this 5,500’ AGL exit right, you’re going to end up doing it all over again before you move on to its lower-altitude counterpart. It’s not the end of the world: unless, of course, you ride your oops too far down. Don’t launch right into kicking yourself if you fail -- that’s just going to make you more unstable. Accept your lot and pull by 3,500 feet AGL whether you’re stable or not.
8. Expect your parachute to check out the scenery. Your canopy, when deployed subterminally, will open into the relative wind and “seek.” It may not open directly above you, as it usually does. Don’t get spooked and tense up.
9. Give yourself a high five. Cross your fingers against the unlikely event of a low aircraft emergency that would test your newfound skills in the fun-free way. And buy the beer.

By nettenette, in General,

How To Land Where No One Has Landed Before (The Star Trek Trick)

...Or Where Everyone Else Is Landing, But That’s Beside the Point
Image by Wolfgang Lienbacher You’ve seen Star Trek, you big nerd -- so you know the answer to this question: When everybody’s staring out the front of a spaceship as it slams into warp speed, what are they looking at?
Don’t make that face. This absolutely applies to skydiving.
The answer, of course, is that they’re staring dramatically out into a starfield. Within that starfield, the outside stars are streaked into blurs and the center stars are distinct, clear and individual. At any given moment, the spaceship is headed towards the clear stars in the center of the frame.
Gene Roddenberry and his glitter-stirring co-wizards didn’t come up with that out of nowhere. they used a classic model, called the Radial Optic Flow Pattern (or ROFP), to base their screensaver-worthy visuals upon. Originally defined by scientist James J. Gibson, Radial Optic Flow has greatly driven the development of an “ecological” approach to visual perception. This approach investigates human vision in the context of the natural environment (as opposed to a laboratory).
It may sound obscure, but that same model is the one you, as a skydiver, should consciously use if you’d rather land in the peas than the trees. Here’s how.
Velocity Fields and FOEs
As a human in motion, your field of view – your very own spaceship windshield – is called your “velocity field.” Within that velocity field, when you’re traveling along a straight path (with no eye, head or body rotation), your heading is nailed quite precisely by the unmoving focus of expansion (FOE) in the center of your vision. How precisely? Well, a 2008 Oxford University study found that humans can use the FOE in optic flow to estimate their heading within one degree of the visual angle, and that’s good – because the FOE is exactly where you’re going.
As opposed to a paraglider – which can go up just as handily as down, in the right conditions* – a skydiving canopy has one essential mode: forward/down. A ROFP for forward movement describes expansion – like the stars in the front windshield of the spaceship as it rushes towards the FOE described by the still stars in the middle. (As our skydiving canopies can’t really go backwards, we won’t worry about the “reverse thrusters” mode.)
Image by Wolfgang Lienbacher
Where’s My FOE?
If you’re flying your skydiving canopy straight, your FOE is easy to pick off: it’s the place in your vision that isn’t dropping, rising, or side-sliding. As you approach the landing area, the FOE remains central while the rest of the field expands proportionally more quickly.
If you’re throwing a bunch of canopy inputs into the mix, however, it’s much more difficult to determine FOE. That’s because you’re introducing a “rotational component of lamellar flow,” which forces the retinal flow pattern not to be radial anymore, thereby making it difficult to recover the original heading.
How to “Energize” Your Accuracy:
When you set up your landing, choose objects on the ground and notice whether they’re moving up or down in your velocity field. Notice the still spot that indicates your FOE. Notice how accurate you can make your landings by fixing your FOE on your intended spot landing.
As you learn to determine your FOE close-up, start to work on spotting your FOE from higher and higher altitudes. By doing this, you’ll train yourself to know instantly if the spot is off and you’ll need to choose an alternate landing area.
Keep your FOE on the target, not an obstacle. When I was racing motorcycles, I used to refer to this trick as my “eye magnets.” That sounds just as silly as spending four hours in a makeup chair getting a rubber Klingon face glued on, but it’s not: your gaze truly is functionally magnetic. You'll head inexorably towards the one tree in the landing area you’re terrified of hitting (and thus staring at). Conversely, you'll kinda-magically turn away from that tree without any other conscious inputs if you “unstick” your gaze and attach it firmly to open turf. Improperly applied eye magnets are referred to less-cutely as “target fixation.”
Many skydivers refer to this phenomenon as “the accuracy trick,” which seems unfair – there are a lot of helpful tools for accuracy, of which this is only one. That said, consistently landing where you want to is a great way for a skydiver to live long and prosper.
(Shh. You know you giggled.)
** For this reason, “the accuracy trick” is a little trickier to use for paraglider pilots, because visual cues have a tendency to bounce around as the wing is affected by thermic “bubbles” near ground level.

By nettenette, in Safety,

Polish 100-Way National Record

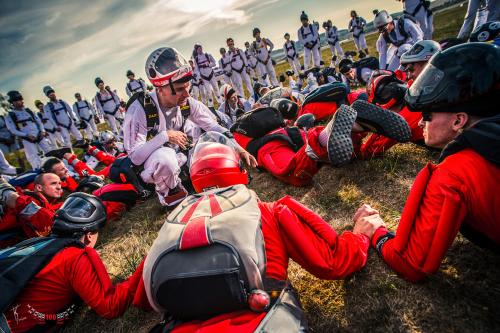
Some jumps are supposed to be a part of skydiving history, and this jump was one of them, with 100 polish skydivers creating a white-red formation.
This week was the hottest in the year at 38 C degrees. The day consisted of 4 skyvans and 1 cessna waiting with engines on, FS suits, helmets, rigs and full sun over beautiful Klatovy airfield. 100 skydivers did their best to focus on the job - which took 8 tries before it was successfully completed. On the 9th load the formation was built, kept strong and everyone from the ground could see the white-red flag in the sky.


This would never happen without dedication, discipline, self-control and only one goal in mind. And it all came together with the dedication of skydivers, organizers, dropzone staff, cameramen, load organizers, manifest, packers and sponsors.
This way Poland is the 8th country in the world to successfully complete a 100-way national FS record (only Polish citizens)!
Congratulations to all those involved.
It is also worth mentioning that on Monday there was another record beaten: that of the 34-way of Polish women's FS formation. Girl power at its best! Congrats, ladies!
Organizers:

Dariusz “Dafi” Filipowski

Jarosław “Widget” Shot

Maciej “Heniek” Węgrzecki
Camerateam:

Jarosław “Widget” Shot

Jacek “Grabarz” Grabowski

Sebastian Lewandowski
Load Organizers:

Dariusz “Dafi” Filipowski

Marek Nowakowski

Sebastian Dratwa
Safety Officer:

Maciej “Mahoo” Machowicz
FAI judges:

Grzegorz Świerad

Maciej Antkowiak

Mariusz Puchała

By admin, in Events,

Canopy Safety on Large Formation Skydives

Image by Andrey Veselov This article is a continuation of my previous article “Diving and Tracking Safety on Large Formation Skydives”. Some of that article is repeated here because maximum separation under canopy cannot be achieved without proper breakoff and tracking.
On any skydive, it is critical that jumpers keep their heads on a swivel at all times. Nowhere is this more important than large formation skydives where separation is paramount and there is no place for canopies weaving in and out of traffic or front-riser spiraling below other jumpers and cutting them off in the landing area.
A few years ago, Kate Cooper-Jensen and other big-way organizers compiled what they called “Rules of the Sky” for canopy piloting on big-way formation skydives. Cooper-Jensen makes sure that everybody knows about these rules at every big-way event she runs. This article reiterates those rules and provides a few additional rules a jumper must follow from the time he breaks off until he opens.
Let’s start with responsibilities during breakoff and tracking.
At breakoff, jumpers turn and track with their designated tracking groups. Breakoff turn directions should have already been established in the dirt dive to avoid collisions. But turn direction is one thing; how far to turn is another. Jumpers facing the center of the formation turn a full 180 degrees at breakoff. A jumper who is already facing, say, 45 degrees away from the center of the formation turns only about 135 degrees.
Jumpers track with their groups for at least five seconds, staying level with their tracking leaders then fanning out a few degrees from the center until the designated opening altitude for their group.
A “flat track” is required and absolutely no steep (or “dive”) tracking is allowed! If a jumper goes low, he moves off to the side, assumes a slow fall rate, and tries to get above the formation until the outer wave breaks off, at which time he turns and tracks as far as he can until 2500 feet.
Jumpers on the outside of the formation break off first, track the furthest, and open the lowest. Jumpers in the middle break off next and track as far as they can until time to open (at the highest altitude on the load). Jumpers in the base ring track the least distance and open at a low altitude like the outer groups. These staggered openings make it is easier for jumpers to see each other and fly their canopies. Imagine how congested the skies would be if everybody on a 100-way opened at the same altitude.
Image by Andrey Veselov As a jumper tracks, he scans the sky in front, below, and on either side. It is his responsibility to watch out for jumpers below. It is also his responsibility to check the sky directly above before he waves off. If another jumper appears directly above or below as he waves off, the jumper can continue tracking to get out of the way.
Once a jumper is under a good canopy, the first thing he must do is grab his rear risers and be ready to yank down on a riser if another canopy is coming at him. The general rule is to yank down on the right rear riser if another canopy is approaching directly from the front. If a canopy is coming from another direction, however, say, from the right, it is obvious that the left rear riser should be used.
Once the jumper is absolutely sure he is clear of other jumpers, he can collapse his slider, flip up his visor (if applicable), and release his brakes. However, jumpers on large formation loads are normally not permitted to remove booties under canopy.
The jumper is now ready to navigate his canopy alongside other canopies in his group on their way to the landing area.
Here are the “Rules of the Sky” that big-way jumpers must follow under canopy:
Know the recommended canopy wing loading for the event. While not set in stone, a wing loading between 1.25 and 1.75 is typically recommended on large formation skydives so that all canopies will be flying at roughly the same speed. Weights increase a canopy’s wing loading and jumpers should already know if they can safely fly their canopies with the additional weight.
Inspect a map of the DZ and landing areas prior to jumping. Know the “outs” and alternate landing areas. This applies mostly to visiting jumpers unfamiliar with the DZ.
Know the designated landing direction and landing areas. At most DZs, jumpers follow a left-hand landing pattern unless the spot and wind direction make it impossible to do so. A mandatory landing direction is often assigned. If separate landing areas have been assigned to different sections of the formation, a jumper must follow the same pattern as his landing group.
Note: Downwind or crosswind landings may be required by the predetermined landing direction or because of a wind shift after the first canopy lands. Jumpers should already possess the skills necessary to land their canopies crosswind or downwind.
Do not cross over into the pattern of another group. If the spot is long, try to make it back to the designated landing area unless doing so would interfere with other jumpers trying to get to their landing areas. In this case, pick an alternate landing area before reaching 1000 feet.
Enter the group’s landing pattern around 1000 feet. Follow but stay off to the side of other jumpers entering the landing pattern. Never fly directly behind another canopy. The leading jumper can’t see you and the depressurized air behind the leading canopy can cause your canopy to collapse.
Make the final turn between 300 and 500 feet and make no more turns after that. On final approach, turn no more than 90 degrees and never perform S-turns, spiral or hook turns, or fly in deep brakes. This includes camera personnel, organizers, and DZ staff.
After landing, turn around while stowing breaks, etc. This allows you to get out of the way of jumpers landing behind you. If the landing area is congested, move off to the side as quickly as possible while watching out for other jumpers trying to land.
If landing off the DZ, gather in groups and walk together to the nearest road.
If required, check in with the group’s/plane’s designated person. This is especially important if jumpers have landed off the DZ.
Conclusion
Safety starts with the attitudes and the actions of each and every one of us. While it is perfectly acceptable to demonstrate confidence and experience, it is never acceptable to show off with a blatant disregard for the rules and the safety of others. On the other end of the spectrum, it is never acceptable for a jumper to put himself on a load or in a slot that he is not experienced enough to handle. At one extreme there is over-confidence, at the other, lack of experience. Either one can kill.
Reading fatality reports is a sad undertaking but it also makes us angry – angry that the poor judgment of a few puts the rest of us at risk and gives our sport bad press – angry that needless injuries and deaths still occur – and, finally, angry that dear friends had to make the ultimate sacrifice in order for the rest of us to learn.
Big-way organizers can only do so much. They can invite the most experienced skydivers in the world, but if just one skydiver doesn’t follow the rules, the results can be fatal. So let’s police ourselves and follow the rules, not just on big-ways, but each and every time we strap on a rig or get a student ready for his first skydive. This sport is a heckuva lot of fun when we do.

By admin, in Disciplines,

Toggles Matter

It is often the little things in our skydiving day that change the way things go. Paying attention to the details can make all the difference when it comes to preventing malfunctions, and when we get lazy, tired or complacent, our attention gets fuzzy and unfocused. That is when we make mistakes that we regret. One area that often results in malfunctions is errors in stowing our toggles, and there are quite a few ways in which we can perform this seemingly simple act incorrectly, only some of which will be discussed in this article.
The most obvious aspect of this necessary part of packing that we can mess up is the depth of the toggle in the keeper. If we do not push the toggle sufficiently into its fabric keeper, the toggle will eventually unstow during deployment.

Premature brakes releases result in countless cutaways each year. Each time we chop, we risk losing our main canopy and our freebag; a very expensive mistake.
Another facet of stowing our toggles that can result in a premature “brake-fire” is insufficient tension on the portion of the brake line that leads to the canopy.
This slack can allow a sharp tug of the brake line near the toggle, causing it to pop out of the keeper, and even snap the line itself. A healthy practice when setting your brakes is to pull upward on the brake line above the toggle, ensuring that everything is loaded against the toggle properly.
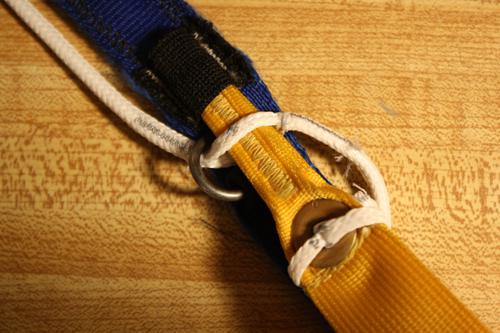
Yet another common error when stowing the steering toggles is to pass the toggle through the brake line above the guide ring.
This will almost always result in a premature brake release. It will also usually result in damage to the fabric toggle keeper, as the load on the brake line will go directly to the keeper rather than to the guide ring. I see this one quite a lot, and the jumper is always blown away when I point it out while they are packing. Better a moment of embarrassment on the ground than a premature brake fire in the sky.
On that note, if you experience a premature brake release, or snap a brake line during deployment, your canopy will turn. On many parachutes, this turn can be quite fast, and it is likely to increase in both airspeed and rate of rotation. This means that time is of the essence when dealing with this kind of malfunction. This, however, does not mean that the correct response is to claw for the stowed toggle like a crazed monkey. Yes, you do need to unstow the remaining toggle, but having this singular goal in mind has resulted in many cutaways, AAD fires and even some fatalities. When you open up in a spin, your first job is to try to stop the spin, while remaining aware of your altitude. If you apply opposite harness input or simply pull the rear riser on the side of the canopy that has experienced the toggle release or broken line, you will slow the situation down. By holding a heading, you will be losing much less altitude, and will afford yourself the time and brain power to properly execute whatever procedure is next.
Also key to your safety is the condition of your equipment. For instance, if the toggle keeper has become loose due to wearing over time, even sufficiently stowed toggles will unstow prematurely. Since we stow the toggle in the same way every time, the toggle eventually becomes deformed, narrower at the load point, which can cause the toggle to jam when you try to release it.
Also contributing to this possibility is the inevitable shrinkage of the “cat’s-eye” hole in the brake line on spectra lined canopies. This is caused by heating of the line due to friction as you unstow your toggles. The melting point of spectra is 297 F and the material’s response to heat is shrinkage, unlike George Castanza. Most cat’s eyes begin at about 25 millimeters on new canopies, and by 3 or 400 jumps, it reduces to a 19 or 18 millimeter passage. When combined with a narrow point in the toggle, a brake-lock malfunction is quite likely. This problem can easily be avoided through regular replacement of the mid and lower brake lines, and pinching of the toggle with plyers to create a uniform width.
When the tip of the toggle fails to extract from the cat’s-eye, it is possible that the jumper unstowed the toggles in a gentle, slow motion, allowing the friction to hold the toggle in place inside the brake line. This phenomenon can often be avoided by making it a habit to always unstow the toggles with a sharp, snapping motion. This method has served me well for many years, and has totally eliminated the “stuck toggle” malfunction for me.
On the topic of toggles that do not want to release, we have another malfunction that shows up from time to time. There are many things you can do with your excess brake line, depending on your particular riser design and your personal preferences. Some skydivers choose to pass the excess line through keepers on the opposite side of the riser. This is perfectly acceptable. If, however, the free end of the brake line is passed down through the keepers and then around the bottom of the toggle, a complete failure to release is possible.
This occurs when the upward relative wind blows the brake line up over the toggle during opening.
The jumper then can grab the toggles below this loop of line and unstow, causing an irreparable knot around the keeper loop on the opposite side of the riser.
Another way that jumpers sometimes cause a toggle-lock is by passing the excess brake line through the soft links, and then securing the end of the loop through the tip of the toggle. Although this method has proven to be perfectly safe, and may make it easier to pull the slider down after opening, a serious danger exists. If the soft links are not sewn in place with tack-cord, the loop of brake line can get caught on the tab or ring on the soft link, causing a locked toggle malfunction.
It is true that a toggle-lock does not need to result in a cutaway. If the jumper cuts the brake line with a hook knife, the parachute will fly straight. Nevertheless, this fix requires the canopy pilot to land with a rear riser flare, something that many are not prepared to do. If you have never performed this maneuver in premeditated circumstances, you are not likely to perform the task well in an emergency. As I often say, there is no such thing as an emergency if you have practiced the solutions; it is just a change of plans.
The last toggle-related problem that I will discuss is failure to stow the excess brake line at all. It is true that many jumpers have been leaving “free range” brake line for many years without incident. In most cases, these are jumpers with small canopies who have very little excess brake line to deal with due to the size of their parachutes. Regardless, it is my experience that it is just a matter of time before this free line snags on something. It might be your GoPro. It might be someone else’s GoPro. It might be the door of the airplane or something even worse that I can’t even think of. The bottom line is, the procedure of stowing your excess line costs you only a few seconds, but it can save your life. Deal with it, please.
It is the smallest of details that usually result in the worst and best experiences on the dropzone. Skydiving is a sport of tiny issues that add up to big consequences, and if we continue to enjoy the process of paying attention to these little particulars, we can continue to enjoy the sport for a very long time. If we flippantly skip off the tops of the waves so-to-speak, and pretend that the danger does not exist, this sport will prove us wrong in the most painful and terrifying ways. We are always at risk when we skydive, but fear is not what keeps us safe. It is attention to the details, and the positive emotions that come as a result of knowing that we are doing everything we can think of to stay alive. If we are happy, we are more skillful, and skill definitely increases the chances of a happy landing.
About the Author: Brian Germain is a parachute designer, author, teacher, radio personality, keynote speaker with over 15,000 jumps, and has been an active skydiver for 30 years. He is the creator of the famed instructional video "No Sweat: Parachute Packing Made Easy", as well as the critically acclaimed book The Parachute and its Pilot. You can get more of Brian’s teaching at Adventure Wisdom, Big Air Sportz, Transcending Fear, and on his vast YouTube Channel

By admin, in Gear,

Stalling For Success

Image by Andrey Veselov Stalling For Success: What You Don’t Know About Stalling Your Canopy Could Smack You. Hard.
This, suffice it to say, could end badly.
There was a balloon jump. (Whee!) The winds picked up at around 3,000’ and shoved your jolly crew rather far off-DZ. (Um…) You jumped anyway. (Whee!) You over-rotated your super-magnificent aerial and pulled a titch lower than you wanted to. (Um…) Your landing options are now -- well -- limited. And a little heavy on the obstacles. And kinda tiny. And now you’re on final. (Uh-oh.)
Do you know where your stall point is?
Probably not. Right about now, I bet you wish you did.
In this regard, skydiving is unusual. After all, stall training is a foundational part of the training process in other air sports (paragliding, specifically), and there’s no question it’s vital. Considering how important it is to know the exact point at which your equipment stops flying, it’s surprising how few skydivers – even advanced ones – have seriously investigated the stall point of their canopies.
Perhaps this is because the transition between the very-slow-flight and no-flight modes produces a stomach full of butterflies. It could also have something to do with the fact that skydiving canopy rides are much shorter than paragliding flights -- and, because the skydiving canopy is trimmed to fly down instead of up, comparatively easy to fast-forward. No matter what the root cause, the fact remains: knowing your stall point is an essential component of safe and skilled canopy flight. And there’s probably a lot that you probably don’t know -- yet. Here’s the skinny.
1. You aren’t really in control up there.
Sorry, buddy. Without understanding your system’s stall point, you are not in full control of your wing. Most notably, you’re at a significant disadvantage during the landing process, as the execution of a flare is the approach to a stall in very close proximity to the ground.
2. It’s not about slow flight. It’s about no-flight.
The lion’s share of ram-air canopy pilots believe that the definition of a stall is directly related to slow airspeed – that the “stall point” is when the canopy is flying too slowly to produce lift. Sound familiar? Yep. Unfortunately, while it often ends up being the case in practice, this isn’t actually true. The true “stall point” is defined as the moment when the parachute is no longer producing lift, no matter what the airspeed when you enter the maneuver. Bear with me here, because this has bearing on your jumping career.
When a ram-air airfoil reaches an excessive “angle of attack,”* a stall results. As relative wind moves over an airfoil, it “curls” over and downward to create lift. However, when the pilot adjusts the airfoil to a higher angle with respect to the relative wind – often, but not always, by pulling hard on the brakes – he or she is effectively building a nylon wall against that relative wind, making it harder for the relative wind to follow its usual path and create lift. Finally, it reaches a point where it can’t. At any point that the angle of attack reaches that point, no matter what the airspeed, the pilot has a stall on his or her hands. When you understand the stall as a function of AoA, you can easily see how a ram-air airfoil can stall at high speed as well as low speed.
This leads to an important fact: a higher-loaded wing will stall at a higher airspeed than its more lightly loaded counterpart. This is just another of the galaxy of reasons why it’s important to downsize your canopy thoughtfully and knowledgeably.
3. You can choose your own adventure.
Initiating a stall for the first time is not unscary. Don’t just stab the brakes and cross your fingers, though: manage the process. The rodeo quality of the stall depends on the type and sharpness of the inputs you use to get into it, and on your technique for stall recovery.
Stalls entered using slow inputs tend to initiate a stall from slow speed and slight sink, making the stall more docile than those entered using quick, brutal inputs. The more aggressive and uneven you are in your entry, the more likely you are to introduce a bank angle at the entrance of the stall. This will stall the lower wing first, which can often result in a spin (and, maybe, line twists) during recovery.
Another bit of advice: Don’t just reach for your brakes. Jumpers tend to initially experiment with stalls by monkeying around with their toggles – mostly, because they’re more familiar with those controls. That’s not really the best idea. Though rear-riser stalls “kick in” more suddenly than stalls initiated with the brakes (as they profoundly and quickly change the shape of the canopy using the C and D lines), recovering from them is smoother and easier.**
...and, of course, pull high. The “lab” is up at a nice, cushy altitude. Make sure to stop your experiments with a lot of margin between you and the dirt.
4. You don’t have to go it alone.
Look at your canopy’s manual to familiarize yourself with the stall dynamics you can expect from it. If there’s no information regarding stall behavior in the manual, contact the manufacturer and ask about it. They’re happy to help. So are canopy coaches.
Ask, ask, ask.
Then you might not have to ask the farmer to disentangle you from the fence, collect your scattered dignity and help you hobble to the road. That’s worth it, no?
Here’s a great little video by AXIS Flight School that demonstrates a rear-riser stall. In this video, you can closely inspect the canopy’s reaction to the stall input.
*The angle of attack, or AoA, is the angle between the cord line – visualized as a straight line between the leading edge and the trailing edge – and the relative wind that the airfoil is moving through.

By admin, in Safety,

Diving and Tracking Safety on Large Formation Skydives

Image by Brian BucklandBy Ed Lightle
This is the first of two articles geared toward safety on big-way formation skydives. This article deals mostly with the freefall part of the skydive whereas the second article “Canopy Safety on Large Formation Skydives” deals mostly with safety under canopy. To get the most benefit, it is recommended that you read both articles.
In Formation Skydiving, hundreds of big-ways are completed every year without incident. This is a testament to both the skill level of today’s formation skydivers and the screening process utilized by big-way organizers. To qualify for most big-way events, a participant must obtain the recommendation of a big-way plane captain or organizer and must have recently participated in a big-way camp or big-way event.
Organizers take safety seriously. A safety violation on a big-way, whether at a training camp or on a big-way attempt, will get a jumper benched when an honest learning mistake might not.
Diving and tracking on big-ways are special areas of concern. With longer diving and tracking times and more jumpers in the air, big-ways naturally increase the risk of a freefall collision. But this risk can be eliminated if jumpers use good common sense and think safety on each and every jump. Here are some tips that can help.
Watch Jumpers Ahead of You While Diving
As soon as a diver leaves the plane and gets squared away, he must identify the base and the jumpers who will be docking ahead of him in the formation. He must keep them in sight while he dives, stops, sets up and moves in to dock. He should constantly scan the sky in front of him, starting from the base and extending all the way out to the person he will be docking on. He should keep an eye out for camera flyers as well.
Because several divers are heading to the same sector of the formation, each diver must follow a straight line from the plane to the area outside the formation where he wants to be stopped and ready to follow jumpers ahead of him into his slot.
A jumper should never dive directly behind another diver in case the leading diver comes out of his dive early. The trailing diver should always stay a few feet off to the side.
Don’t Zigzag
If a diver flares (comes out of his dive) early, he should not zigzag from side to side to bleed off altitude. If he does, he risks being hit by jumpers who are diving behind him. To bleed off altitude at this point, he should either get back into his dive (if he has a lot of distance to make up) or assume a fast fall position while keeping jumpers ahead of him in view.
Get to the Red Zone on Time
Another area of concern is getting down to the red zone in time. (The red zone is the area around and outside the formation where jumpers have stopped their dives and are lined up and moving straight ahead and down into their slots. From a camera flyer’s perspective, jumpers in the red zone look as if they are lined up in various seats in an imaginary football stadium as them move down to their slots on the field.)
A jumper who arrives late in the red zone more than likely has to maneuver around jumpers who are already closing on their slots. He also prevents later divers from getting to their slots. All of this increases the chance of a collision.
A more serious situation can occur when a jumper arrives so late that the first wave of jumpers is breaking off. This is not serious if he immediately turns and tracks away with this first wave. If he doesn’t, he risks a head-on collision.
Break Off with Your Group
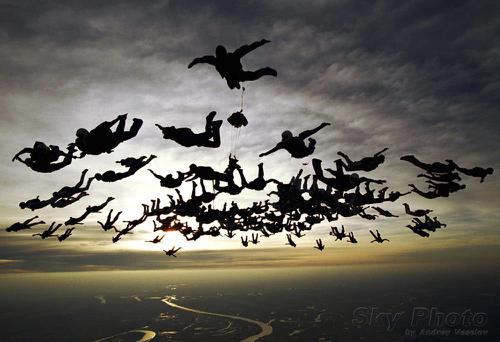
To maximize horizontal separation and avoid congestion, jumpers on big-ways break off in “waves”. Imagine how congested it would be if everybody on a 100-way turned and tracked at the same time! On a 100-way, for example, the outer wave might break off around 7000 feet, the next wave around 6000 feet, the next wave at 5000 and so on until only the base group is left. Obviously, the outer wave tracks the furthest horizontal distance and the base tracks the shortest. Again, a jumper who doesn’t arrive in the red zone until break off should turn and track with the outer wave.
Track with Your Group
When their wave breaks off, jumpers should track away in groups. A group can consist of a few jumpers from one whacker and a few from an adjacent whacker with one jumper in the center of the group designated the tracking leader. At breakoff, jumpers from each whacker turn in the direction of the tracking leader, track side by side for a few seconds, then fan out away from the center.
A jumper who goes low should move off to the side, assume a slow fall rate, and try to get above the formation until the outer wave breaks off, at which time he should turn and track away with them.
Flat Track, Don’t “Dive” Track
A jumper should stay level with other trackers in his group, and everybody should “flat track” to conserve altitude and maximize horizontal separation. “Dive” tracking (very steep tracking) is not acceptable behavior on a big-way,” says Kate Cooper-Jensen, big-way organizer and multiple world record holder, adding, “A jumper can almost stop dive tracking simply by choosing to alter his body position during the turn away from the formation.”
To initiate a flat track, a jumper assumes a slow fall position while turning away from the formation, essentially de-arching as he turns. This prevents him from immediately dropping into a dive track below other jumpers in his group. Keeping his hips elevated as he finishes his turn, the jumper then locks his knees, points his toes, and points his head toward the horizon. His arms are initially extended 45 degrees away from his sides and his feet shoulder-width apart. As he picks up speed, he rolls his shoulders forward, and brings his arms closer to his sides and his feet closer together. He should feel the lift as he picks up speed.
Open at the Same Altitude as Your Group
As an additional safety measure, opening altitudes of the various waves are staggered to maximize separation and make it easier for jumpers to account for open canopies around them. According to one theory, groups in the middle wave open at the highest altitudes while the outside and base groups open at the lowest. The result is a curve of open canopies, starting lowest at the base, curving up in the middle then down again on the outsides.
Conclusion
A successful big-way is a team effort with the goal of building a completed formation the safest way possible. Diving and tracking on a big-way is like driving on the highway. A safe driver knows more than just how to push the accelerator and go fast. He maintains a safe distance from the driver in front, he doesn’t switch lanes without looking, and he doesn’t cut in front of other drivers just to beat them to the exit. He gets to where he needs to be in plenty of time without causing an accident. So does a safe big-way formation skydiver.

By admin, in Disciplines,